5 Quick Crafts Ideas for Weddings
Hey creative souls! Planning a wedding or helping friends tie the knot? These five quick crafts are bright, doable, and oddly satisfying. You’ll love the burst of personality they bring without breaking a sweat—trust me.
1. Celestial Paper Lantern Wedding Centerpieces
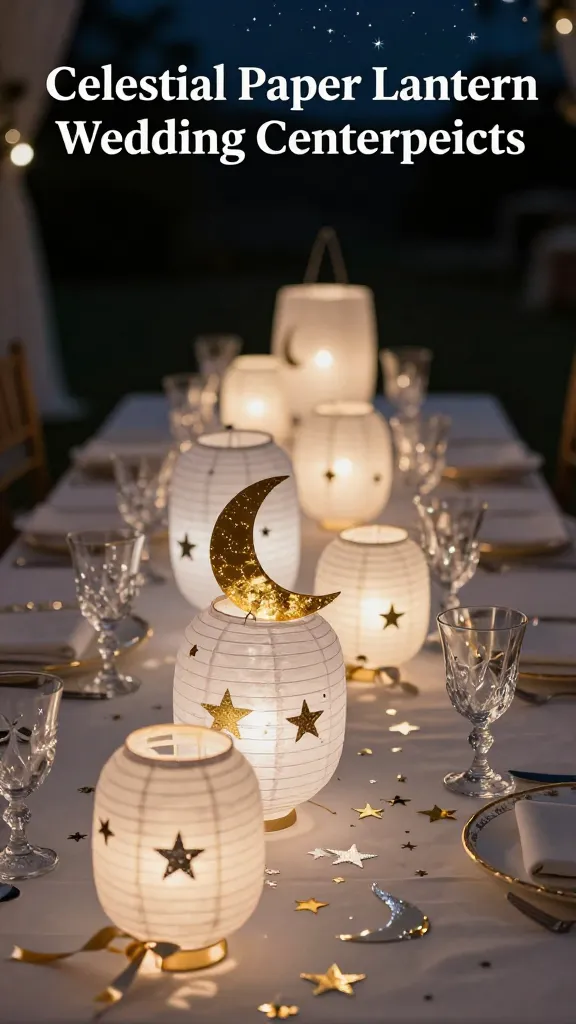
Imagine a tablescape that feels like a night sky—soft, magical, and totally shareable on social. These celestial paper lanterns bring that vibe without any fuss. They glow in fairy-tale perfection and double as decor and favors.
Materials Needed
- Plain paper lanterns in white or ivory
- Metallic gold or silver cardstock
- Double-sided tape or glue dots
- Hole punch and thin gold/silver ribbon
- Star and moon confetti or DIY cut-outs
How to Make It
- Fold metallic cardstock into small star and moon shapes, then punch a few holes to create a delicate cut-out effect.
- Attach the shapes to the lanterns with tape, spacing them in clusters for a dreamy look.
- Thread ribbons through the top and hang at varying heights above the tables for dimension.
Pro Tips / Styling Ideas
- Layer with warm white LED string lights inside the lanterns for a soft glow.
- Place a few lanterns on LED-topped pedestals for a “stargazing” centerpiece.
- Use navy linens and gold flatware to make the metallics pop.
Who would love it: couples chasing a whimsical, romantic vibe and DIY fans who want an easy, high-impact centerpiece.
2. Peppermint Candy Boutonnières (But Make It Eco-Chic)
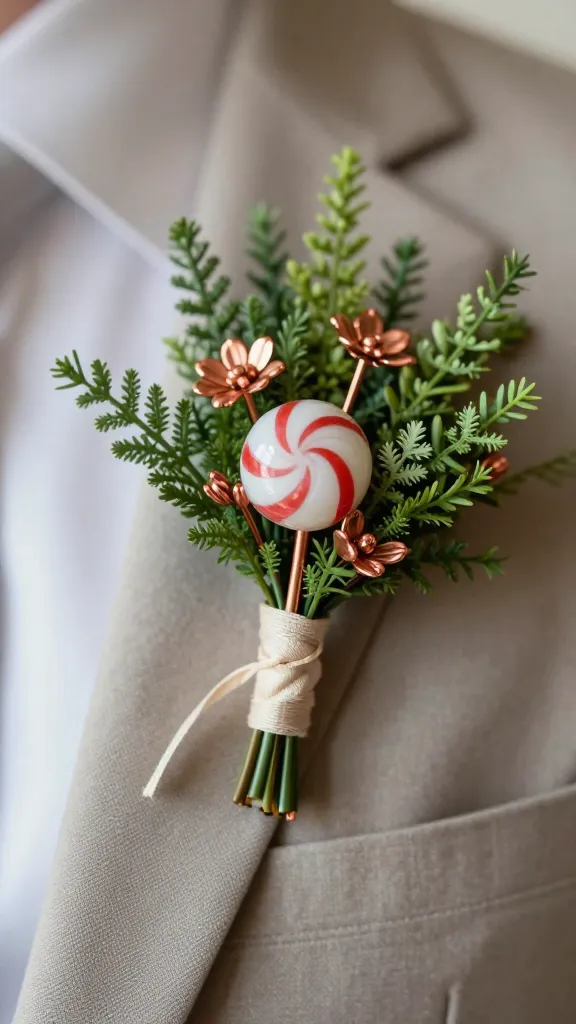
Fresh, playful, and surprisingly simple—these candy-inspired boutonnières give a sweet wink to the wedding vibe. They’re lightweight, smell amazing, and you can swap in real botanicals later for a second-life keepsake.
Materials Needed
- Assorted faux greenery sprigs
- Small peppermint candies or candy-looking resin beads (optional)
- Copper floral pins or boutonnière pins
- Floral tape
- Ribbon to wrap stem
How to Make It
- Bundle a few greenery sprigs with a tiny accent candy or resin bead at the center.
- Secure with floral tape, then wrap the stem with ribbon to finish.
- Attach a pin backing or small clip on the underside for easy wear.
Pro Tips / Styling Ideas
- Mix matte greenery with glossy resin accents for texture.
- For an eco-friendly twist, use dried citrus slices dusted with a touch of glitter.
- Coordinate ribbon colors with the bridesmaids’ dresses or the wedding palette.
Who would love it: grooms who want something sweet-and-spunky and hosts looking for a lightweight, wearable craft. FYI, it’s also a fun memory-maker for guests to participate in a craft station.
3. DIY Floral Photo Garland With Garden-Fresh Vibes
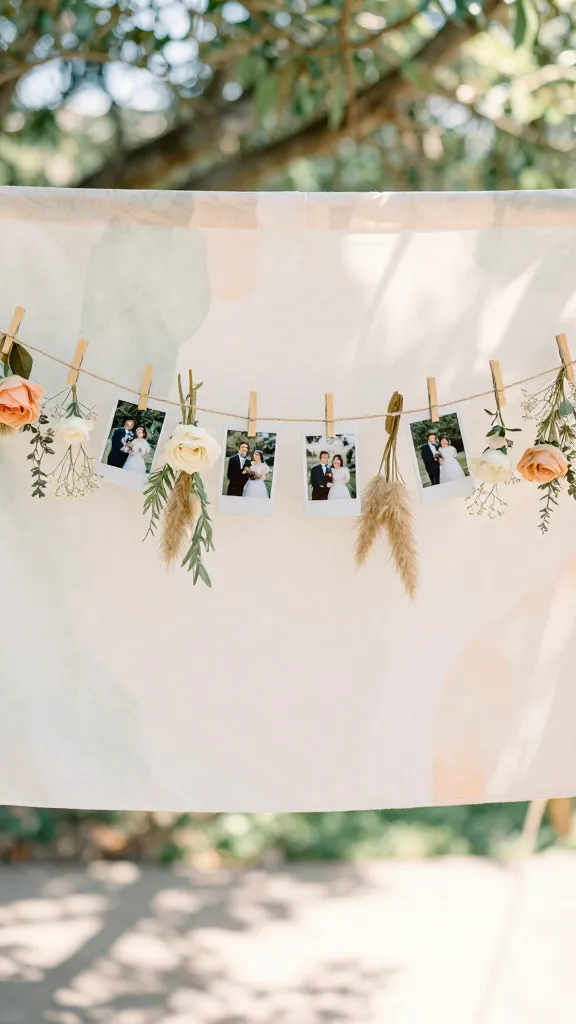
Turn memories into a flutter of color with a hand-stitched floral photo garland. It’s a keepsake that doubles as decor, and you can customize it with favorite engagement photos or candid moments from the couple’s journey.
Materials Needed
- Assorted faux or real dried flowers
- Twine or thin jute string
- Mini clothespins or wooden clips
- Photos (4×6 or Polaroid-style)
- Optional: light watercolor backdrop for hanging area
How to Make It
- Cut twine into desired lengths and space out evenly between anchor points (doorways, arch, or a fireplace mantle).
- Clip photos at varying heights, alternating flowers between clips to create an organic flow.
- Gently tuck small blooms between clips for a 3D effect.
Pro Tips / Styling Ideas
- Add soft greenery between photos to soften the line and create a garden feel.
- Use a pastel watercolor panel behind the garland for a dreamy backdrop at the reception or ceremony.
- Change the photos after the wedding for an instant home gallery display—double win!
Who would love it: history-loving couples who adore personal touches and DIY decor that doubles as a wedding photo booth backdrop.
4. Rustic Welcome Sign With Salvaged Wood and Copper Accents
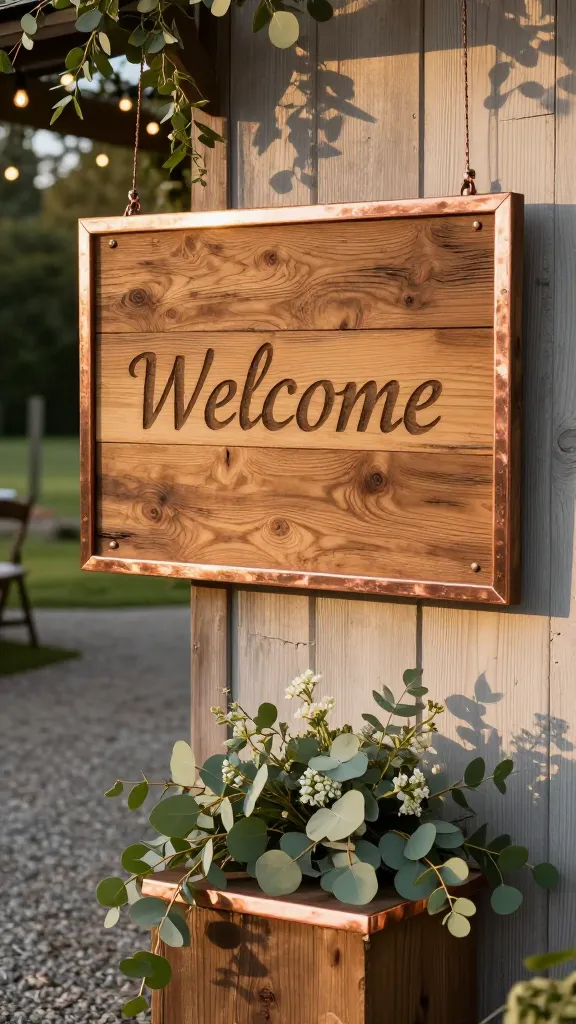
A warm, welcoming sign sets the tone the moment guests arrive. This rustic version uses salvaged wood, handwritten calligraphy, and copper accents for a timeless, Instagram-friendly entrance.
Materials Needed
- Small reclaimed wood plank or pallet board
- Copper paint or copper foil for edging
- Paint pens or chalk markers
- Clear sealant spray
- Stain or wood wax (optional for the wood’s natural grain)
How to Make It
- Sand the board lightly and seal the edges with copper paint or foil for a metallic trim.
- Plan your lettering and sketch lightly in pencil, then go over with paint pens or chalk markers.
- Seal to protect the design, then mount on a stand or hang from a doorway.
Pro Tips / Styling Ideas
- Add a small potted plant or a jar of wildflowers at the base for a grounded vignette.
- Use a waxy finish to bring out the wood’s natural warmth, especially in rustic barn settings.
- Personalize with a tiny copper heart or initials for an extra touch.
Who would love it: couples who adore a classic rustic aesthetic and DIY lovers who want a lasting memento that doubles as home decor.
5. Hand-Sewn Seed Paper Coasters for Thank-You Keepsakes
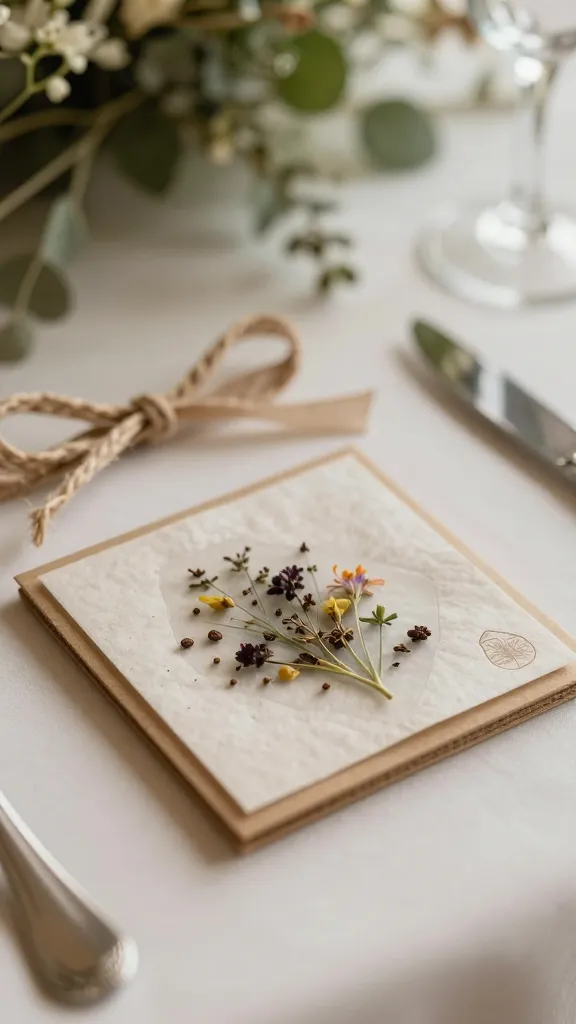
Give guests a practical token that plants seeds—literally. These seed-paper coasters are cheerful, eco-friendly, and surprisingly simple to make. Guests can plant them when they get home, turning the wedding memory into a living reminder.
Materials Needed
- Seed paper sheets or pulp to DIY (paper with embedded flower seeds)
- Sturdy cardboard or kraft backing
- Craft adhesive or glue sticks
- Decorative stamps or handwriting for messages
- Optional: small ribbon for packaging
How to Make It
- Cut seed paper into small circles or squares and mount onto the backing with a dab of glue.
- Write a short thank-you note or a cute pun on the backing.
- Package with a ribbon to tie the sweet, eco-friendly bow.
Pro Tips / Styling Ideas
- Choose seeds suitable for the wedding season and the couple’s climate—sunflowers for summer, herbs for a kitchen-friendly keepsake.
- Pair with a tiny plantable tag that doubles as a favor and a cardholder.
- Present them in a small glassine bag for a clean, modern look or nestle in a linen pouch for rustic charm.
Who would love it: guests who value sustainability, couples who want a meaningful, clever goodbye gift, and anyone who enjoys a little DIY with a big payoff.
Conclusion
Five bold, distinct, and totally doable crafts that elevate a wedding without turning your to-do list into a marathon. Pick one to start, or go all-in and transform the vibe from ceremony to reception. You’ll have fun, you’ll save money, and you’ll create keepsakes that truly shine. So which one are you trying first?