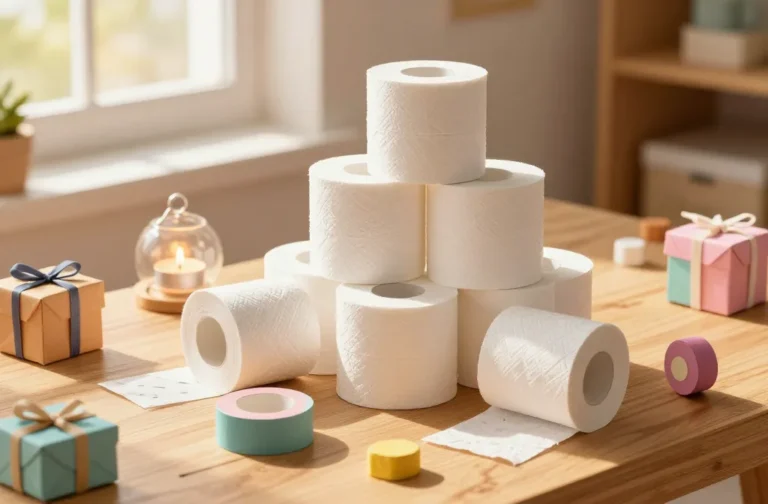
8 Toilet Paper Roll Crafts for Preschoolers
Preschoolers love hands-on projects, and toilet paper rolls are the perfect tiny canvas for color, texture, and imagination. Trust me, these quick crafts turn humble scraps into show-stoppers that parents will actually want to display. Let’s dive into eight completely unique ideas that are simple, playful, and totally Pinterest-worthy.
1. Whimsical Caterpillar Parade
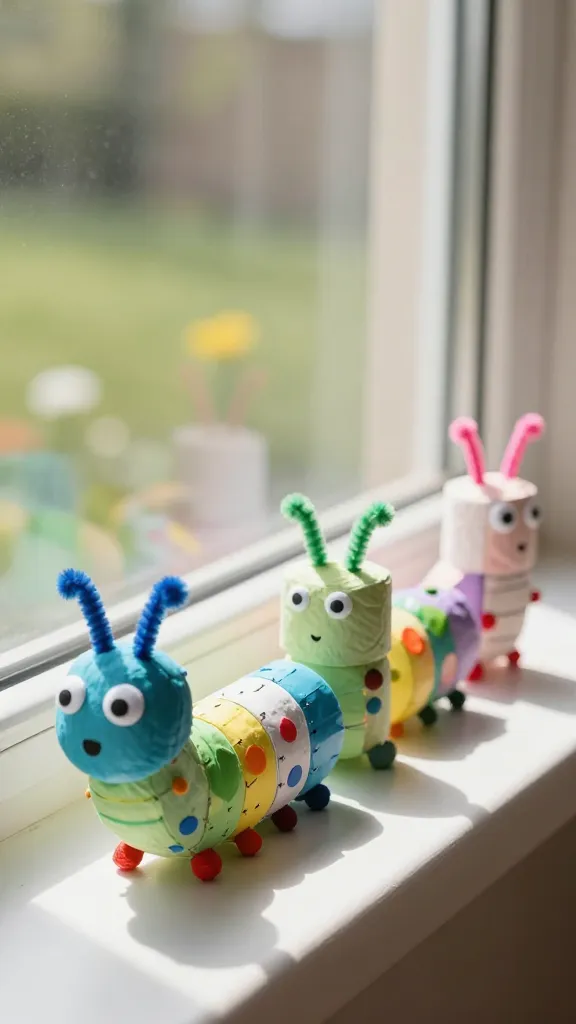
Imagine a row of cheerful caterpillars marching across a windowsill, each one a splash of color and texture. This craft turns a few rolls into a string of friendly bug friends—perfect for a spring storytime display or a classroom wall banner.
Materials Needed
- Plain toilet paper rolls (enough for your caterpillar lineup)
- Acrylic paints or markers
- Googly eyes or white paint for eyes
- Pipe cleaners or paper due for antennae
- Colored paper scraps for spots and patterns
- Glue, scissors, and a stapler (optional for stringing)
How to Make It
- Paint each roll in a bold color. Let it dry.
- Turn each into a caterpillar by adding eyes, a smile, and segments with markers or paint stripes.
- Decorate with spots, stripes, or dotted patterns using paper scraps or markers.
- Attach antennae with a dab of glue; you can bend the ends for a fun wiggle.
- Line up multiple caterpillars across a wall or string them to create a playful parade.
Pro Tips / Styling Ideas
- Use a mix of bright hues and a few glittery accents for extra whimsy.
- Hang them from a string to create a mobile-style display.
- Introduce a little rhythm: count the caterpillars as you place them!
Who’ll love it: Preschoolers who adore cute creatures and a little art you can brag about on the fridge.
2. Cozy Mini Bird Nests
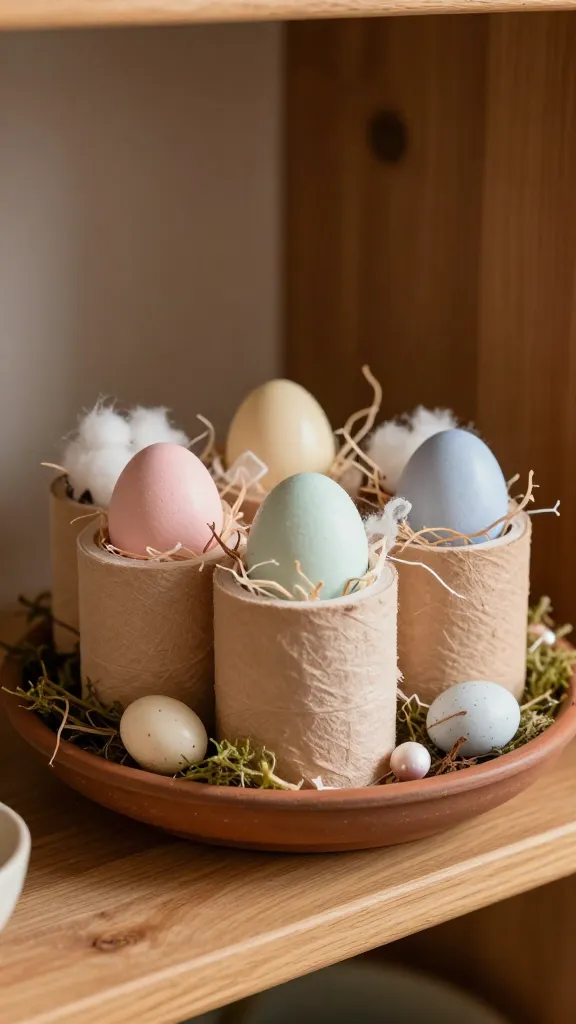
These tiny nests are both adorable and surprisingly calming to make. A nestful of color-coordinated eggs sitting on a shelf or inside a clay dish makes a sweet spring vignette.
Materials Needed
- Toilet paper rolls
- Brown acrylic paint or tea-dyed paper
- Cotton balls or shredded tissue for texture
- Small decorative eggs or beads
- Glue, scissors
- Optional: moss or natural twine for extra nest texture
How to Make It
- Cut the roll into short rings to resemble nest cups or keep as full rolls for a deeper nest.
- Paint with brown tones; dab with a little texture if you like.
- Fill with shredded paper or cotton to mimic nesting material.
- Place tiny eggs or beads inside for a delicate, nature-inspired finish.
Pro Tips / Styling Ideas
- Glue a clump of moss around the rim for a woodland vibe.
- Pair with pastel eggs for a spring display or mix with felt birds for a mini diorama.
Who’ll love it: Quiet crafters who enjoy soft textures and ready-made display pieces.
3. Sparkly Starry Lanterns
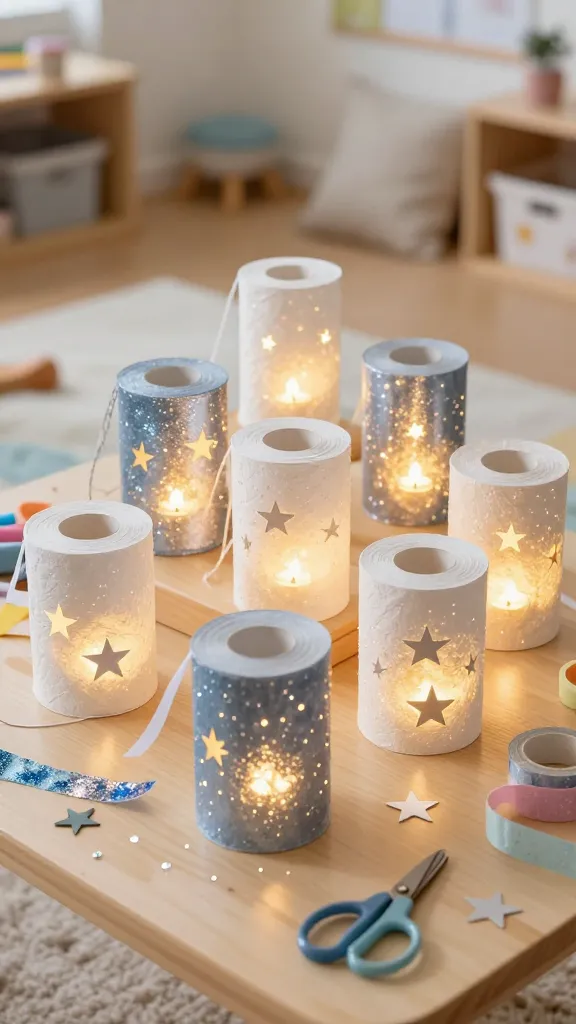
Bright, twinkly, and just a bit magical, these lanterns bring a gentle glow to a reading nook or party table. A few rolls become a constellation of stars that preschoolers can help assemble.
Materials Needed
- Toilet paper rolls
- White or metallic paints
- Pinking shears or scissors to cut star shapes
- Glitter, washi tape, or metallic markers
- LED tealights or battery-operated tea lights
- Ribbon for hanging (optional)
How to Make It
- Paint the outside of the rolls with a starry color palette, allowing patterns to peek through.
- Carefully cut star shapes around the rim or sides for a glow-through look.
- Decorate with glitter or metallic accents if you like extra sparkle.
- Place a small LED light inside and set on a safe, flat surface or hang with a ribbon.
Pro Tips / Styling Ideas
- Line a few lanterns on a mantle for a cozy, starlit display.
- Use metallic markers to draw constellations inside the cutouts.
Who’ll love it: Tiny night-sky lovers and anyone who appreciates a soft, ambient glow.
4. Garden Gnomes in a Tube
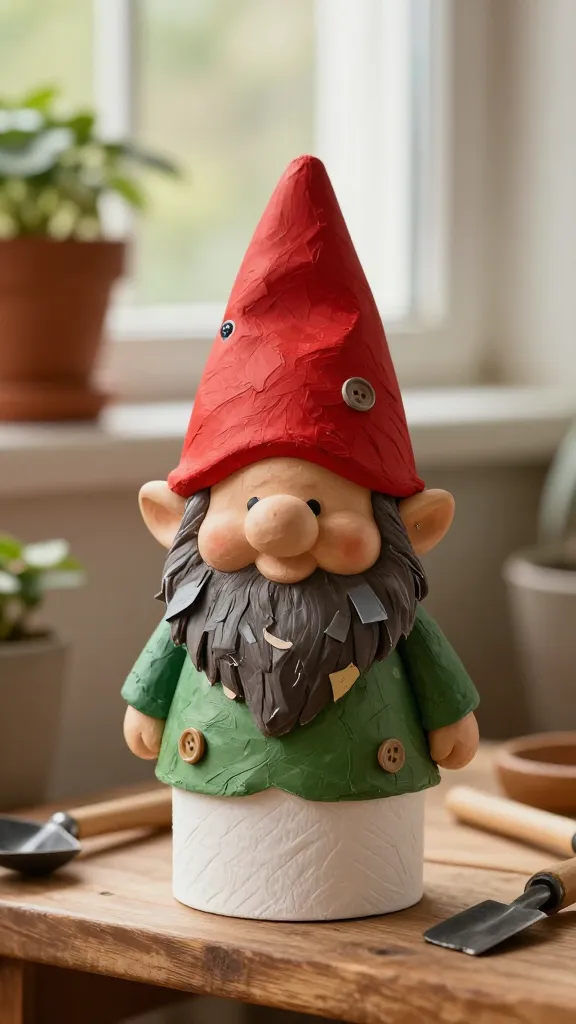
Turn rolls into little garden gnomes ready for a shelf or windowsill garden. These cheeky characters bring character to any room and spark a playful storytelling vibe.
Materials Needed
- Toilet paper rolls
- Acrylic paints in skin tones, greens, and reds
- Construction paper for hats and beards
- Buttons or small beads for noses
- Glue, scissors
- Tiny fabric scraps for clothes (optional)
How to Make It
- Base paint the roll to a skin tone; add a beard or mustache with paper and paint.
- Cut a triangular hat from construction paper and glue on top; add a dot of color for a feather or pom-pom.
- Dot on eyes with a small brush or marker; add a red nose using a bead or paint.
- Dress with a small fabric apron or outfit, if desired.
Pro Tips / Styling Ideas
- Line a tiny “garden” on a shelf with several gnomes of different colors.
- Place a few moss balls and a twig fence to complete the look.
Who’ll love it: Little storytellers who adore fantasy and cozy, homey décor.
5. Rainbow Rainbow Toy Stamps
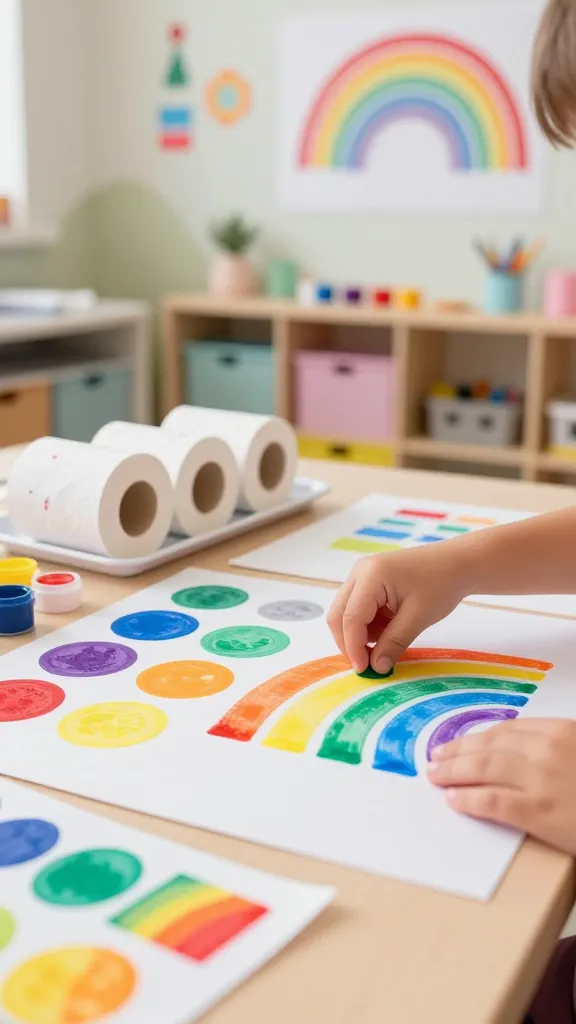
Transform plain surfaces into a rainbow playground with stampable army of color. This project doubles as an art activity and a décor piece—plus it’s a great way to practice color names and fine motor skills.
Materials Needed
- Toilet paper rolls
- Foam stickers or sponge cut into shapes
- Washable paints in several colors
- Paper for stamping
- Paper towels for quick cleanup
How to Make It
- Cut the rolls into small stamp shapes by pressing with a sharp edge or using a cork.
- Dab with paint and stamp on paper to create colorful patterns.
- Let the kids stamp multiple layers for a vibrant, rainbow-yield background.
Pro Tips / Styling Ideas
- Turn the stamped sheets into a colorful wall banner or a custom wrapping paper sheet for gifts.
- Encourage kids to name each color as they stamp—great language practice!
Who’ll love it: Preschool artists who love bold color and mess-friendly play.
6. Silly Silhouette Animals
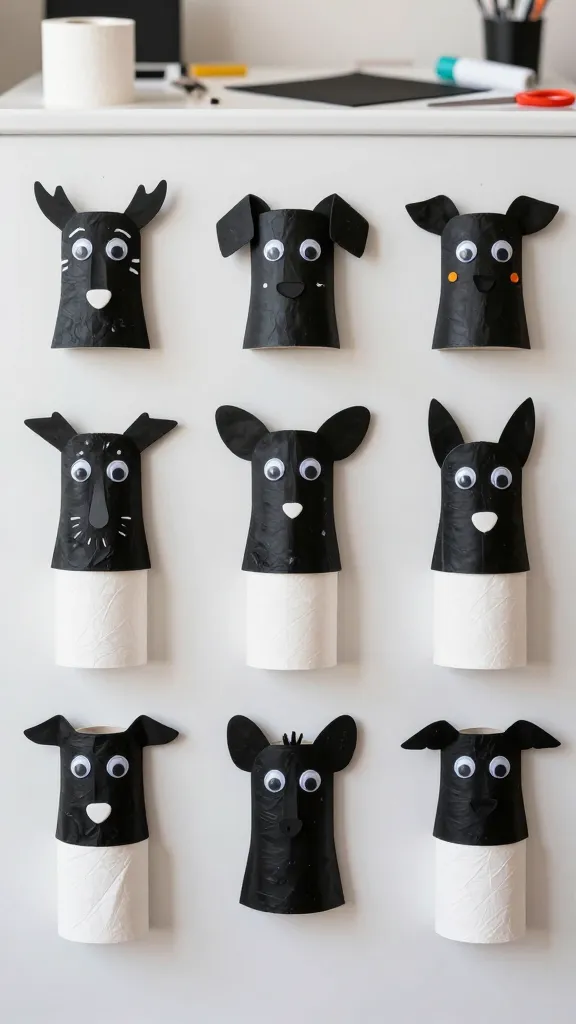
Cut and arrange roll silhouettes to form friendly animal faces. It’s a playful way to explore shapes, symmetry, and a dash of whimsy, all while making a gallery-style display for the fridge or wall.
Materials Needed
- Toilet paper rolls
- Black cardstock or black paint
- Scissors
- Googly eyes or white dots of paint
- Glue
- Colorful accents (felt scraps, yarn, etc.)
How to Make It
- Flatten a roll slightly and cut into two symmetrical halves to form ears or a nose silhouette depending on the animal.
- Paint or cover with black cardstock to create the silhouette of an animal head—think cat, bunny, or fox.
- Add eyes and small features or accessories with colored paper or paint.
- Arrange several on a string or wall to create a playful animal family scene.
Pro Tips / Styling Ideas
- Use a neutral wall with a pop of color from each silhouette for a bold gallery effect.
- Combine with a simple background paper to mimic a forest or meadow scene.
Who’ll love it: Little budding zoologists and kids who love a minimalist, modern craft vibe.
7. Monster Mashup Magnets
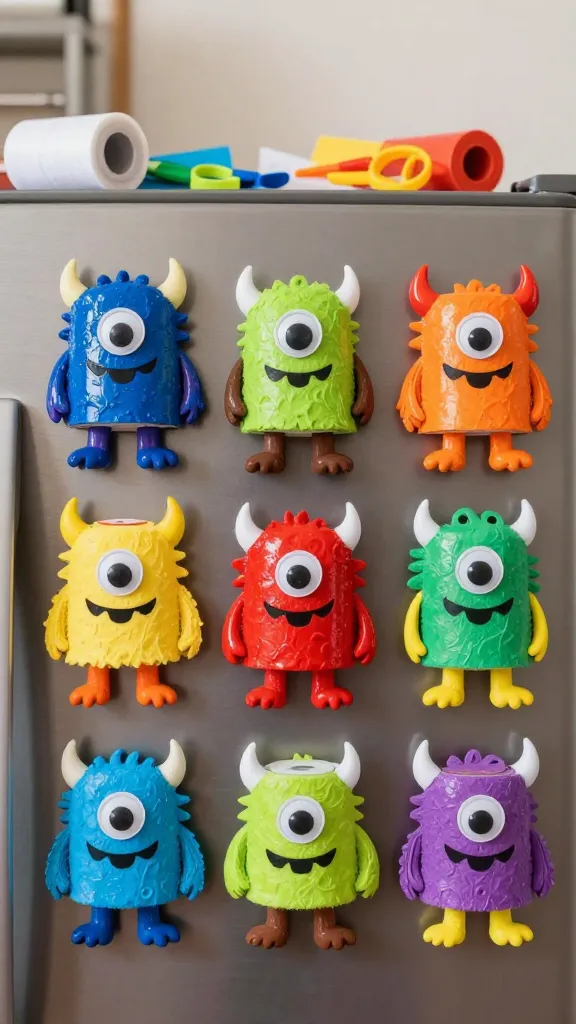
Turn rolls into friendly fridge magnets that sparkle with personality. The glossy magnets add a functional twist to craft time, and kids can proudly display their colorful creatures on the kitchen steel.
Materials Needed
- Toilet paper rolls
- Magnet tape or small magnets
- Acrylic paints in bold colors
- Googly eyes, felt scraps, buttons for noses
- Glue, scissors
- Clear sealant spray (optional for durability)
How to Make It
- Cut the roll into short discs or keep whole for a rounded monster head.
- Paint with vivid colors; add features with paper or felt pieces.
- Attach a small magnet on the back using glue and let dry completely.
- Stick the magnets on a magnetic surface and enjoy your mini monster gallery.
Pro Tips / Styling Ideas
- Create a whole family of monsters with varying shapes and colors for a fridge-best display.
- Seal with a light spray to prevent chipping if you’re using high-gloss paint.
Who’ll love it: Kids who crave a touch of whimsy on the fridge and parents who want a functional art piece.
8. Calming Cloud Mobile

Soft, dreamy, and surprisingly simple, this cloud mobile turns scraps into a gentle, moving sculpture. It’s a serene addition to a nap corner or reading nook and doubles as a soothing sensory project.
Materials Needed
- Toilet paper rolls
- White or pastel paints
- White tissue paper, cotton balls, or felt for cloud texture
- Thin string or fishing line
- Needle for threading (optional)
- Small bells or beads for a tiny chime (optional)
How to Make It
- Cut the rolls into cloud shapes or keep rounded forms for a softer look.
- Paint in gentle whites and pastels; add texture with tissue or cotton.
- Thread several clouds at varying lengths from a central dowel or hoop.
- Optionally attach a small bell or bead for a delicate sound when moved by air.
Pro Tips / Styling Ideas
- Hang over a cozy reading chair to enhance a calm, dreamy atmosphere.
- Keep colors light and airy to maximize the soothing effect.
Who’ll love it: Quiet space lovers and families who want a gentle decor piece that doubles as a soothing activity.
Conclusion
Eight totally unique, kid-friendly crafts from humble toilet paper rolls—proof that you don’t need fancy supplies to spark big creativity. Each project is short, colorful, and designed for preschoolers to enjoy with minimal supervision. Ready to start? Pick one (or all eight) and let the crafting magic unfold. You’ll love the smiles, the mess-free moments, and the adorable results.