10 Creative End of Summer Memory Crafts: Snap, Craft, Cherish
End of summer is begging for a little celebratory craft therapy, and these ideas are all about turning memories into art you’ll actually display. You’ll love how quick, colorful, and satisfyingly tactile each project feels. Ready to craft your way into cozy nostalgia? Let’s dive in.
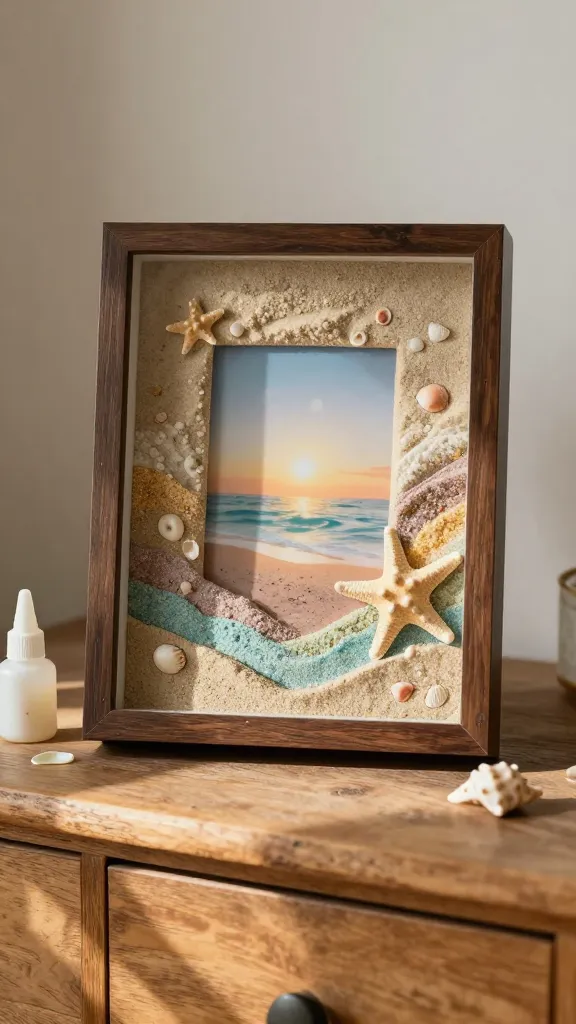
1. Seaside Shadow Box Keepsake
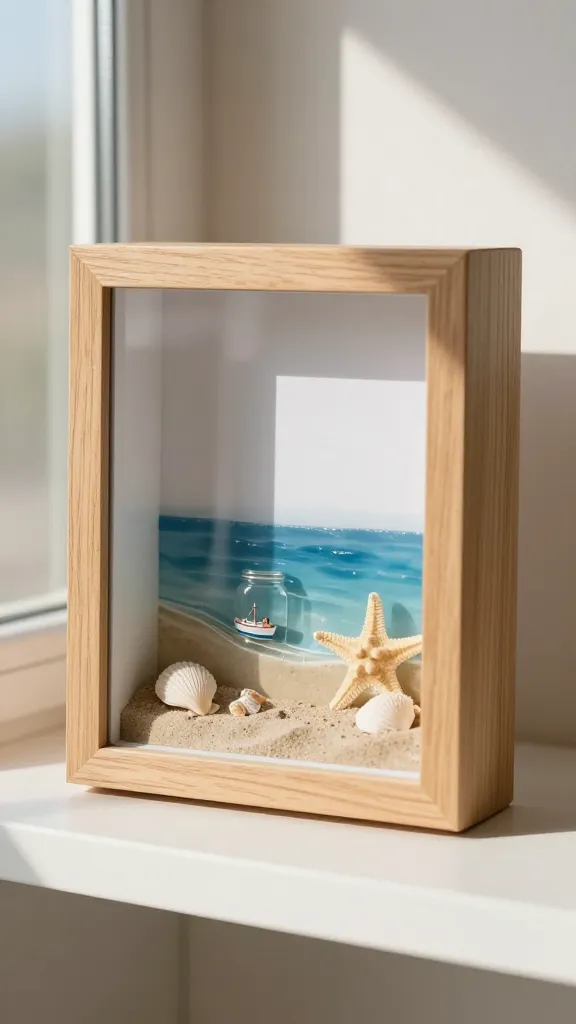
Picture a sunlit shelf filled with a tiny beach scene frozen in time—a jar of sand, a shell imprint, and a skiff of blue resin. This shadow box captures one perfect end-of-summer memory and keeps it close all year. It’s clean, coastal, and wonderfully personal.
Materials Needed
- Wooden shadow box frame
- Smooth sand from a meaningful beach
- Small shells and starfish
- Clear resin or epoxy
- Blue acrylic paint or tinted resin for water effect
- Miniature boat charm (optional)
How to Make It
- Line the bottom with a thin layer of sand and arrange shells in a pleasing cluster.
- Pour a shallow layer of blue resin to simulate water, then seal with a clear top layer as it cures.
- Add a tiny boat charm or other mementos before the resin fully hardens.
- Close the frame and hang where you’ll see it daily.
Pro Tips / Styling Ideas
- Add a handwritten date or a short caption on the back for memory-layering.
- Paint the inner back panel a soft seafoam for extra depth.
Who loves this: dreamers who want a calming, nature-inspired piece that whispers of warm days and lazy tides.
2. Photo String with Painted Ashes
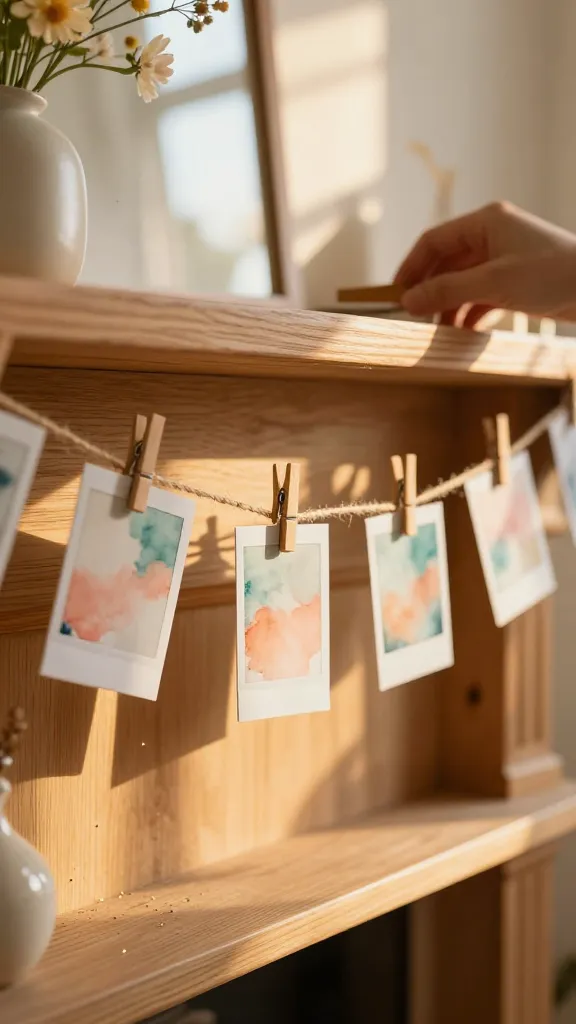
Turn a handful of summer snapshots into a charming garland you can drape across a mantel or window. A dash of watercolor-esque paint gives each photo a sunlit glow. It’s simple, sentimental, and totally Instagrammable.
Materials Needed
- String or twine
- Mini clothespins or clips
- Printed photos (polaroid-style or standard)
- Watercolor paints or pastel markers
- Optional glitter or mica powder for sparkle
How to Make It
- Lightly brush a soft watercolor wash across the edges of each photo for a cohesive, sunny vibe.
- Clip photos at varying intervals along the twine.
- Dot a few glitter flecks for a subtle, summery shimmer.
Pro Tips / Styling Ideas
- Mix in small handwritten labels with dates or tiny memories.
- Hang in a sunlit corner to catch the glint as the day shifts.
Who loves this: memory-keepers who want a flexible display that grows with new summer snaps.
3. Embroidered Journal Covers Terrarium Journal
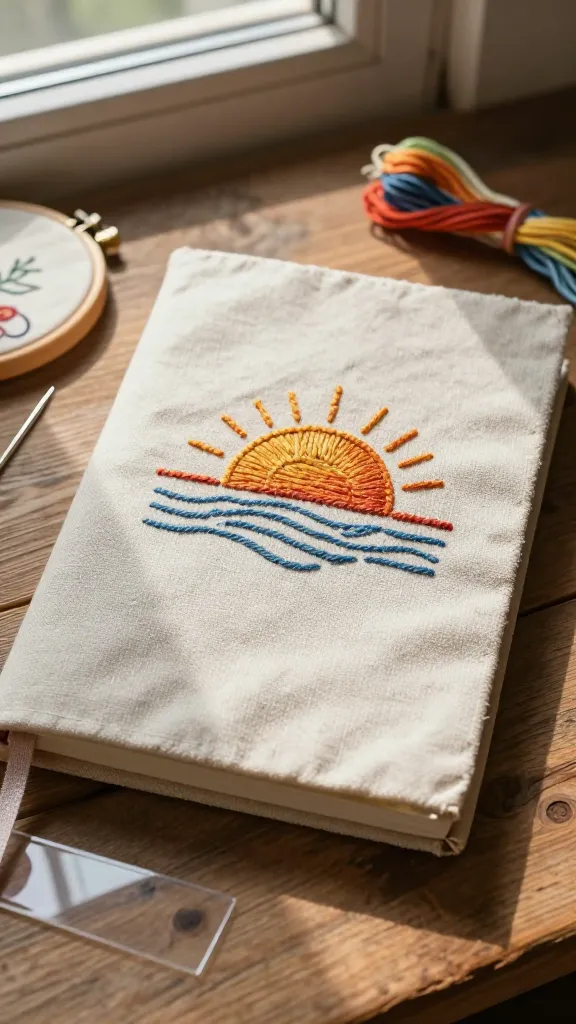
Give a beloved notebook a memory-rich makeover. A stitched cover with a tiny “end of summer” motif turns a plain notebook into a cozy, gift-worthy keepsake. It’s tactile, personal, and endlessly printable for future adventures.
Materials Needed
- Plain fabric journal cover or DIY fabric wrap
- Embroidery floss in sunset colors
- Needle and small embroidery hoop
- Acetate or clear protective sleeve (optional)
How to Make It
- Transfer a simple motif (sun, wave, leaf) onto the fabric with a pencil.
- Stitch a simple backstitch or satin stitch to outline and fill the design.
- Wrap the fabric around the journal, tighten, and secure with a neat seam.
Pro Tips / Styling Ideas
- Choose colors that mirror late-summer sunsets for a cohesive vibe.
- Pair with a matching pen for a complete memory kit.
Who loves this: writers, list-makers, and anyone who loves a little handmade charm in their daily routine.
4. Crisp Leaf Monogram Wreath
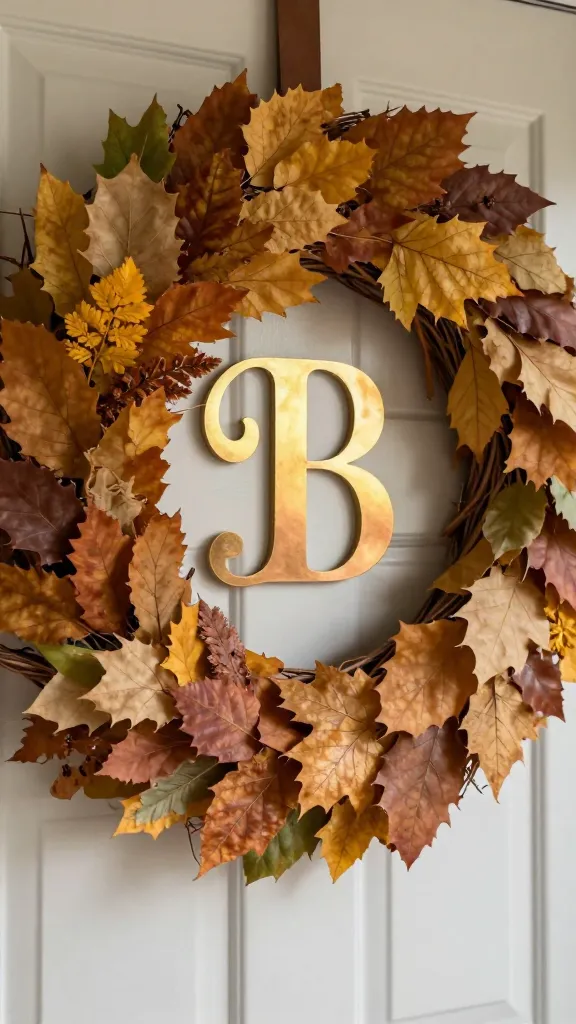
A memory-forward wreath that captures the hush of fall creeping in after summer. Dried leaves, a bold initial, and a whisper of metallic accents make a statement on any door or wall. It’s decorative nostalgia with a modern edge.
Materials Needed
- Wreath base (foam or grapevine)
- Pressed or dried summer leaves
- Foam or wooden letter initial
- Gold or copper spray paint
- Hot glue gun
How to Make It
- Arrange leaves in a circular spiral, securing with glue as you go.
- Center the monogram and attach with glue, allowing some leaves to peek around edges.
- Spray the whole piece lightly to seal and add a subtle sheen.
Pro Tips / Styling Ideas
- Add a small cluster of pinecones or berries for texture.
- Hang above a mirror to bounce light across the leaves.
Who loves this: display lovers who want a year-round accent with a nostalgic twist.
5. Summer Silhouette Candle Jar
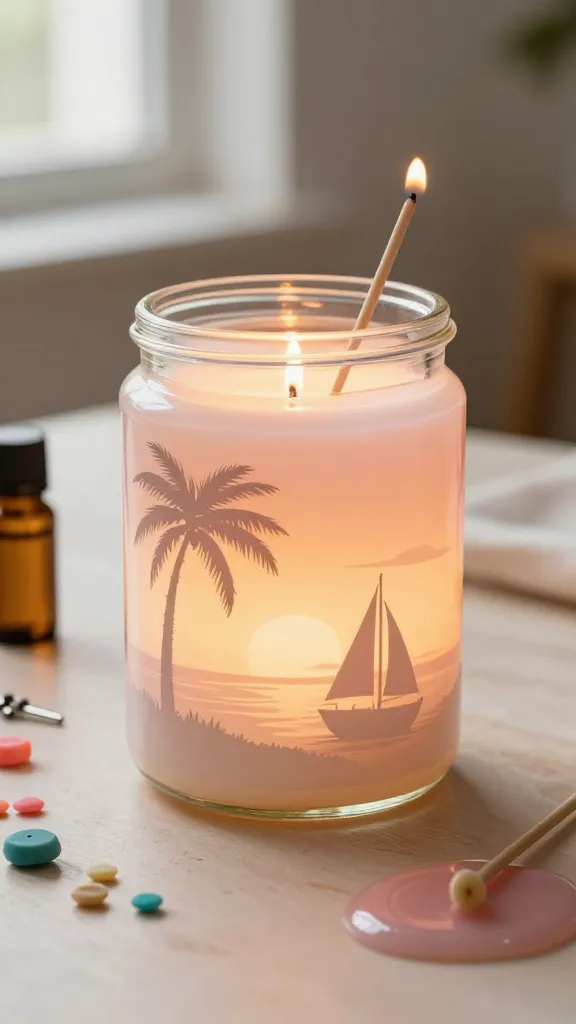
Transform an old glass jar into a memory-lit tribute to a summer night. A silhouetted scene, tinted wax, and a soft scent create a comforting keepsake that glows with personal history. DIY, cozy, and totally giftable.
Materials Needed
- Wide-mouthed glass jar
- Colored wax chips or candles
- Batons or metal wick tabs
- Stencil of a simple scene (sunset, palm tree, sailboat)
- Votive wicks
- Essential oil (optional)
How to Make It
- Wrap the stencil around the jar and paint or etch a silhouette on the outside.
- Layer colored wax to create a sunset gradient inside the jar, leaving room for the wick.
- Place wick, pour the wax, and let set. Add scent if desired.
Pro Tips / Styling Ideas
- Use a small label with the memory’s date inside the lid for a hidden keepsake.
- Pair with a metal lid painted gold for a luxe vibe.
Who loves this: ambiance seekers who want a little glow with a lot of memory.
6. Hand-Painted Picnic Tabletop Coasters
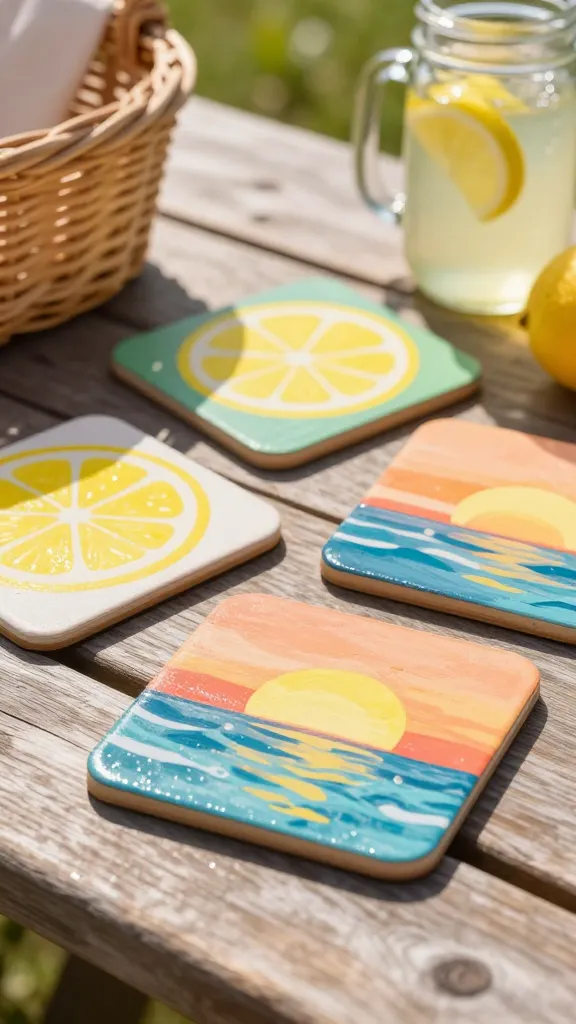
Capture picnic-perfect days in a set of coasters you can actually use. The combination of hand-painted motifs—fruits, sand dollars, sunsets—plus a protective seal makes them both functional and a tiny gallery of sunshine.
Materials Needed
- Wooden coaster bases or ceramic tiles
- Acrylic paints in sunny hues
- Clear sealant or decoupage glue
- Fine-tipped brushes
How to Make It
- Paint a motif on each coaster: lemon slice, wave pattern, peachy sunset, etc.
- Seal with multiple coats for durability.
- Let cure fully before using with drinks.
Pro Tips / Styling Ideas
- Coordinate with a matching wicker tray for a cohesive tea-time set.
- Gift as a set with a printed memory card describing a favorite summer outing.
Who loves this: hosts who want charming, practical décor that sparks conversation.
7. Memory Map Wall Hanging
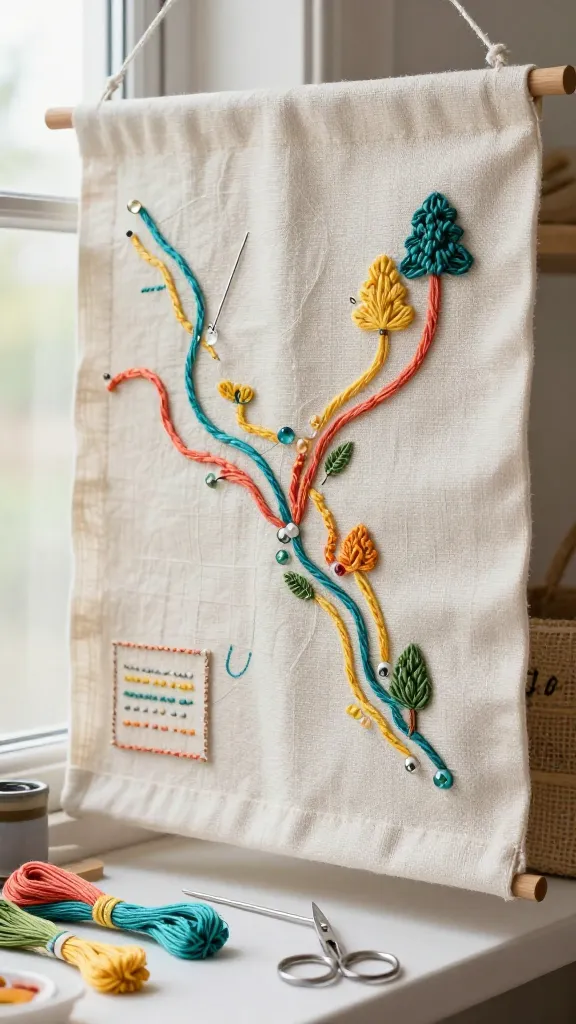
Create a tactile map of the summer you’member most—the places you visited, the routes you walked, the meals you shared. A fabric panel with stitched lines and hand-placed pins makes a personal, decorative geography of your season.
Materials Needed
- Canvas or sturdy fabric panel
- Embroidery floss in map-like colors
- Small pins or glass beads
- Needle and scissors
- Optional fabric paints for city markers
How to Make It
- Lightly sketch a rough map of your summer adventures on the fabric.
- Stitch routes with contrasting colors and place pins at memory sites.
- Add small tag labels naming each location or memory.
Pro Tips / Styling Ideas
- Use cork backing so you can pin new memories over time.
- Pair with warm string lights for a cozy gallery look.
Who loves this: travelers, day-trippers, and anyone who loves to tell a story with stitches.
8. Texture-Rich Sand Art Frames
Frame a tiny, textured slice of the beach in a movable art piece. Layer dyed sand, tiny shells, and a favorite photo behind glass to capture the tactile memory. It’s playful, rustic, and surprisingly elegant on a dresser or shelf.
Materials Needed
- Deep-set picture frame
- Colored sand or dyed sand granules
- Small shells and starfish
- Glue or mod podge
- A personal photo or quote card
How to Make It
- Glue the back panel insert and secure your photo or quote.
- Pour layered sand into the frame, interspersing shells as accents.
- Seal with a glass insert or sealant to hold the sand in place.
Pro Tips / Styling Ideas
- Label the memory with a tiny tag bound to a shell.
- Vary sand colors to match your room palette.
Who loves this: minimalists who crave texture and sea-salt vibes in equal measure.
9. DIY Confetti-Stamped Sunset Cards
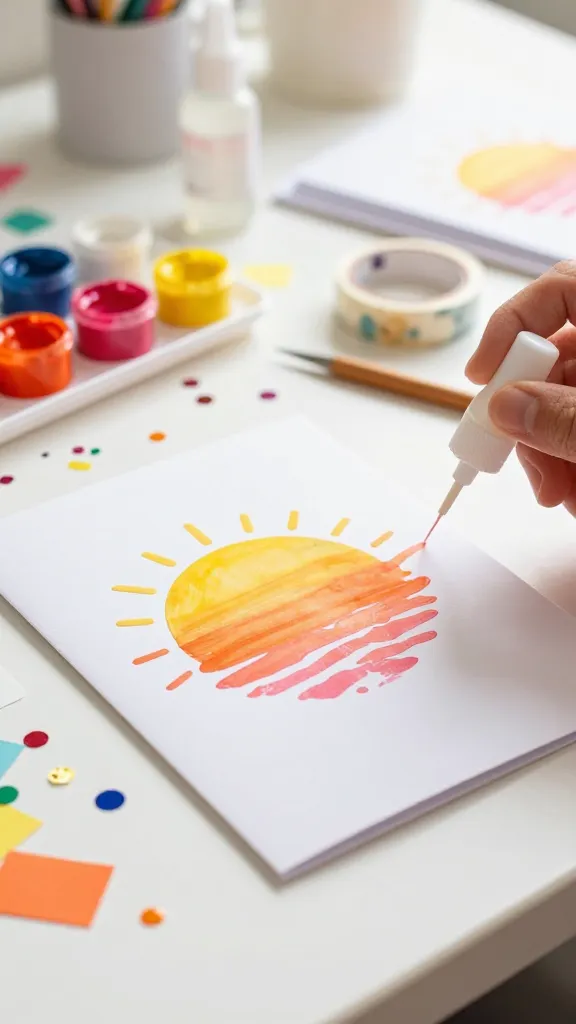
Send a little sunshine to friends and family with handcrafted cards that celebrate the tail end of summer. With easy stamp-and-spray techniques, you can mass-produce a batch that feels special and personal.
Materials Needed
- Blank folded cards
- Masking tape
- Bright acrylic paints
- Confetti, die-cut shapes (optional)
- Spray bottle with water for soft blends
How to Make It
- Mask off a half-oval area for the sun using tape.
- Paint with bright hues and spray a touch of water to blend edges for a sunset look.
- Peel tape to reveal a crisp sun arc and sprinkle confetti for a party-ready finish.
Pro Tips / Styling Ideas
- Personalize with handwritten notes inside that reminisce about a shared memory.
- Bundle with a small wax seal for a retro vibe.
Who loves this: thoughtful friends who appreciate a handmade touch without a huge time commitment.
10. Timeless Tin Pixel Jar of Moments
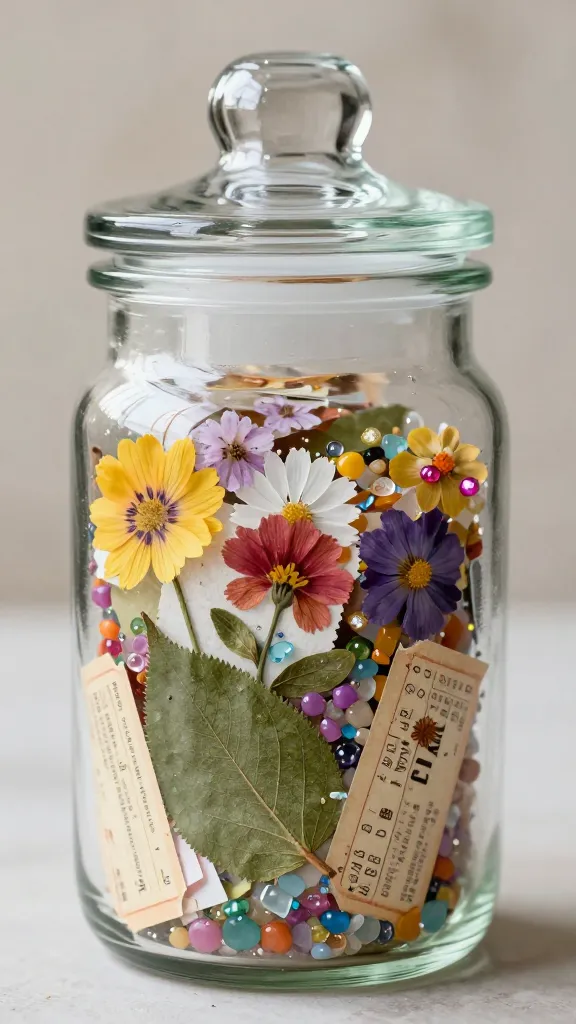
A jar full of tiny keepsakes—ticket stubs, pressed flowers, a dried leaf, a small note—turned into a pixelated mosaic of your summer. It’s a playful, tactile reminder that memories come in small, sparkling shards.
Materials Needed
- Clear glass jar with lid
- Assorted tiny mementos
- Silicone or hot glue
- Colored translucent beads or gel pebbles (optional)
How to Make It
- Fill the jar in layers with tiny mementos, pressing gently as you go.
- Add beads or gel pebbles for a little sparkle between memories.
- Seal the lid and place on a shelf where it catches the light.
Pro Tips / Styling Ideas
- Add a tiny label inside the lid with the year or a short memory.
- Pair with a framed photo nearby to tell the full story of the season.
Who loves this: crafters who enjoy a little puzzle of memories you can open, admire, and reflect upon.
Conclusion
These 10 Creative End of Summer Memory Crafts offer fun, approachable ways to bottle sunshine and reminiscence. Pick one to start, or cycle through a few to build a mini memory gallery you’ll cherish all year. Trust me, you’ll love the glow of making something meaningful from everyday finds.