11 Senior Citizen Craft Ideas Painting That Delight Seniors
Looking for bright, doable crafts that spark joy without stress? You’re in the right place. These 11 painting-based projects are friendly, relaxing, and perfect for any senior crafter who wants something stylish and doable.
Trust me—you’ll finish with something you’re proud to put on display, gift to a friend, or brighten up a cozy corner. Let’s dive into a playful gallery of painting projects that feel like a breeze and deliver big smiles.
1. Rustic Mason Jar Painted Planter Sets
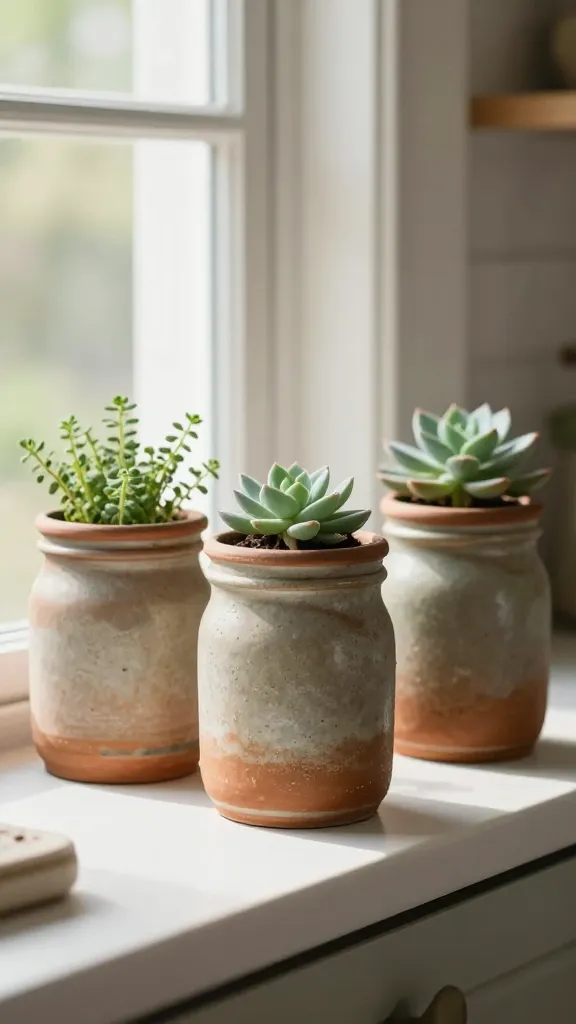
Imagine a trio of terracotta-glazed jars transformed into charming planters with soft, weathered finishes. These are simple to assemble, gorgeous on a windowsill, and make growing herbs or succulents feel special.
These planters look handmade, with a timeless country vibe that fits kitchens, balconies, or sunrooms. You’ll love the texture and the gentle color wash that gives each jar personality without heavy technique.
Materials Needed
- Glass or ceramic mason jars
- Acrylic craft paints in muted tones (sage green, ivory, weathered blue)
- Paintbrushes (medium and fine)
- Painter’s tape
- Clear sealant or mod podge
- Potting soil and small plants or herbs
How to Make It
- Clean jars and dry completely.
- Lightly tape off a band for a two-tone look.
- Paint base colors in two to three soft layers, allowing drying time between coats.
- Remove tape, lightly distress with a dry brush for a rustic effect.
- Seal with a clear matte finish for durability.
- Fill with soil and a plant; group in a row for a charming display.
Pro Tips / Styling Ideas
- Wrap twine around the necks for added texture.
- Pair with lavender sprigs or rosemary for a fresh scent.
- Place in a driftwood tray for a coastal-meets-country vibe.
Who would love this? Garden lovers, kitchen decorators, or anyone who wants a touch of rustic charm without heavy crafting work. Fun, soothing, and endlessly Pinterest-worthy.
2. Napkin Ring Art: Painted Wood Bead Set
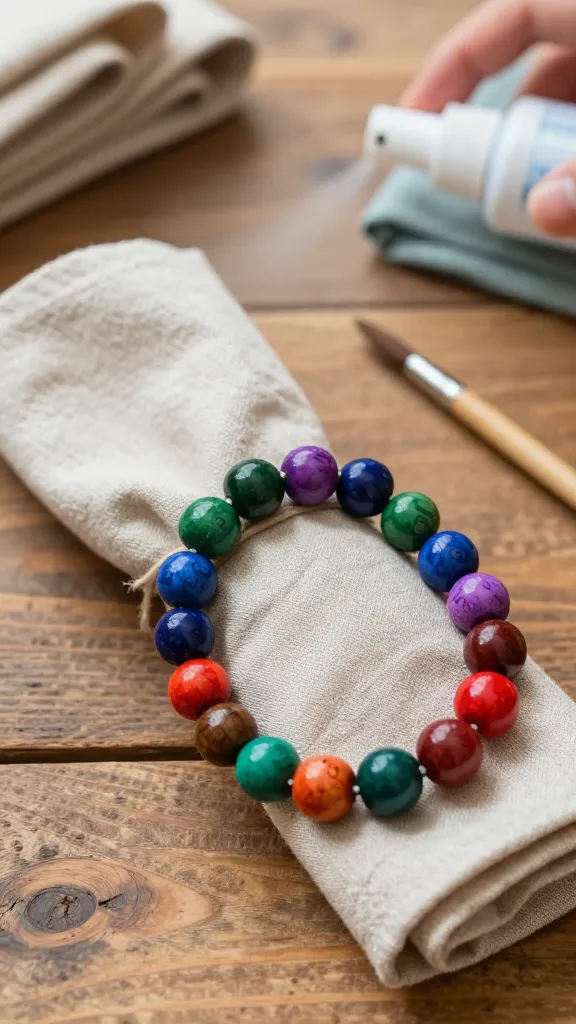
Upgrade simple cloth dining with a set of hand-painted wooden bead napkin rings. They add a playful, artisanal touch to meals and celebrations while staying light on the hands.
These rings feel like tiny works of art. Each bead can carry a different color or pattern, turning a basic table setting into a delightfully personal experience.
Materials Needed
- Wooden beads (varied sizes)
- Acrylic paints in jewel tones
- Small paintbrushes
- Clear sealant spray
- Twine or ribbon for stringing
How to Make It
- Paint each bead in a different color or pattern.
- Let dry, then seal to protect designs.
- Thread beads onto twine to form napkin rings, knotting ends to secure.
Pro Tips / Styling Ideas
- Coordinate colors with seasonal linens for easy table decorating.
- Use metallics (gold, copper) for a festive dinner vibe.
Ideal for: setting a cheerful dinner table, gifting to hosts, or framing a simple lunch party with a personal touch. A playful, doable project you’ll proudly use again and again.
3. Whimsical Birdhouse Miniatures Painted with Love
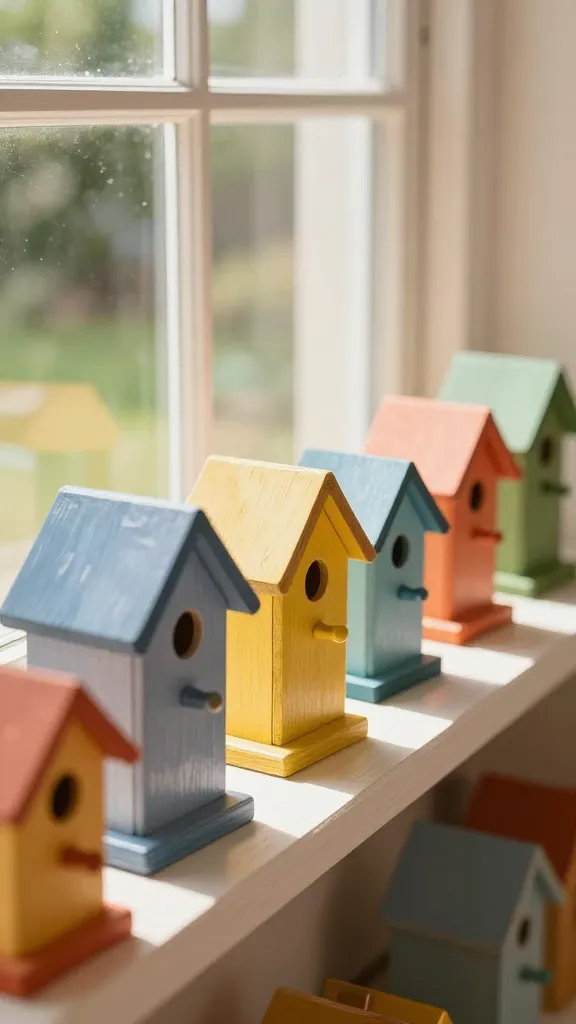
Paint tiny birdhouse miniatures to brighten a windowsill or garden shelf. They’re small enough for quick sessions but deliver big character with bright, friendly faces.
The finished look feels whimsical and cheerful, like a row of chubby winter cottages ready for a story. This project is forgiving and perfect for practicing tiny brush strokes without pressure.
Materials Needed
- Miniature wooden birdhouses
- Acrylic paints in cheerful hues
- Fine-tip brushes
- Sealant spray
- Thin decorative twine for hanging (optional)
How to Make It
- Base coat each birdhouse in a bright color.
- Add contrasting roof color and window frames.
- Lightly distress with a dry brush for a cozy look.
- Seal and place on a shelf or porch rail.
Pro Tips / Styling Ideas
- Display as a cluster on a mantel for a gallery feel.
- Pair with small potted plants for a nature-inspired vignette.
Who loves it? Nature lovers, lovers of tiny decor, and anyone who enjoys sweet, childlike charm with a modern twist. Perfect for sunny décor corners or a thoughtful, handmade gift.
4. Sunlit Landscape Coasters
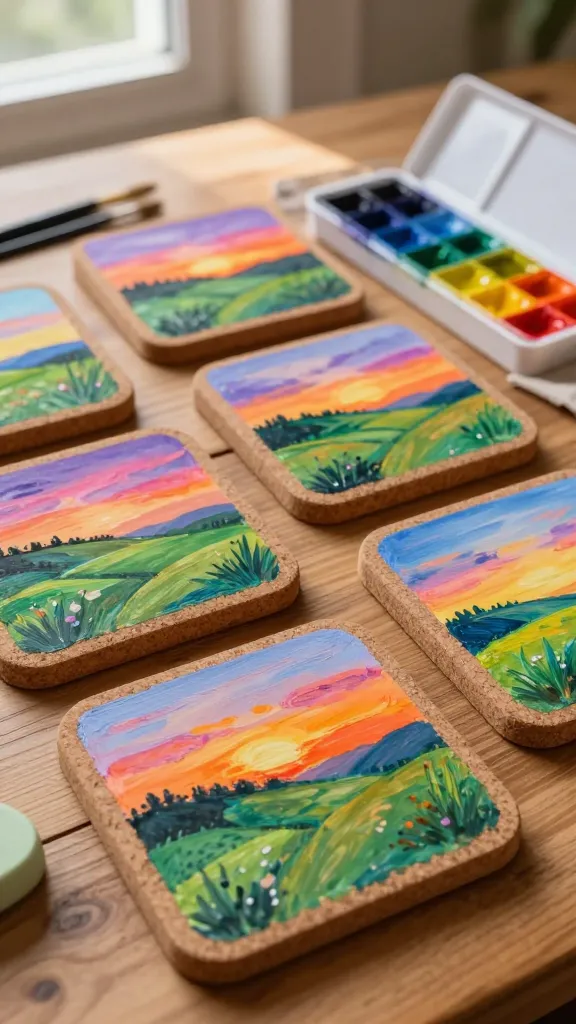
Turn plain cork or wood into sun-kissed coasters that brighten coffee breaks. A dash of landscape painting—think rolling hills, sunset skies, and a splash of texture—transforms everyday tables into tiny artworks.
Coasters are practical, inexpensive, and endlessly customizable. When friends comment, you’ll smile knowing you painted something that’s both useful and pretty.
Materials Needed
- Plain cork or wooden coasters
- Acrylic paints (blues, greens, yellows, oranges)
- Small brushes and sponges
- Clear sealant
- Optional: decoupage paper or stencils
How to Make It
- Base coat with a sky or land color.
- Paint simple landscapes—hills, trees, sun—using layered strokes.
- Seal for durability; let dry completely.
Pro Tips / Styling Ideas
- Group three to five coasters for a cohesive look.
- Coordinate with a matching placemat set for a complete table upgrade.
Who would adore this? Coffee lovers, hosts, and anyone who wants a sunny reminder of nature indoors. It’s a small touch with a big smile factor.
5. Garden Stepping Stone Palette Boards
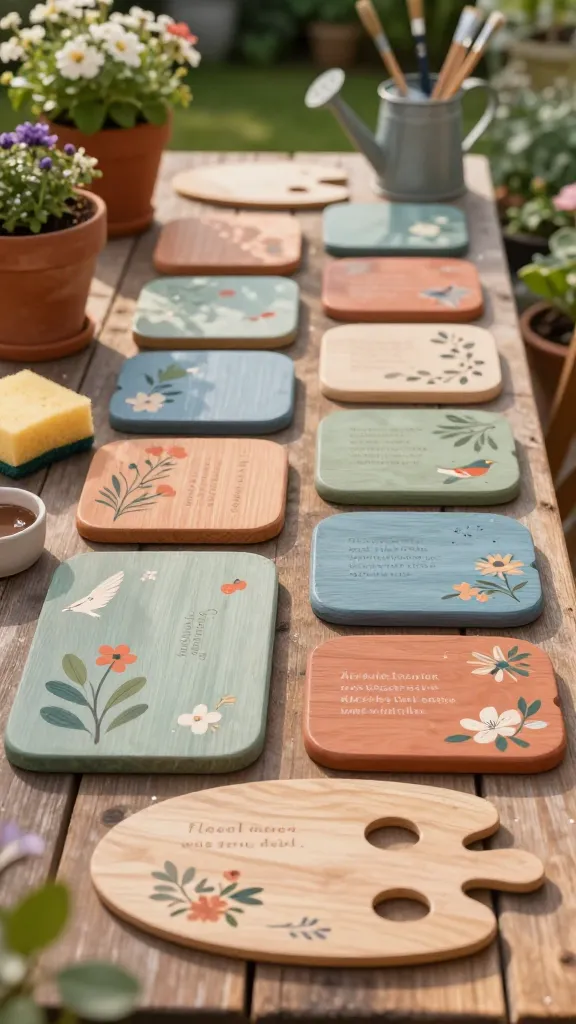
Paint decorative palette boards to mimic stepping stones for a garden path or indoor display. You’ll love the earthy textures and the way each board brings a personal scene to life—flowers, birds, or a favorite quote.
These boards are surprisingly sturdy and create a welcoming, handmade vibe anywhere they’re placed.
Materials Needed
- Wooden palette boards or small wooden panels
- Acrylic paints in earthy and floral tones
- Paintbrushes and a sponge
- Clear sealant
- Optional: small stencils for lettering
How to Make It
- Prime the boards and plan your design on each.
- Paint with layers, adding texture with a sponge for stone-like look.
- Add a simple phrase or motif on one board for a personal touch.
- Seal thoroughly and place in the garden or indoors as a wall piece.
Pro Tips / Styling Ideas
- Line them along a path or a sunny patio wall for a rustic gallery.
- Vary sizes for a dynamic display.
Who would love this? Garden lovers, interior decorators seeking a natural vibe, and anyone who enjoys a sturdy, handmade piece with personality. Seriously, it’s a satisfying, outdoor-friendly project.
6. Soft Fern Wall Art Panels
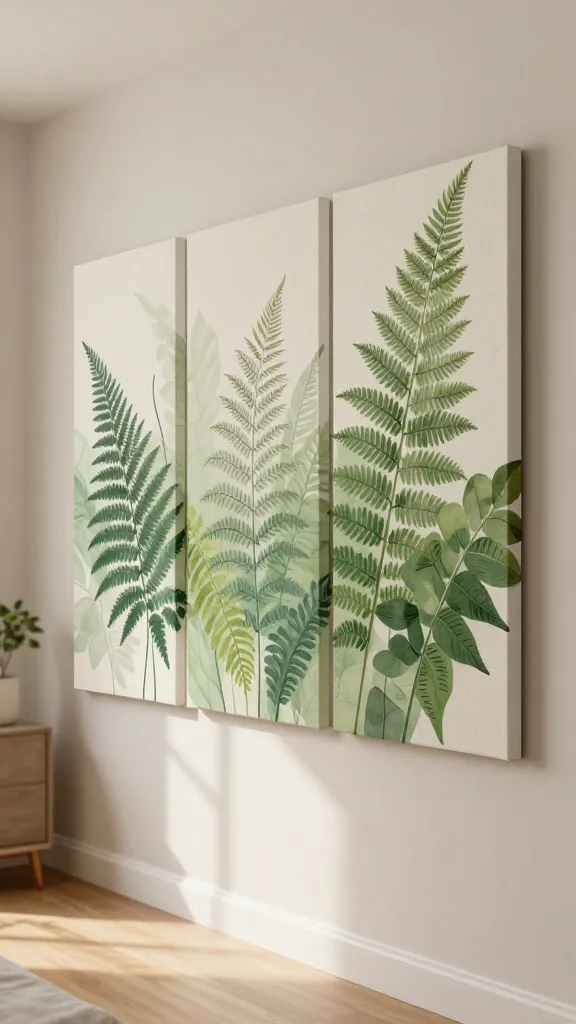
Create gentle, botanical wall panels featuring painted ferns and soft mossy greens. These look luxurious but stay approachable with simple shapes and layered greens.
The result is a calming, nature-forward piece that instantly elevates a hall or bedroom. It’s a peaceful, easy project with big, gallery-wall impact.
Materials Needed
- Canvas panels or MDF boards
- Acrylic paints in greens and neutrals
- Small liner brushes
- Pencil for sketching
- Clear protective spray
How to Make It
- Lightly sketch fern shapes on the surface.
- Layer leaf shapes in varying greens for depth.
- Finish with a subtle background wash and seal.
Pro Tips / Styling Ideas
- Group three panels for a striking vertical display.
- Use this as a calming focal point in a reading nook.
Who would love it? nature lovers, those seeking spa-like bedroom vibes, and anyone who enjoys easy, elegant wall art. Cozy, fresh, and perfectly suited for senior crafters craving a peaceful project.
7. Painted Ceramic Tiles for a Kitchen Backsplash Accent
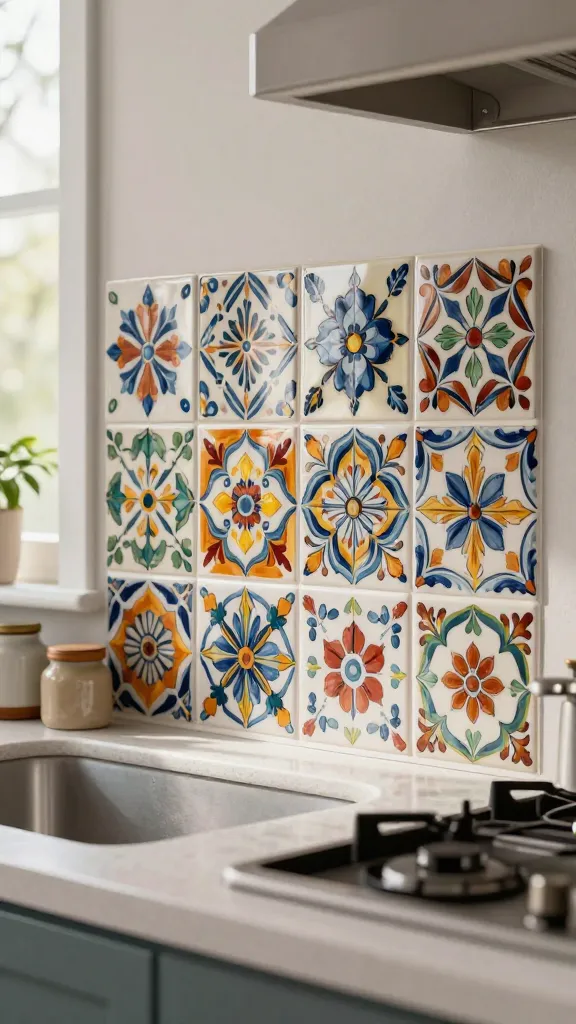
Give a kitchen a spark with hand-painted ceramic tiles that act as a colorful, durable backsplash accent. They’re small-scale, forgiving, and incredibly satisfying when the design comes to life behind the sink or stove.
Each tile becomes a mini canvas—bold florals, geometric patterns, or simple dots—that instantly upgrades the mood of cooking space.
Materials Needed
- Plain ceramic tiles (often 4×4 or 6×6 inches)
- Acrylic pours or tile-friendly paints
- Fine brushes and a detailing pen
- Tile-safe sealant or clear epoxy
How to Make It
- Clean and dry tiles thoroughly.
- Plan and sketch your design lightly with pencil.
- Paint, build up layers, and add details.
- Seal with a tile-safe sealant or epoxy coating.
Pro Tips / Styling Ideas
- Mix two bold patterns with a few neutral tiles to balance.
- Frame a small coffee bar nook with a few accent tiles for a playful effect.
Ideal for: kitchen aficionados, condo décor, and anyone who loves a bold, personal kitchen feature. It feels modern, vibrant, and incredibly doable.
8. Painted Lamp Shade Makeover
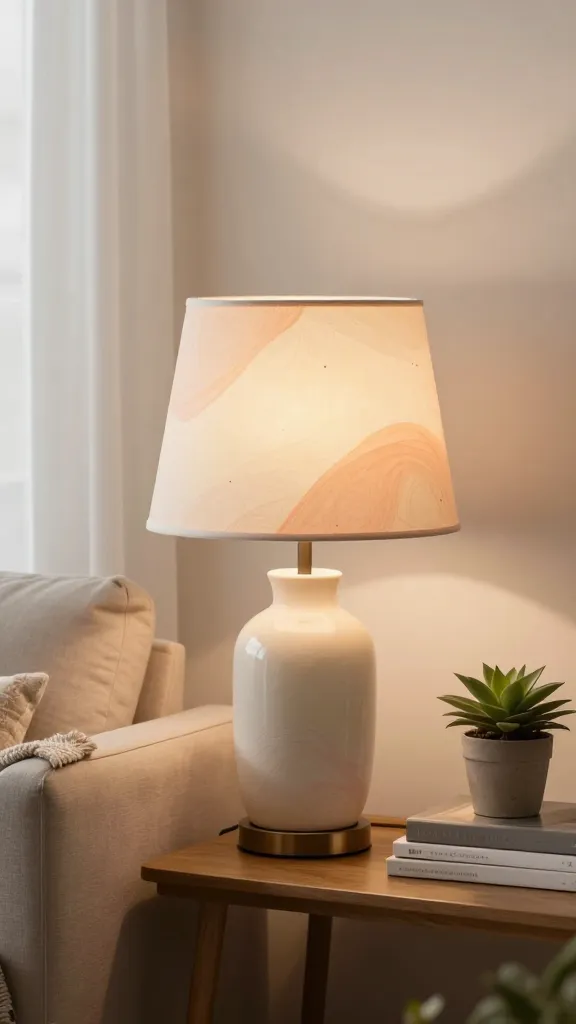
Refresh a tired lamp with a painted shade that complements your room’s color story. A few swirls, dots, or a delicate gradient can transform a ho-hum lamp into a statement piece.
It’s a quick project with high reward—soft lighting, cozy ambiance, and a dash of personality every time you flip the switch.
Materials Needed
- White or neutral lamp shade
- Acrylic paints or fabric paints designed for textiles
- Foam brushes or sponges
- Painter’s tape for pattern work
- Sealant suitable for fabric or shade material
How to Make It
- Prepare the shade surface; lay down patterns with tape if desired.
- Paint in light coats, allowing drying time between layers.
- Seal and let cure fully before reattaching to the lamp.
Pro Tips / Styling Ideas
- Coordinate with curtain fabrics or throw pillows for a cohesive room update.
- Try a subtle ombre effect for a modern twist.
Who would love this? DIY enthusiasts reimagining living spaces, or anyone who wants an easy, restorative home upgrade. It’s seriously satisfying to see a familiar lamp look brand-new.
9. Painted Door Flag Panel for Seasonal Cheer
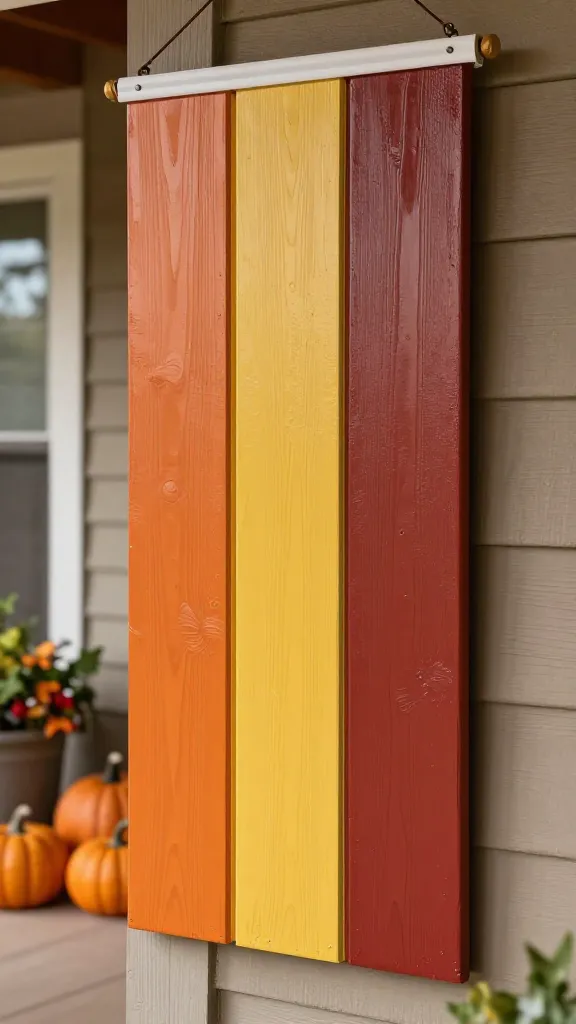
Craft a cheerful painted door flag or panel that celebrates seasons or holidays. It’s a warm, welcoming touch for front doors, entry walls, or a covered porch.
The design can be as simple or as elaborate as you like, making it perfect for practicing brush control while still looking polished.
Materials Needed
- Wooden door flag or hanging board
- Acrylic paints in seasonal colors
- Brushes, sponges, and a fine liner for details
- Clear outdoor sealant (for exterior use)
How to Make It
- Sketch a simple motif (pumpkins, snowflakes, sunflowers) on the surface.
- Paint in broad fills, then add details and outlines.
- Seal if used outdoors; hang on the door or wall with decorative rope.
Pro Tips / Styling Ideas
- Swap colors to reflect holidays—red/green for Christmas, orange/yellow for fall.
- Hang with a seasonal wreath for a layered effect.
Who would love it? Seasonal decorators, porch heroes, and anyone who loves a friendly welcome sign with personality. It’s a tiny project, big mood booster.
10. Antique-Style Frame Portraits
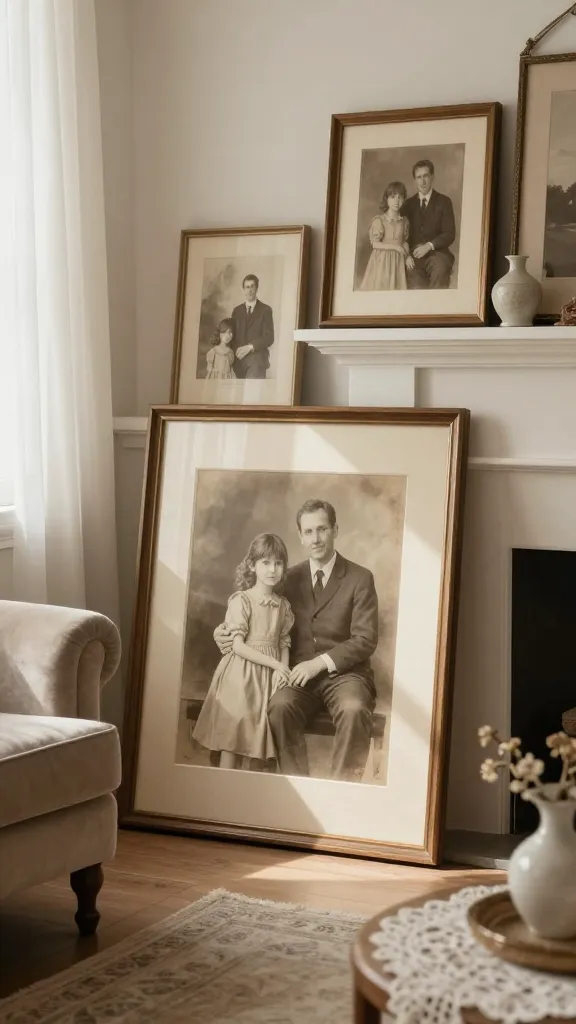
Turn family memories into antique-inspired framed portraits. A soft, weathered finish and gentle color wash give old photos a nostalgic, timeless look that feels museum-worthy in your living room.
This project is all about sentiment—preserve memories with a touch of vintage charm and a sprinkle of modern color.
Materials Needed
- Plain wood frames in various sizes
- Photo prints or scanned images
- Acrylic paints in ivory, sepia, and muted tones
- Fine brushes and a dry brush for texture
- Sealant spray
How to Make It
- Paint frames with a light ivory base and antique washes.
- Gently distress edges for a vintage look.
- Place memory photos behind the glass and hang in a gallery wall.
Pro Tips / Styling Ideas
- Group mismatched frame sizes for a curated, old-world vibe.
- Pair with candlesticks or a lace table runner to amplify the vintage feel.
Who would love this? Families, nostalgia buffs, and anyone who loves a classic, cozy aesthetic. It’s a heartfelt project that never goes out of style.
11. Watercolor Floral Tiles on Ceramic Tiles
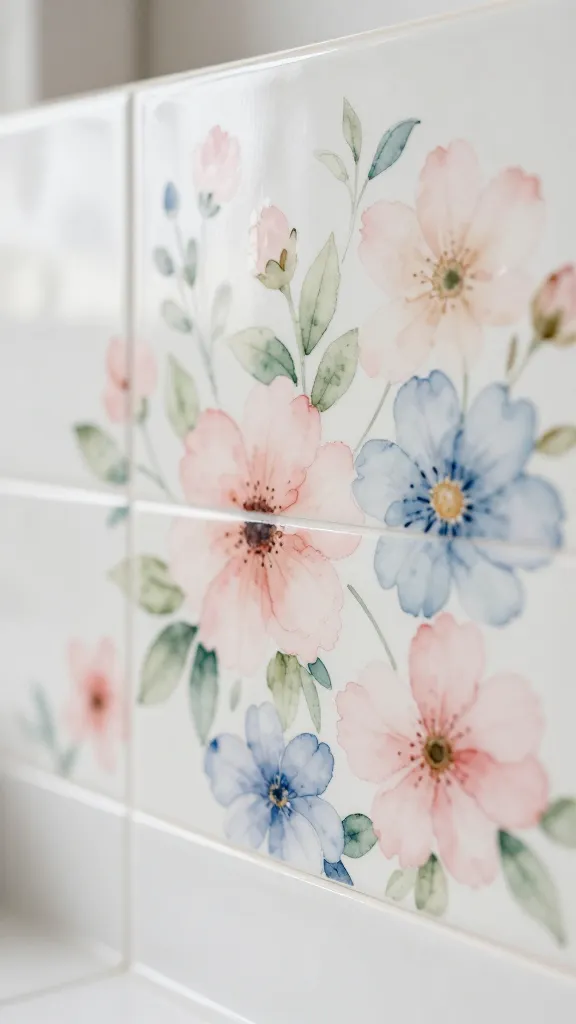
If you’ve ever dreamed of watercolor art on tiles, this project is for you. Create soft, airy floral tiles that can border a window, backsplash, or a decorative tabletop display.
Watercolor-inspired painting on tiles looks contemporary and fresh while remaining forgiving for beginners. The watery effect brings a breezy, artistic touch to any space.
Materials Needed
- Plain ceramic tiles (small or medium)
- Acrylic paints or watercolor markers suitable for tile
- Fine brushes
- Tile sealer or clear epoxy
How to Make It
- Sketch light floral outlines with pencil if you like.
- Paint with soft washes to mimic watercolor. Layer colors for depth.
- Seal to protect designs from moisture and wear.
Pro Tips / Styling Ideas
- Arrange several tiles in a small art grid on a wall or tabletop.
- Use a monochrome palette for a modern, understated look.
Who would love this? Studio artists, home decorators seeking a fresh, airy vibe, and anyone who loves a light, uplifting painting project. It’s feel-good art that’s easy to share with friends and family.
Conclusion
These 11 painting-focused crafts prove that senior creativity shines brightest when it’s enjoyable, doable, and expressive. Grab a brush, a favorite color story, and a sunny afternoon—each project is crafted to inspire confidence and a sense of accomplishment. Start with one, or dive into all of them—your home, and your heart, will thank you.