9 Toilet Paper Roll Crafts for Seniors
Ready for a little creativity that’s gentle on the eyes, easy on the hands, and incredibly satisfying? These 9 toilet paper roll crafts are perfect for seniors who want charming projects without a steep learning curve. Trust me, you’ll finish with that happy, accomplished glow and a few cute keepsakes to share with loved ones.
1. Cozy Memory Photo Ornaments

Picture a string of soft, keepsake ornaments featuring favorite photos—suddenly, holiday décor and heartfelt memories collide in one tiny, delightful project. These ornaments turn humble toilet paper rolls into sentimental frames you can hang year-round.
Materials Needed
- Toilet paper rolls
- Photos printed small (or photocopied from a phone)
- Mod podge or craft glue
- Clear acrylic sealer
- Ribbon or twine
- Scissors, pencil, decorative washi tape (optional)
How to Make It
- Cut a roll into two or three sections, depending on how many photos you want per ornament.
- Glue a photo inside each section, using the roll as a tiny frame. Seal with a thin layer of Mod Podge.
- Stack the frames and secure with a dab of glue, then add a ribbon loop for hanging.
- Decorate the outside with washi tape or paint if you like.
Pro Tips
- Use waterproof Mod Podge if the ornaments might get damp from humidity.
- Seal the finished piece lightly to prevent photo smudges.
Who will love this?
Grandkids’ photos? Yes. A cozy, personalized gift for relatives? Absolutely. It’s warm, thoughtful, and super displayable.
2. Aromatic Seed-Stamp Cards
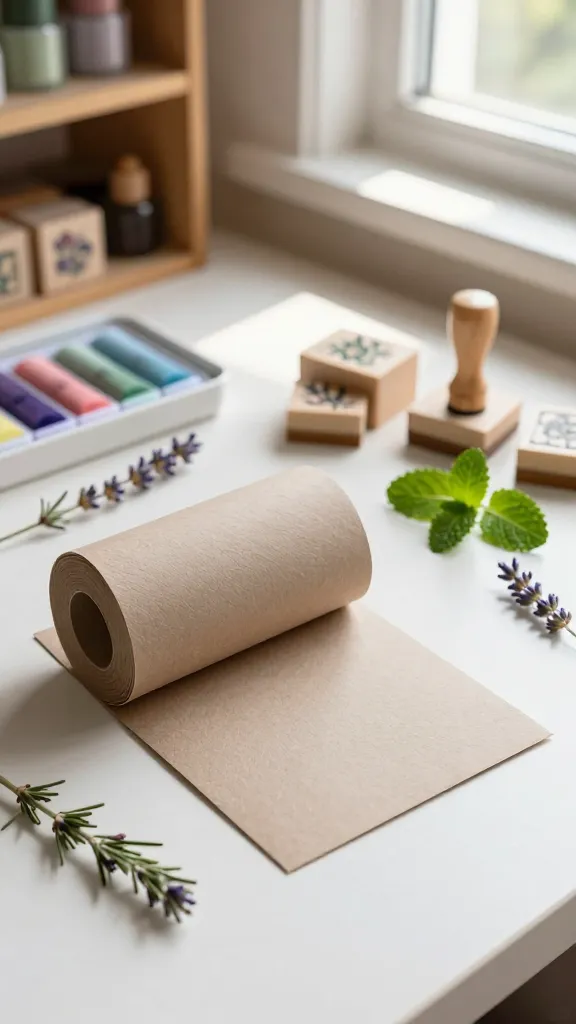
Imagine a tiny personalized card that smells as inviting as it looks. This craft blends simple stamping with a little scent magic, giving you stationery that feels like a warm hug.
Materials Needed
- Toilet paper roll tubes
- Cardstock or thick craft paper
- Fresh or dried herbs (lavender, rosemary, mint)
- Colored ink pads or markers
- Double-sided tape
- Small rubber stamps (optional)
How to Make It
- Flatten a roll section to create a card base. Cut to preferred size.
- Adhere cardstock around the tube for a textured look.
- Fill a pocket with a few herb sprigs and a seed stamp pattern using ink.
- Dress up with a simple stamped greeting on the front.
Pro Tips
- Choose herbs with gentle fragrances to avoid overpowering the card.
- Dust the card lightly to keep the scent lingering without staining.
Who will love this?
Friends who adore handwritten notes, gardeners, and anyone who enjoys a sensory greeting card that smells as good as it looks.
3. Soft-Touch Diffuser Orbs
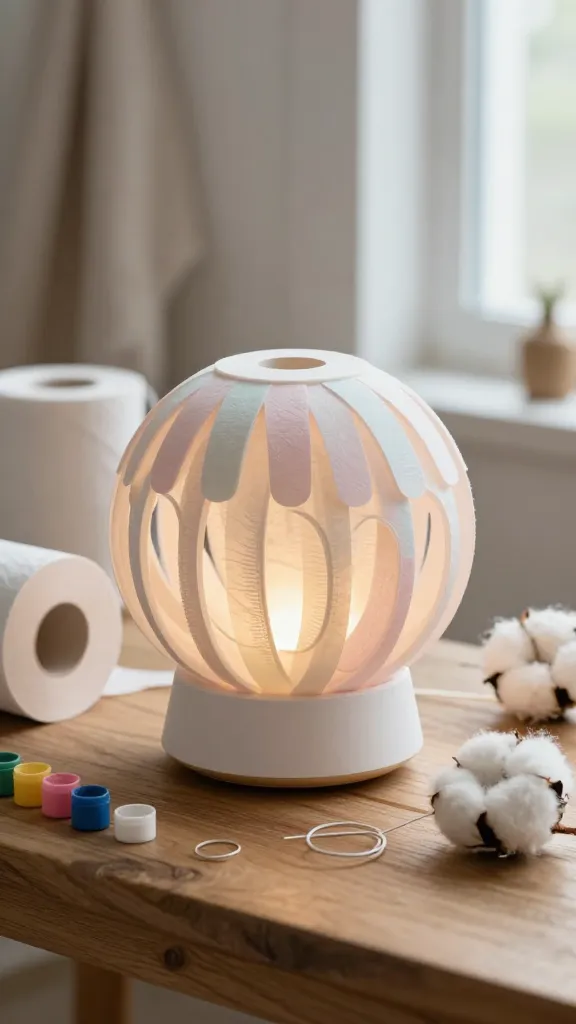
Soft, tactile decor that doubles as a light diffuser—these orb accents are soothing to touch and easy to assemble. A little glue, a few color washes, and you’ve got modern craft charisma.
Materials Needed
- Toilet paper rolls
- Acrylic paints or watercolors
- Cotton balls or soft yarn for texture
- Clear glass or plastic ornament caps (optional)
- Wire for hanging (optional)
How to Make It
- Slice the roll into rings and paint them in a soft color palette.
- Glue rings into a spherical arrangement to form an orb. Add cotton or yarn for a plush texture.
- Hang in a sunny spot or place atop a small stand for a cozy centerpiece.
Pro Tips
- Mix matte and satin paints for subtle depth.
- Seal with a light matte spray to protect colors.
Who will love this?
Anyone who loves tactile decor—perfect for living rooms, porches, or bedside tables.
4. Miniature Floral Lanterns

Delicate lanterns that glow softly with a tea light and a burst of florals. These tiny lanterns are charming on a windowsill or as a table centerpiece for warm, cozy evenings.
Materials Needed
- Toilet paper rolls
- Thin scrapbook paper or tissue paper
- Tea lights or LED candles
- Ribbon for handles
- Glue, scissors
- Dried flowers or pressed petals (optional)
How to Make It
- Cut a rectangular window into each roll or wrap with patterned paper.
- Decorate the exterior with dried flowers or petals for a pretty garden vibe.
- Slip a tea light inside and hang with a ribbon or place on a tray for a soft glow.
Pro Tips
- Use LED lights for safety and longer-lasting glow.
- Experiment with different paper textures for varied light diffusion.
Who will love this?
Cottagecore enthusiasts, weekend tea lovers, or anyone who wants a gentle, pretty glow without fragility.
5. Pocket-Sized Plant Starters
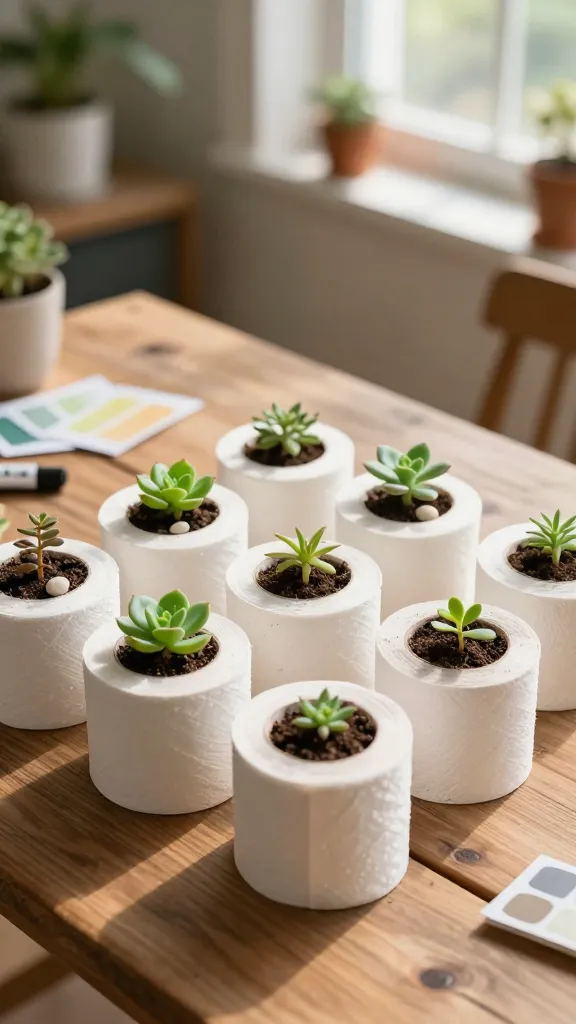
Yes, you can create miniature planters from roll segments. Tiny, adorable, and surprisingly sturdy, these greens-on-the-go planters are perfect for patios, sunrooms, or sunny kitchen counters.
Materials Needed
- Toilet paper rolls
- Small succulent cuttings or herb seeds
- Potting soil
- Pebbles for drainage
- Paint or markers for decoration
How to Make It
- Cut the rolls into short, sturdy cups. Poke a small drainage hole if possible.
- Fill with a little soil, add a plant cutting or seeds, and cover lightly with soil.
- Decorate the outside with cheerful colors or patterns.
Pro Tips
- Place on a shallow tray to catch moisture and ease watering.
- Use low-maintenance plants like kalanchoe or herbs for beginners.
Who will love this?
Beginners and plant lovers who want low-stress greenery that’s easy to move around the house.
6. Stylish Coaster Set With Textured Rims
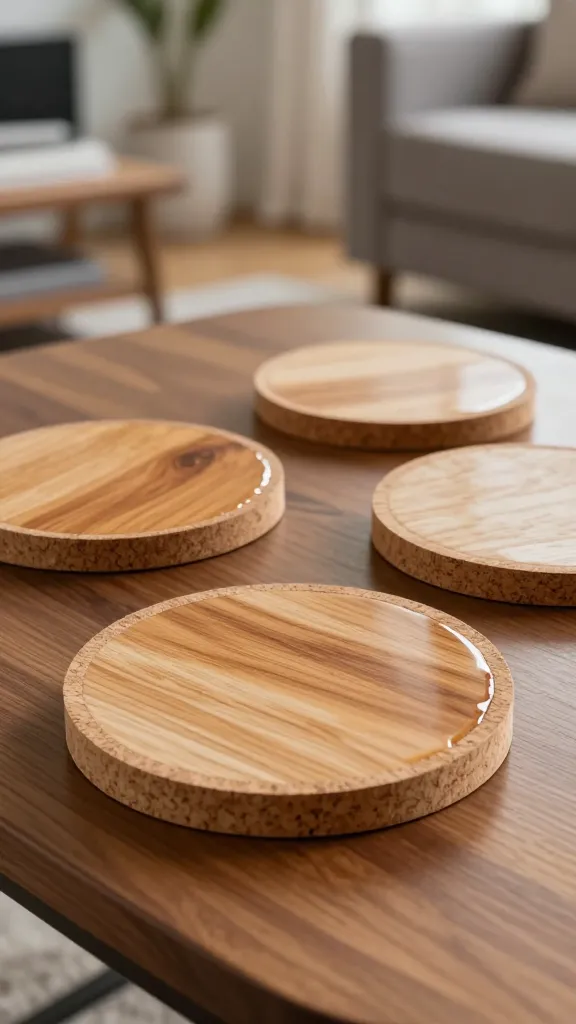
Upgrade your coffee table with a coaster trio that brings texture and a handmade touch. These roll-based coasters are sturdy, wipe-clean, and stylish enough to match any decor.
Materials Needed
- Toilet paper rolls
- Cork or thin rubber backing (optional)
- Acrylic paint or stain
- Mod Podge for sealant
- Foam brush
How to Make It
- Flatten a roll, then cut into circular discs. Sand edges lightly for a smooth finish.
- Paint or stain, and glue to a cork base for added durability.
- Seal with Mod Podge to protect from moisture.
Pro Tips
- Mix metallic accents with matte backgrounds for a modern vibe.
- Make a set of three in coordinating colors for a cohesive look.
Who will love this?
Hosts, coworkers, and anyone who enjoys a small, stylish, functional homemade gift.
7. Gentle Yarn-Wrapped Figures
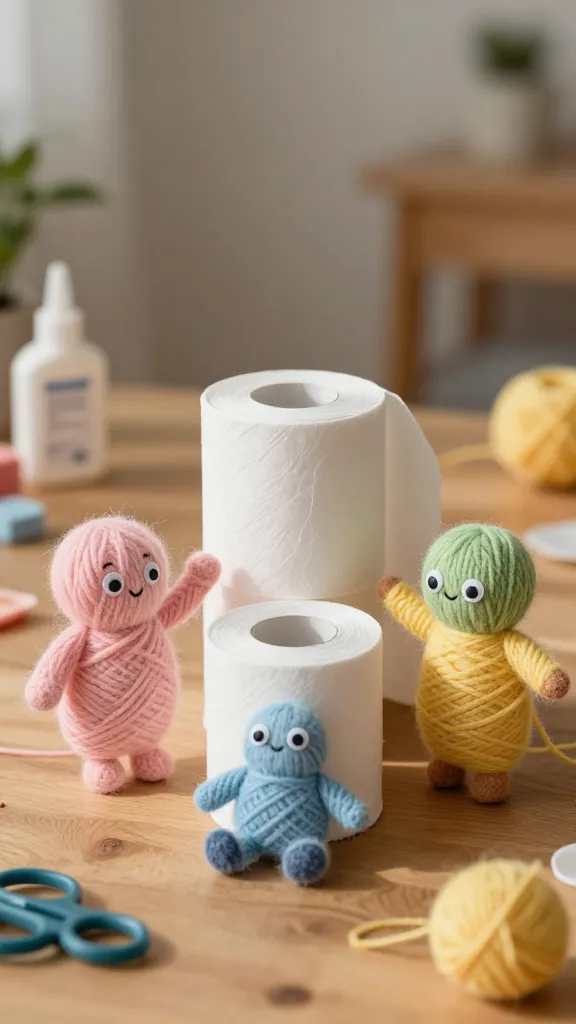
Soft, whimsical characters made by wrapping yarn around roll shapes. These littles are playful, tactile, and wonderfully easy—great for kids, grandkids, or anyone young at heart.
Materials Needed
- Toilet paper rolls
- Yarn in your favorite colors
- Hot glue or craft glue
- Googly eyes, felt scraps (optional)
How to Make It
- Roll an armature with yarn, gluing as you go to create bodies and heads.
- Add facial features with felt or googly eyes for a cute expression.
- Create a little party of figures and position them on a shelf or mantel.
Pro Tips
- Use a mix of neutral and bright yarns to balance whimsy with elegance.
- Keep glue minimal to preserve the soft texture of the yarn.
Who will love this?
Grandchildren’s artwork come to life, or a cheerful set for a bookshelf display.
8. Soft Lighting Pillar Candles
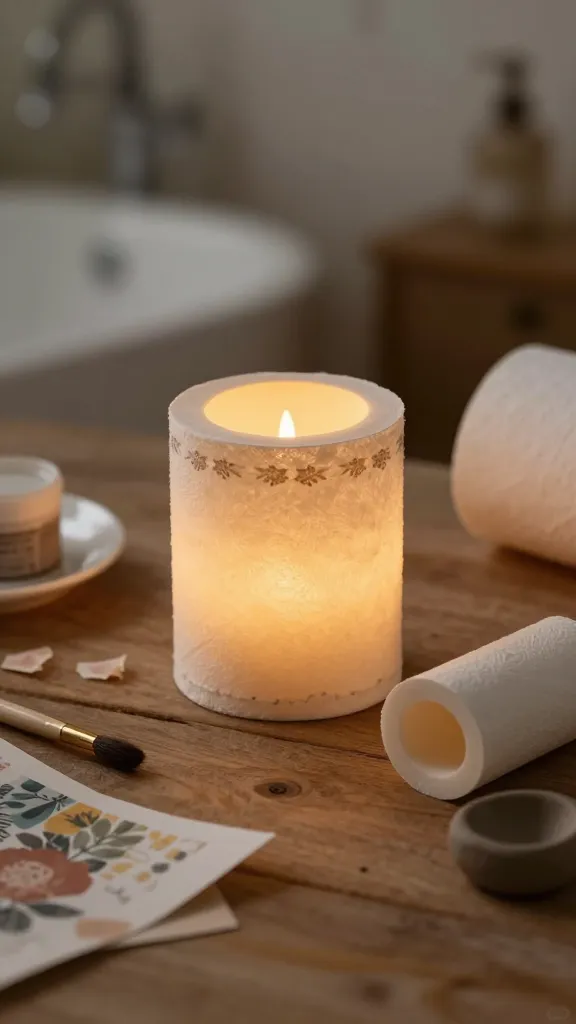
These gentle, safe-to-handle candles are fashioned from roll segments and a touch of wax or clay. They offer a warm, ambient glow for evening reading or relaxing baths.
Materials Needed
- Toilet paper rolls
- Votive candles or LED tea lights
- Wax sheets or clay (optional for a candle look)
- Paint, markers, or decoupage paper
How to Make It
- Cut a roll to fit around a small votive candle or LED light.
- Wrap the outside with decorative paper or paint. If using wax, glue a thin layer around the inner edge to emulate a candle’s glow when lit.
- Place a light inside and enjoy the soft illumination.
Pro Tips
- Never leave real candles unattended; opt for LED for safety.
- Use warm tones to maximize that cozy, inviting glow.
Who will love this?
Home decorators who crave cozy lighting without a lot of fuss or risk.
9. Reusable Gift Boxes With Tiny Ribbons
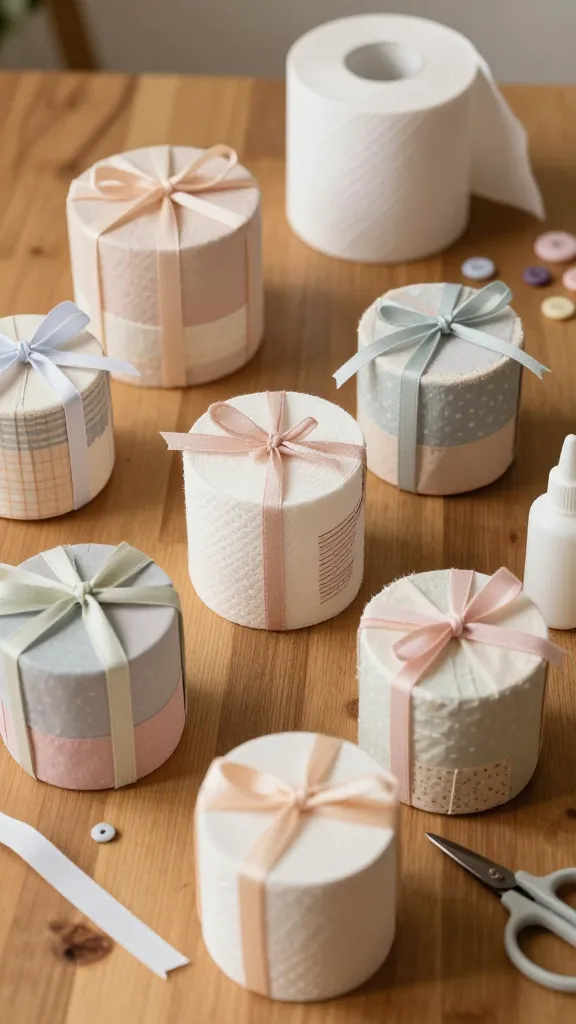
Turn roll segments into tiny gift boxes—perfect for storing jewelry, buttons, or tiny treats. They’re compact, charming, and infinitely giftable.
Materials Needed
- Toilet paper rolls
- Colored paper or fabric scraps
- Ribbon, twine, or decorative string
- Glue, scissors
How to Make It
- Rolls become the base; cut a lid from an extra piece of material to fit snugly on top.
- Wrap with fabric or colored paper, then decorate with a ribbon loop for a cute closure.
- Fill with small goodies or use as an elegant gift box topper.
Pro Tips
- Use seasonally themed papers for holidays or birthdays.
- Line the inside with tissue paper to cushion the contents.
Who will love this?
Gift-givers, organizers, and anyone who enjoys a tiny treasure box that’s easy to customize.
Conclusion
These 9 toilet paper roll crafts for seniors prove that creativity comes in small, simple packages. Whether you’re decorating your space, making thoughtful gifts, or starting a little at-home project hobby, you’ll find something delightful here. Pick one (or all nine) and dive in—your space will feel cozier, brighter, and uniquely yours.