15 Aesthetic Craft Ideas Painting for Teens That Pop
Ready to splash some color and vibe into your space? These 15 aesthetic craft ideas painting for teens are bite-sized, boldly stylish, and totally doable. Trust me, you’ll love how quick they come together and how they transform a plain corner into a vibe.
Grab your supplies, pick a favorite mood, and let’s dive into a world of color, texture, and personal flair. FYI, these projects are perfect for dorm rooms, bedrooms, gift swaps, or a just-because-tantamount-to-fun day.
1. Abstract Acrylic Moon Wall Art
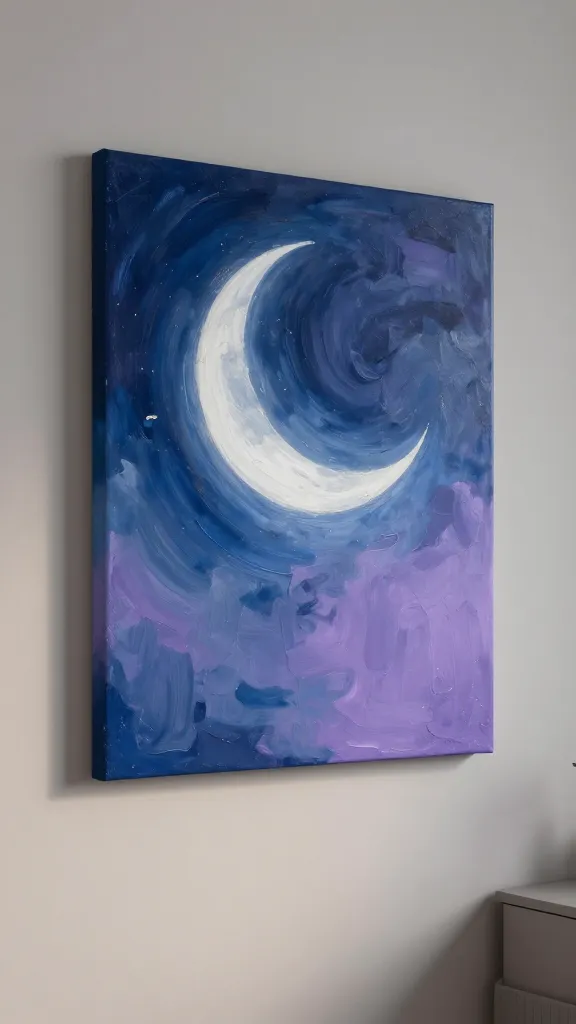
Picture a dreamy wall splash: a large canvas, midnight blues merging into lilac haze, with a luminous crescent drifting above. This abstract piece adds a moody, gallery-worthy vibe to any teen room.
Materials Needed
- Canvas panel (16×20 or similar)
- Acrylic paints in blues, purple, black, white
- Palette knife or flat brush
- Painter’s tape (optional for sharp edges)
How to Make It
- Layer a base wash of deep blue across the canvas and let it dry.
- Blend purples and whites to create soft gradients, then add a bold crescent in a lighter shade with a palette knife.
- Fade edges with a dry brush technique for a hazy, ethereal look.
Pro Tips / Styling Ideas
- Hang above a desk or bed to anchor the space.
- Frame with a slim, black border to pop the colors.
Who’s this for? Anyone who loves moody, dreamlike art with a modern twist. It’s bold, chic, and surprisingly forgiving to beginners.
2. Tie-Dye Canvas Tote with Glitter Accents
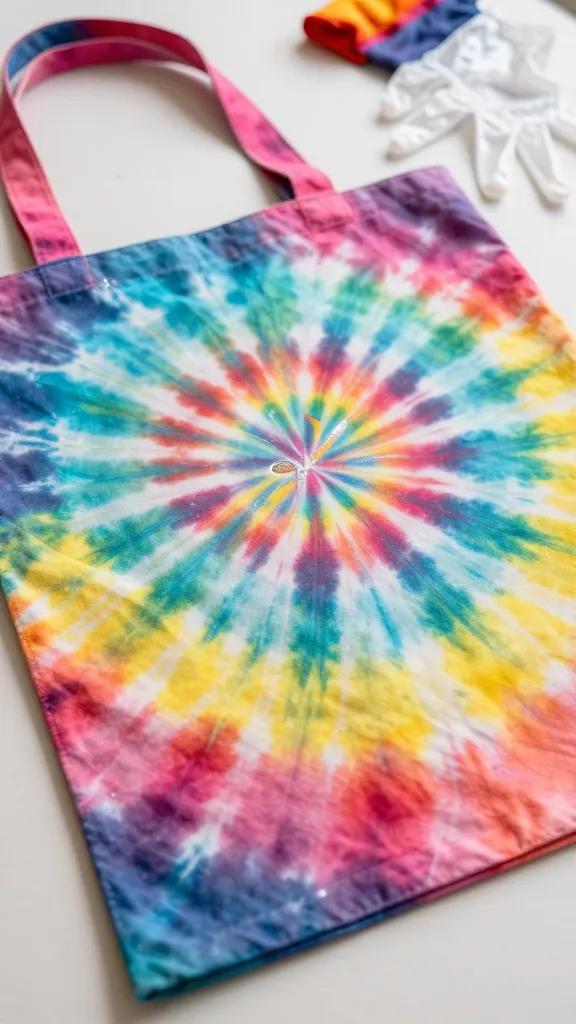
Transport yourself to a retro-chic vibe with a tote that’s both practical and totally aesthetic. The tie-dye gives personality, while a sprinkle of glitter adds that sparkle drama.
Materials Needed
- Plain canvas tote
- Fabric dye in 2–3 colors
- Rubber bands
- Fabric glitter or metallic paint
- Plastic gloves
How to Make It
- Create a classic tie-dye pattern on the tote and let dry.
- Trace or lightly paint a small, center emblem with glitter or metallic paint for a pop.
- Heat-set or let dry completely before use.
Pro Tips / Styling Ideas
- Pair with a denim jacket for a cohesive retro look.
- Use as a school tote or pool bag—the glitter stays fun, not messy.
Who’s this for? The athleisure-loving, color-craving teen who wants portable art they can carry everywhere.
3. Marble Foam Coaster Set
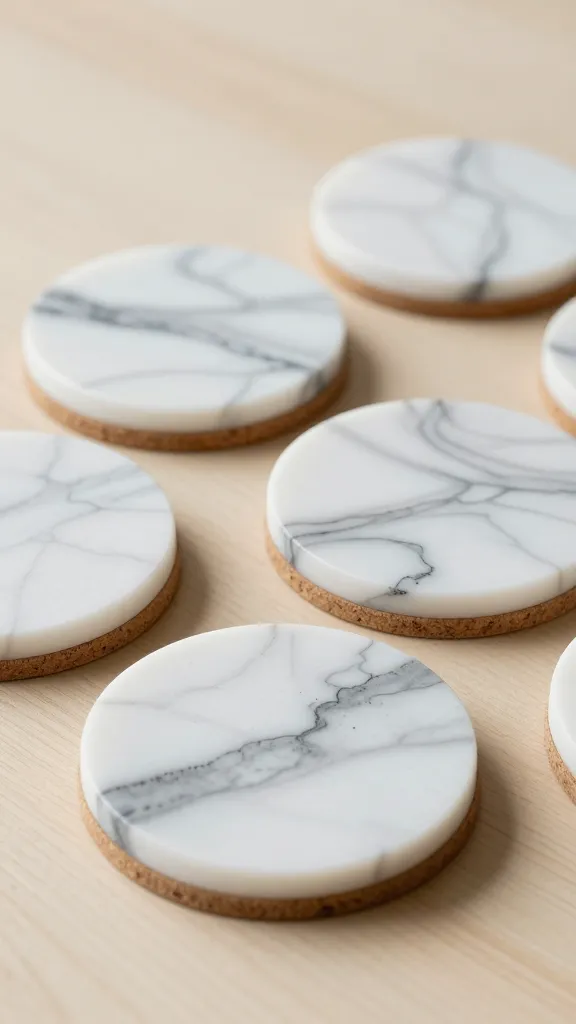
Coasters aren’t just functional; they’re tiny canvases. This marble look is clean, classy, and says “put-together” without effort.
Materials Needed
- Circular cork or wooden coasters (4–6)
- Acrylic paints: white, gray, black
- Wedge sponge or toothbrush for texture
- Sealant spray
How to Make It
- Paint a marble swirl on each coaster using white as the base, with gray and black veining.
- Use a sponge or toothbrush to flick tiny dots for texture.
- Seal once dry to protect the finish.
Pro Tips / Styling Ideas
- Group them with a plant for a chic coffee corner vibe.
- Mix with metallics for a glam desk setup.
Who’s this for? Anyone who loves a minimal, luxe look with zero fuss. They make great gifts, too.
4. Faux Ceramic Planter Plan
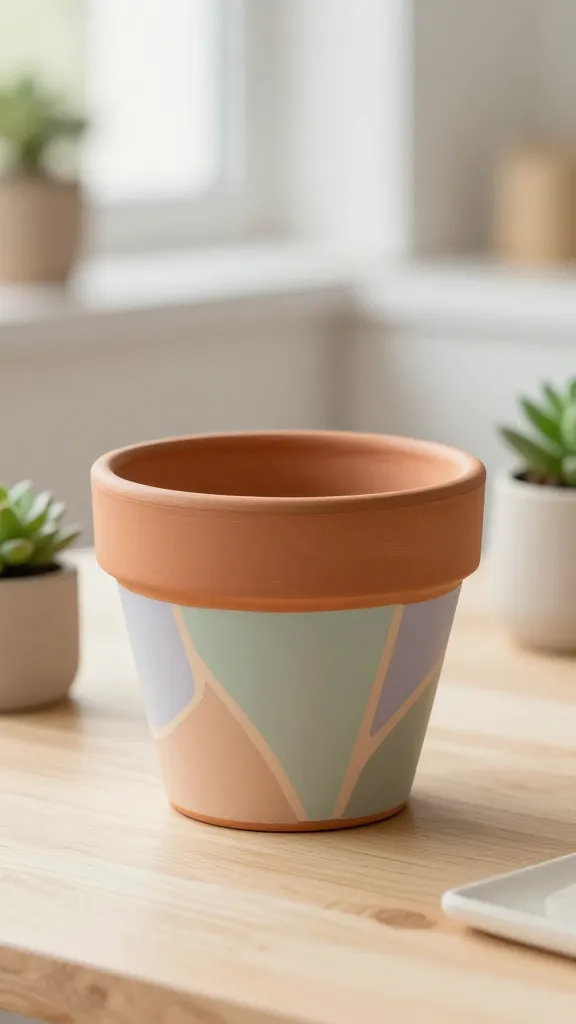
Plant lovers, this one’s for you. A faux ceramic planter look creates a polished finish without breaking the bank or requiring kiln time.
Materials Needed
- Small terracotta pot or plastic pot
- Acrylic paints in earthy tones or pastel hues
- Painter’s tape
- Matte sealant
How to Make It
- Paint base color and add geometric tape sections for a segmented look.
- Paint lines between sections in a contrasting color for a faux ceramic vibe.
- Seal for long-lasting wear.
Pro Tips / Styling Ideas
- Pair with a small succulent or air plant for instant cute decor.
- DIY gift option—personalize with initials or tiny doodles.
A perfect pick for… shelves, desks, or windowsills that need a touch of botanical chic.
5. Neon Ribbon Wall Banner
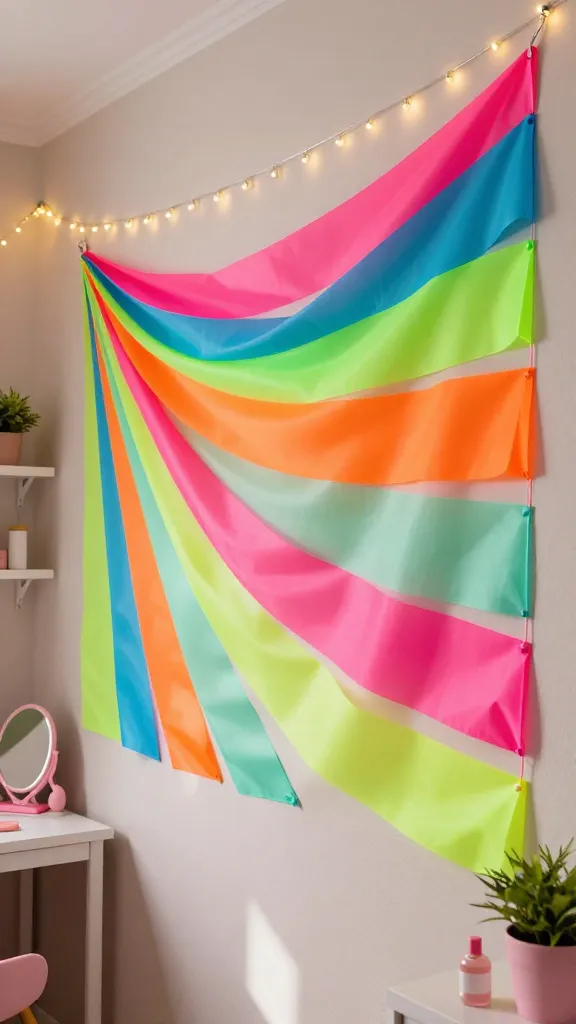
Bright, punchy, and totally teen-approved, this banner bursts with color and personality. It’s lightweight, easy to customize, and perfect for a dorm or bedroom wall.
Materials Needed
- Princess-cut or rectangular craft banner base
- Rolls of neon ribbon or yarn
- Glue gun or double-sided tape
- Optional letter stickers or fabric markers
How to Make It
- Attach neon ribbons in a layered, overlapping pattern to the banner base.
- Write a word or phrase in bold letters (e.g., “Glow,” “Vibe,” “Dream”).
Pro Tips / Styling Ideas
- Co-host a mini DIY party with friends and compare ribbon combos.
- Hang above a desk to inspire daily study sessions.
Who’s this for? The typography lover who wants a playful focal point that’s easy to swap out.
6. Minimalist Monochrome Plant Hanger
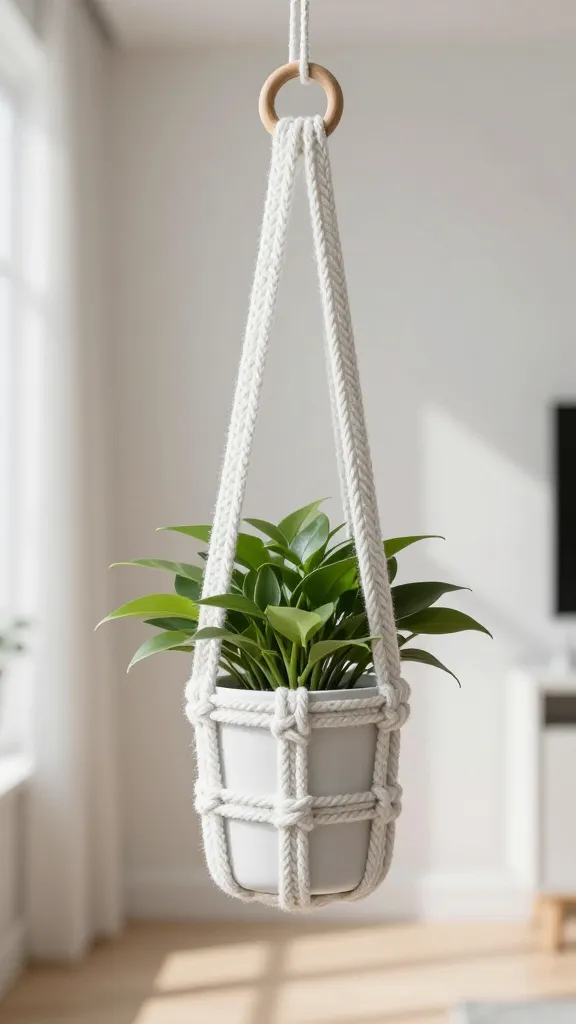
Elevate your greenery with a clean, modern plant hanger. It looks high-end but is totally doable with simple knots and a single color palette.
Materials Needed
- Courtyard twine or cotton cord
- Small potted plant
- Wooden ring (optional)
- Scissors
How to Make It
- Cut multiple cords to equal lengths and tie a series of square knots to form a cradle.
- Secure to a wall hook or ceiling with a simple hanging knot.
Pro Tips / Styling Ideas
- Experiment with different knot densities for a unique texture.
- Display a tiny air plant for a low-maintenance delight.
Who’s this for? The minimalist in your life who loves a subtle, sculptural touch.
7. Painted Glass Jar Lanterns
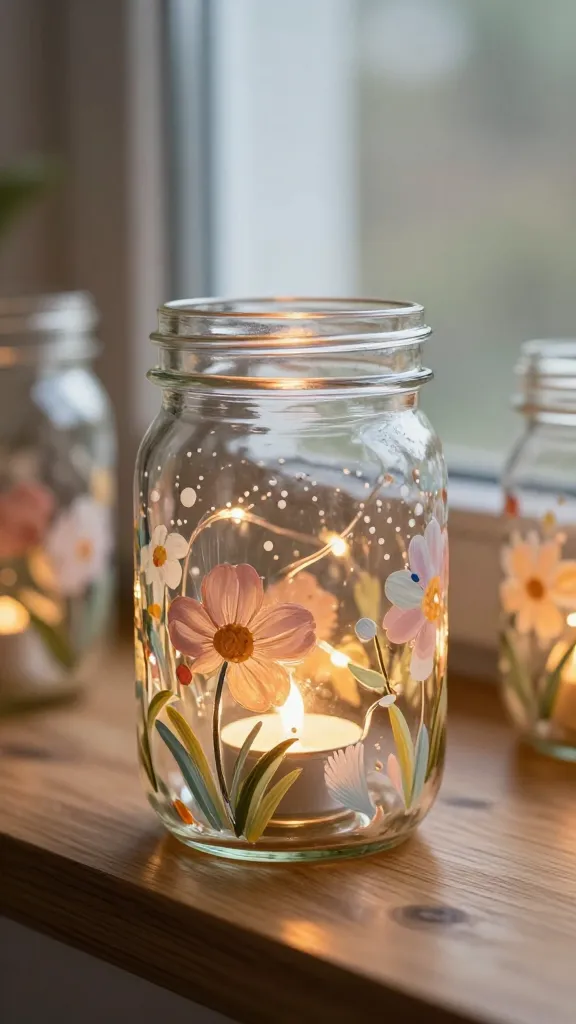
Carry a soft, warm glow with hand-painted glass jars. It’s a cozy, inexpensive way to create ambient lighting you’ll want to snap for photos.
Materials Needed
- Mason or old glass jars
- Acrylic paint or glass markers
- Paintbrushes or sponges
- Tea lights or LED fairy lights
How to Make It
- Paint decorative patterns—dots, stripes, or floral motifs—on the outside of the jars.
- Layer colors for depth and seal with clear acrylic spray.
Pro Tips / Styling Ideas
- Line a windowsill or coffee table for a warm, magical glow.
- Group three for a charming centerpiece at a party.
Who’s this for? The romantic, cozy vibe seeker who loves soft, ambient lighting.
8. Popsicle Stick Photo Frame With Resin Notes
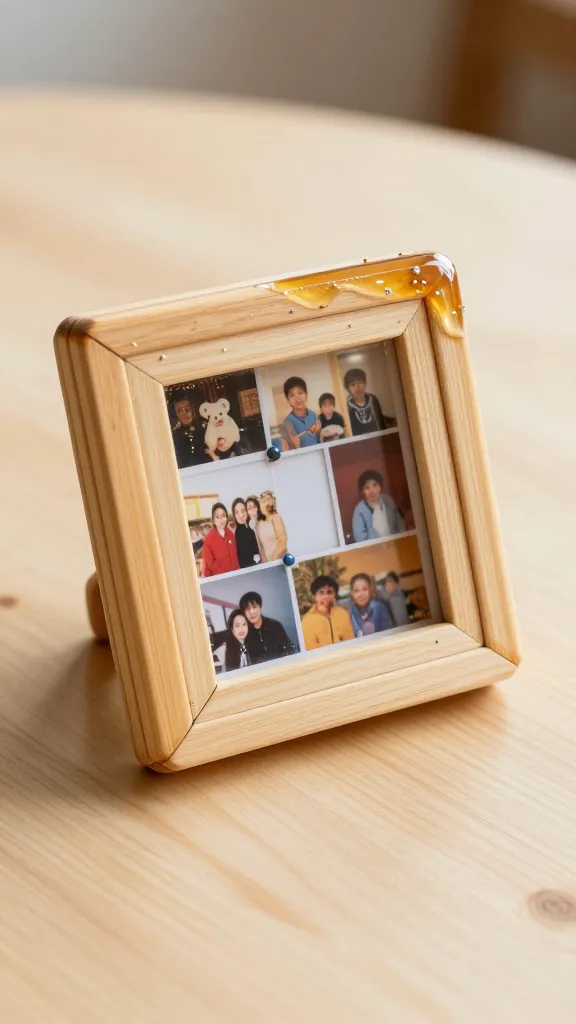
Turn everyday craft sticks into a chic frame that holds mini memories. Resin notes add a glossy, high-end finish without studio time.
Materials Needed
- Popsicle sticks
- Glue, hot glue gun
- Mini photos or printouts
- Clear resin or mod podge
- Small decorative elements (glitter, beads)
How to Make It
- Arrange sticks into a frame shape and glue together.
- Fill the inner edge with photos, then seal with resin or mod podge. Add decorative bits for flair.
Pro Tips / Styling Ideas
- Make a set of four frames in different color palettes for a gallery wall.
- Use as a fabulous dorm desk photo shelf.
Who’s this for? The nostalgic crafter who loves a tiny, stylish keepsake.
9. Dreamy Glitter Glass Bottles
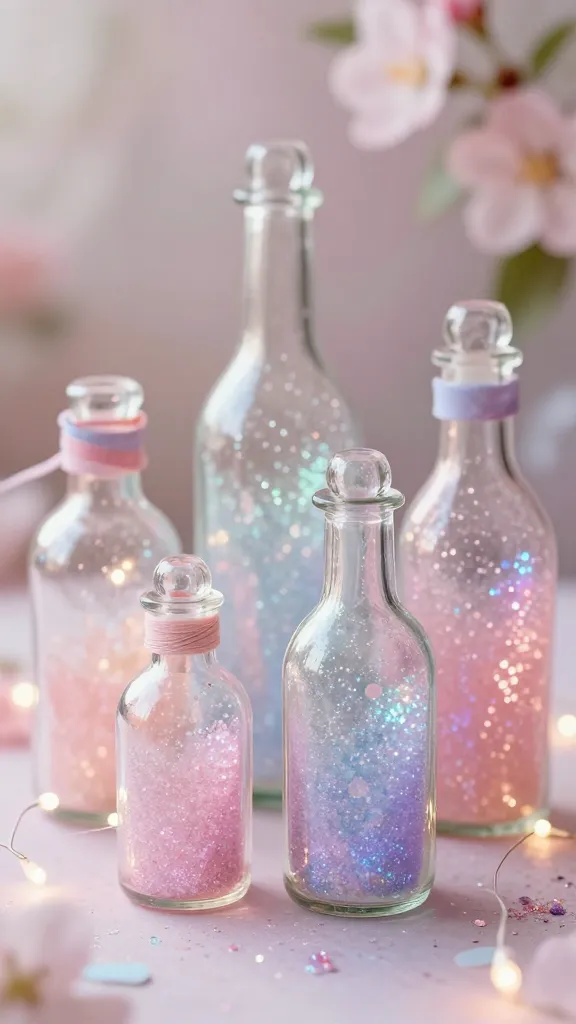
Transform ordinary bottles into sparkling, dream-like décor pieces. It’s an easy makeover with high-glam impact.
Materials Needed
- Clear glass bottles
- Glue or decoupage medium
- Fine glitter in your preferred colors
- Ribbon or twine for finishing touches
How to Make It
- Coat the outside of the bottle with glue and roll in glitter for a flawless finish.
- Wrap with ribbon or twine at the neck for extra charm.
Pro Tips / Styling Ideas
- Place with pastel florals or fireflies string lights for a fairy-tale vibe.
- Use as a desk accent or a nightstand ornament.
Who’s this for? The sparkler at heart who loves a little glam in everyday items.
10. Cozy Knit Wall Hanging
Combine texture and color with a simple knit wall hanging. It’s plush, tactile, and instantly elevates a bare wall.
Materials Needed
- Mini loom or wooden dowel
- Aran yarn in 2–3 colors
- Scissors
- Optional beads or tassels
How to Make It
- Slip stitches onto a loom or wrap yarn around a dowel to create a textured fabric.
- Finish with a clean fringe and, if you like, add beads for sparkle.
Pro Tips / Styling Ideas
- Hang above a mirror or bed for a cozy, hygge vibe.
- Swap colors seasonally to keep the look fresh.
Who’s this for? The texture hunter who loves cozy comfort with a modern edge.
11. Neon Quote Poster Collage
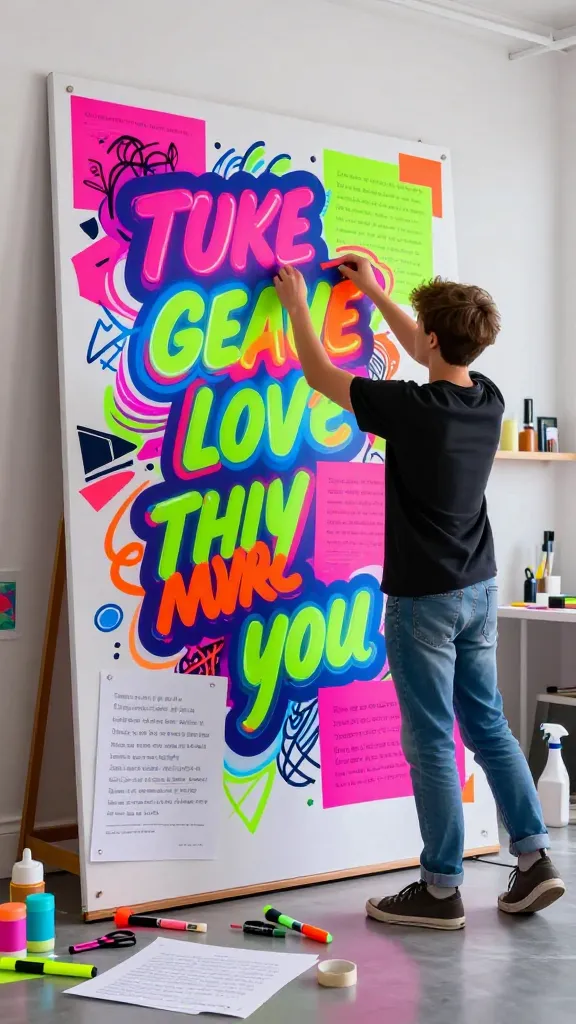
A bold, kinetic collage that screams personality. Neon hues meet inspirational quotes for a punchy visual statement.
Materials Needed
- Poster board or canvas
- Printed quotes in your font of choice
- Neon acrylic paints or colored markers
- Scissors, glue, tape
How to Make It
- Arrange quotes in a dynamic composition, fill with neon accents, and add doodles around the edges.
- Seal with a light spray to keep colors vibrant.
Pro Tips / Styling Ideas
- Lean against a wall or hang as a bold centerpiece above a dresser.
- Use as a graduation or friend gift with a personal message.
Who’s this for? The bold communicator who loves typography, color, and positive vibes.
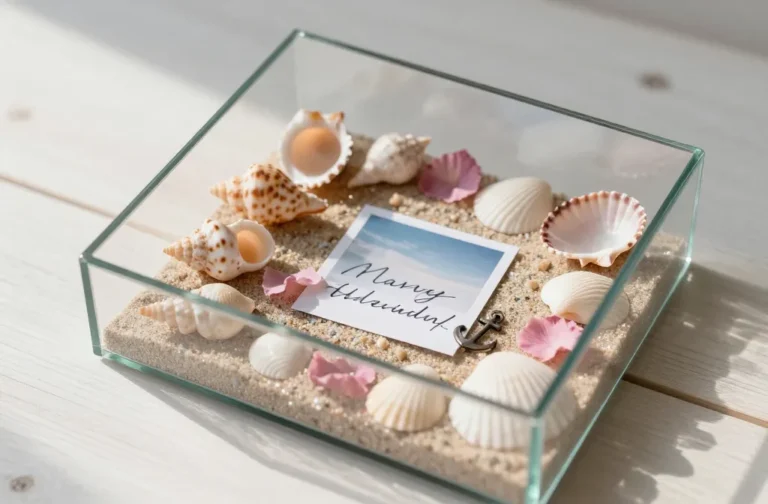
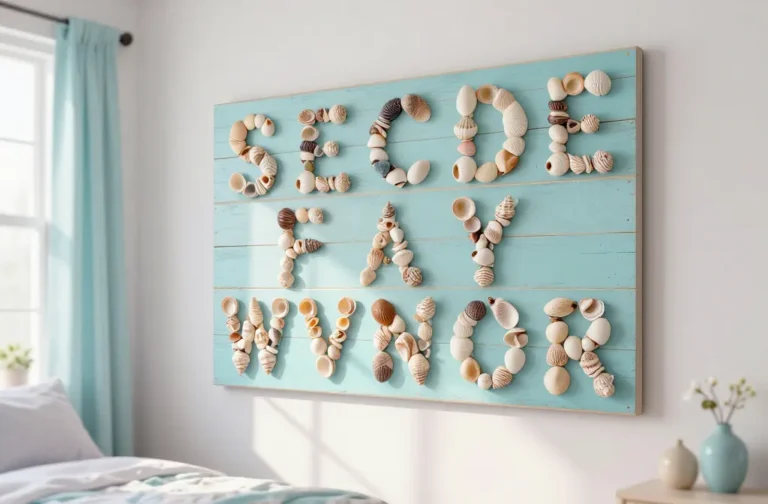
12. Sand-Textured Beach Box
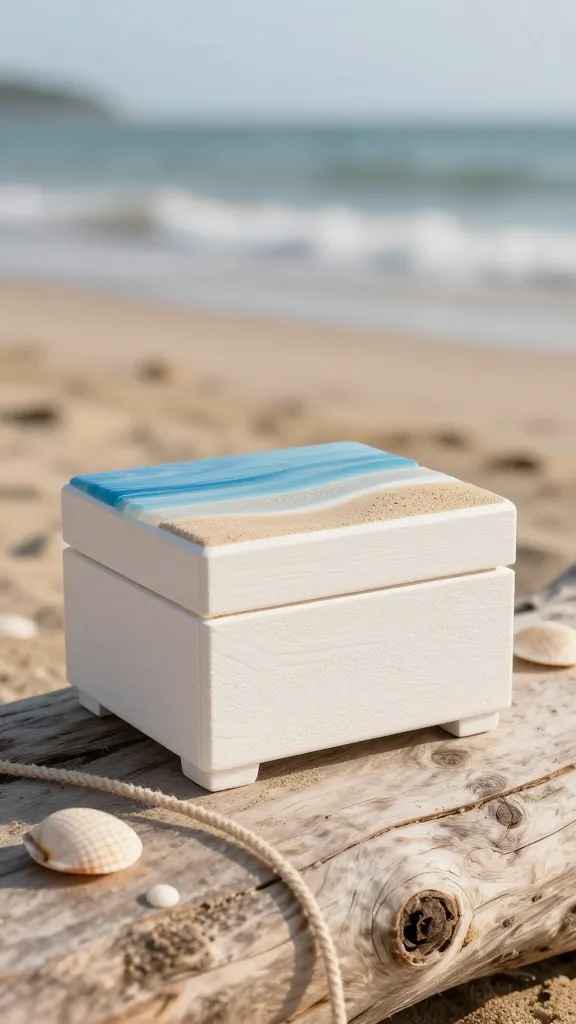
Channel coastal calm with a small decorative box that mimics a sunlit beach. Texture and color combine for a serene focal piece.
Materials Needed
- Small wooden box
- Gesso or white acrylic paint
- Sand (optional) and acrylic paints in soft blues and beige
- Clear sealant
How to Make It
- Paint the box in white, then add a sand-textured finish using a glue-and-sand mix or a textured paint.
- Layer soft blue hues on the lid and sides for a beachy look.
Pro Tips / Styling Ideas
- Store keepsakes, jewelry, or trinkets; it also makes a calming nightstand touch.
- Pair with a shell collection for a cohesive sea-inspired scene.
Who’s this for? The daydreamer who loves memory-keeping with a seaside feel.
13. Metallic Leaf Desk Organizer
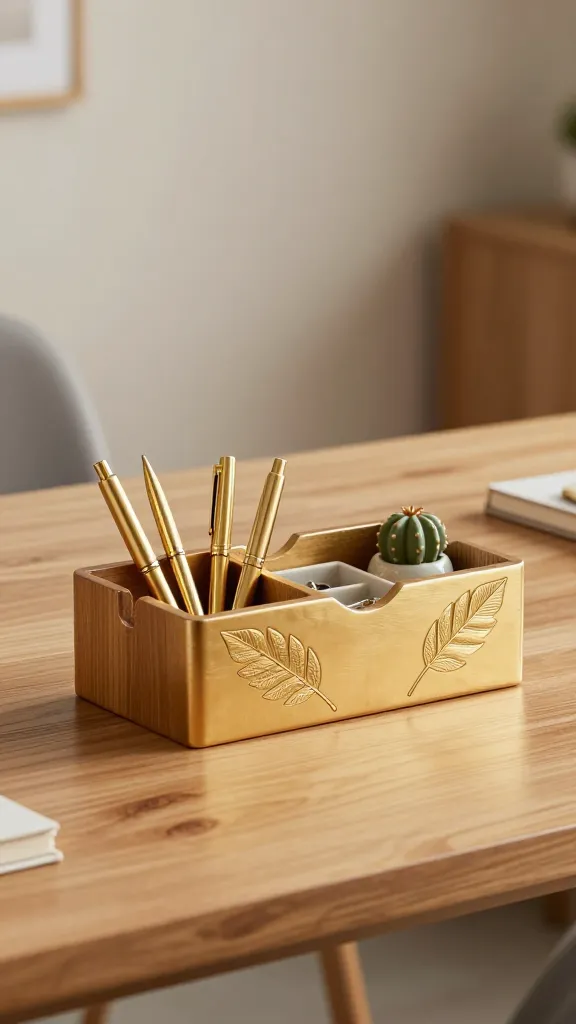
Upgrade your study zone with a gold-leaf themed organizer. It’s chic, organized, and surprisingly easy to achieve.
Materials Needed
- Plain wooden desk organizer or paintable caddy
- Gold metallic paint or foil sheets
- Adhesive glue or spray
How to Make It
- Paint or wrap sections with metallic accents; add a few leaf motifs for that nature-inspired luxury look.
- Seal to protect the finish from daily use.
Pro Tips / Styling Ideas
- Use as a desk cactus, pen holder, and jewelry tray hybrid.
- Place in a monochrome setting to let the metallic pop shine.</p
Who’s this for? The student organizer who loves a touch of glam without going overboard.
14. Hand-Painted Ceramic Tiles Coasters
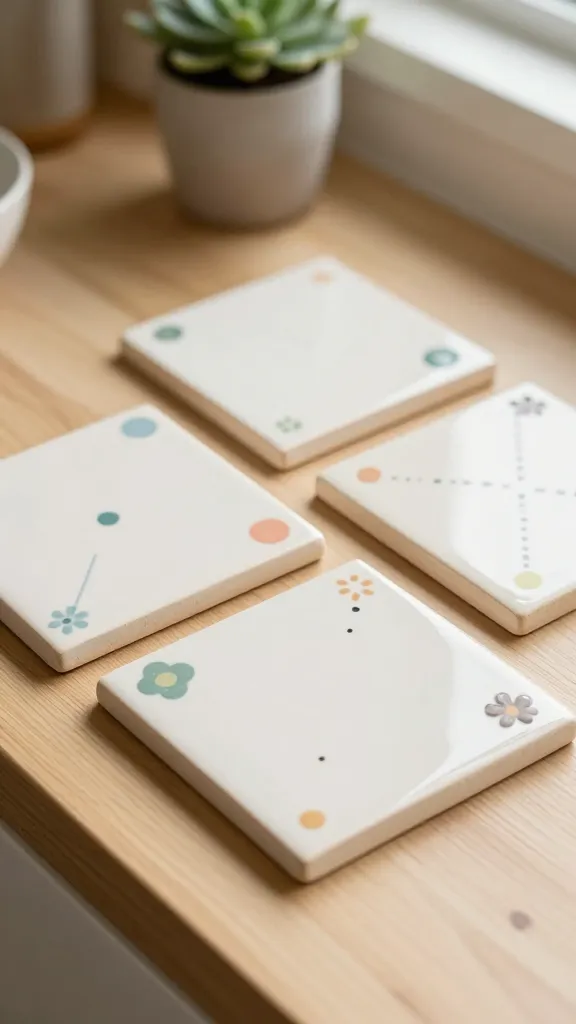
Make a mini tile set you can actually use. Hand-painted motifs give a bespoke look that’s totally Instagram-worthy.
Materials Needed
- Plain ceramic tiles (4×4 inches)
- Ceramic paint or enamel markers
- Clear sealant
- Felt pads (on the bottom)
How to Make It
- Paint simple motifs—dots, lines, tiny flowers—on each tile.
- Seal and add felt pads to protect surfaces.
Pro Tips / Styling Ideas
- Group with a small plant for a sunny kitchen vignette.
- Gift set: three to six tiles with a coordinated color palette.
Who’s this for? The color-curator who loves a cohesive, handmade set you can actually use daily.
15. DIY Dotted Throw Pillow
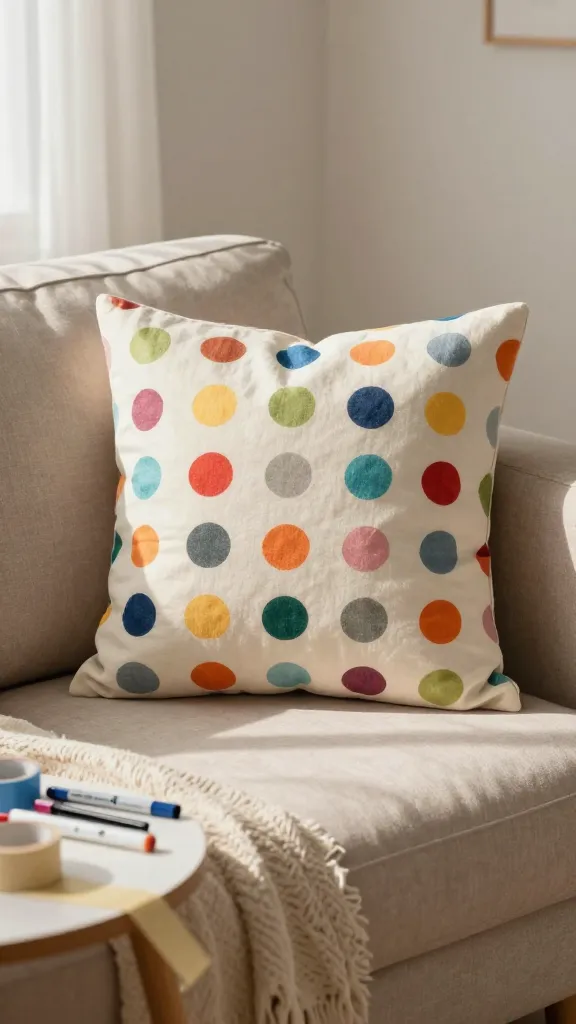
End on a soft, comfy note with a throw pillow decorated in playful dots. It’s cozy, cheerful, and instantly elevates couch vibes.
Materials Needed
- Plain fabric pillow cover or small cushion
- Fabric paint or markers in contrasting colors
- Masking tape (optional)
How to Make It
- Plan a dots pattern, then apply evenly spaced dots across the front.
- Let dry and, if needed, heat-set with an iron (check fabric instructions).
Pro Tips / Styling Ideas
- Pair with a textured throw for a cozy, layered look.
- Use seasonal color palettes to refresh your space without a full redo.
Who’s this for? The cozy decorator who loves playful patterns and a soft touch in the room.
Conclusion
These 15 aesthetic craft ideas painting for teens are all about quick, satisfying wins that look incredibly stylish. Pick a project, grab your supplies, and watch your space transform in a matter of hours. Ready to try one—or all of them? Your future Pinterest boards will thank you, and your room will too.