5 Easy Toilet Paper Roll Crafts for Beginners
Looking for simple, satisfying DIYs that spark joy without clutter or chaos? These 5 easy toilet paper roll crafts prove you don’t need fancy supplies to create something charming. trust me, they’re addictive, cute, and perfect for beginners who want quick wins.
1. Mini Cardboard Garden: Painted Planter Ornaments
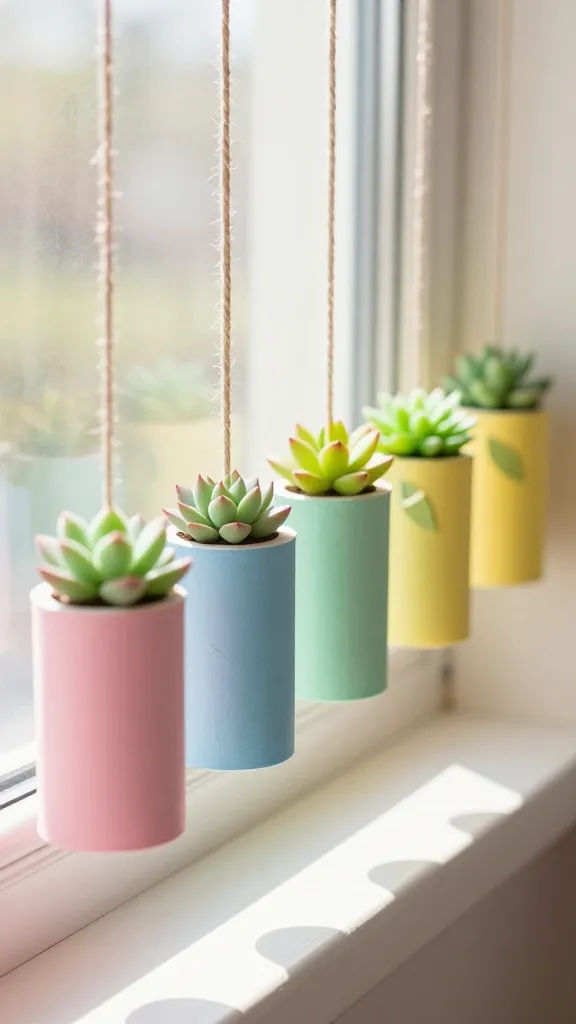
Picture a row of tiny hanging planters brightening a window sill or balcony. This little garden uses empty rolls as the pot bodies, painted in cheerful hues with tiny faux plants peeking out. It’s quirky, whimsical, and totally Instagram-ready.
Materials Needed
- Toilet paper rolls (6–8 for a set)
- Acrylic craft paints in your chosen palette
- Paintbrushes (thin for details)
- Twine or thin string for hanging
- Hot glue gun or craft glue
- Fake mini succulents or tiny paper-cut leaf decorations
How to Make It
- Cut each roll in half to create short, squat pots.
- Paint the outer surfaces with your base color. Let dry, then add accents like stripes, polka dots, or a tiny top rim glow.
- Attach a small loop of twine near the top edges with glue for hanging purposes.
- Fill with a few faux succulents or attach paper leaves to the open ends to simulate greenery.
- Display them in a sunny spot, grouped in a row or staggered for visual rhythm.
Pro Tips / Styling Ideas
- Use metallic paints for a luxe look or pastel tones for a soft vibe.
- Keep the color palette cohesive with your room—think mint, blush, and cream.
- Pair with tiny chalkboard labels for a playful garden theme.
Who will love it: Anyone craving a cheerful, lightweight decor upgrade. Perfect for a sunny kitchen nook or a friend’s plant-loving gift basket.
2. Cozy Cable-Knit Photo Frame: Rolled-Up Roll Keepsake
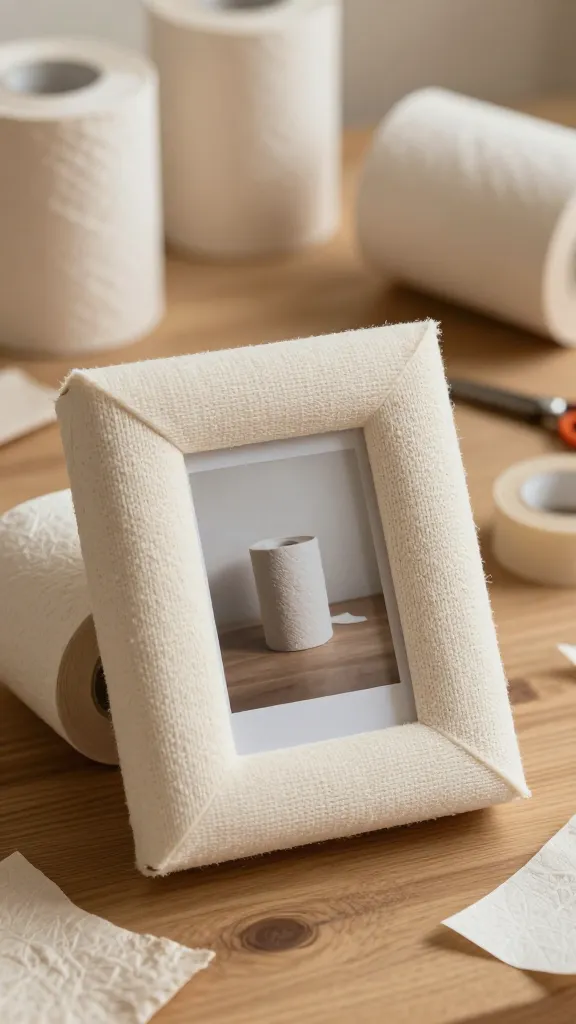
Imagine gifting or framing a favorite portrait in a frame that feels cozy and handmade—without buying a new frame. This project wraps a simple toilet paper roll with textured paper to mimic a knit texture, then houses a photo inside. Seriously, it’s snug, stylish, and surprisingly sturdy.
Materials Needed
- Toilet paper rolls (2–3, depending on size)
- Textured paper or scrapbooking paper (cream or warm neutrals work well)
- Double-sided tape or craft glue
- Scissors
- Small photo (2×3 inches) and a tiny piece of backing cardboard
- Optional: ribbon for hanging
How to Make It
- Cut a roll to a height that suits your photo. Wrap the outside with textured paper, securing with tape as you go to mimic a knit stitch line.
- Trim so the top and bottom edges reveal a neat border. Glue a photo behind the opening, using a backing piece for extra rigidity.
- Optionally thread a ribbon around the top and knot for a hanger.
Pro Tips / Styling Ideas
- Use warm beige or ivory tones to emulate real knit fabric.
- Pair with a soft, matte frame base on a shelf or mantel.
- Switch photos seasonally for a quick, cozy display update.
For who it’s perfect: memory-keepers, homemakers, and gift-givers who adore warm, tactile designs. It’s a tiny treasure that warms any space.
3. Festive Lanterns: Jeweled Nightlight Orbs
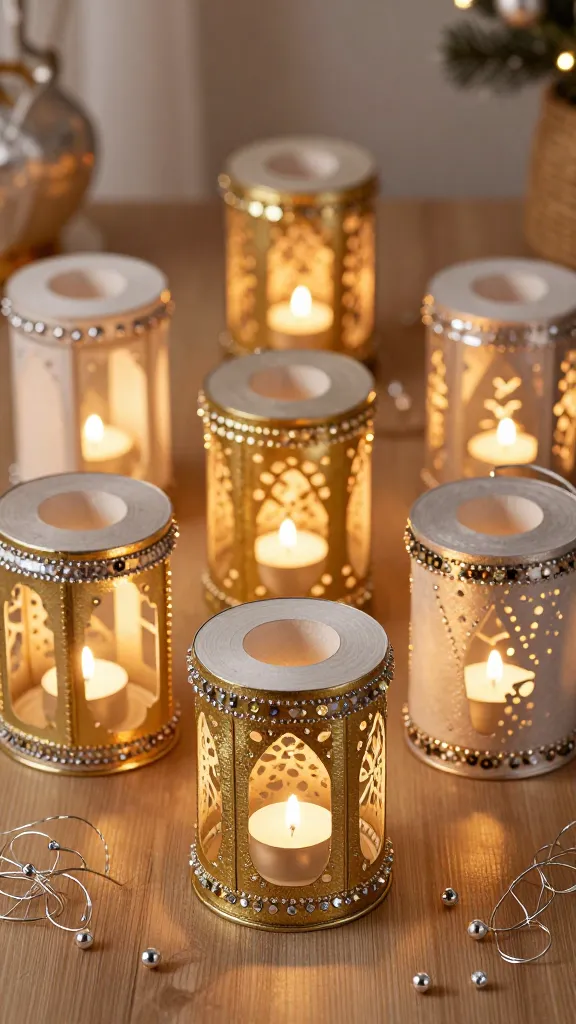
Turn ordinary toilet paper rolls into tiny lanterns you can light with a battery-powered candle or fairy lights. The finish is soft and decorative, with a crisp silhouette that shines on shelves or tabletops. It’s the kind of project you’ll want to show off during gatherings.
Materials Needed
- Toilet paper rolls (4–6 per set)
- Water-based acrylic paints in metallic shades
- Gold or silver craft beads, rhinestones, or sequins
- Glue (hot glue or strong craft glue)
- Votive candles or LED tea lights
- Thin string for hanging (optional)
How to Make It
- Paint the roll in your chosen metallic color. Let dry completely.
- Dab glue on random places and sprinkle beads or rhinestones to create a dotted lantern pattern.
- Stack or hang them in a cluster with LED lights inside for a soft glow.
Pro Tips / Styling Ideas
- Use in a fall tablescape with warm amber lights; switch to silver for winter chic.
- Line a doorway shelf with several of varying heights for visual depth.
- Keep the lights dimmed to maximize the lantern’s ambiance.
Who should try: party hosts, décor lovers, and anyone who wants a low-cost, high-impact glow. These little orbs are instant mood-lifters.
4. Whimsy Animal Garlands: Coral, Cat, and Bird Buddies
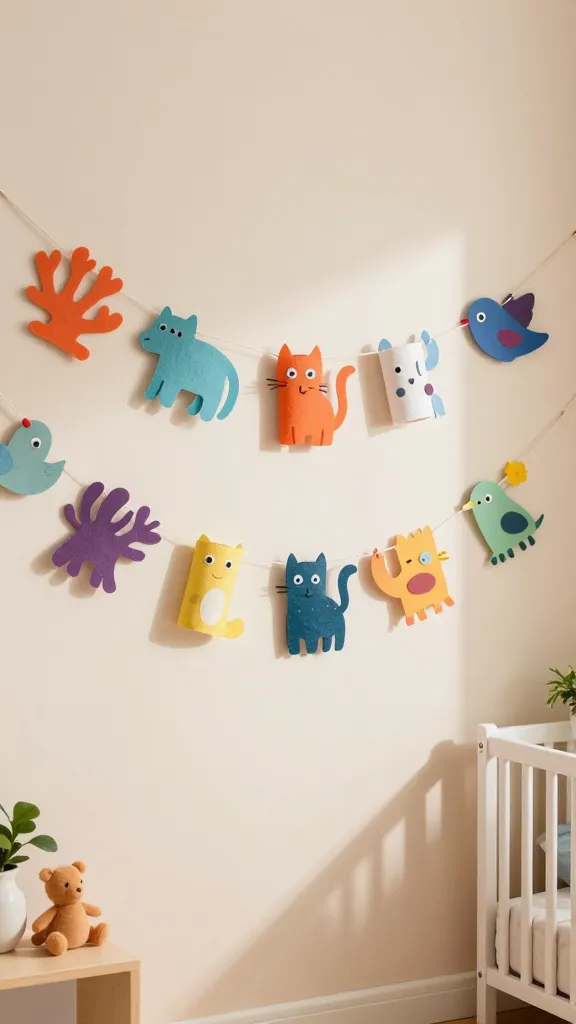
Give your walls a playful punch with a garland that turns simple tubes into animal silhouettes. With a few crafty tweaks, you can create a coral reef of critters or a tiny zoo to decorate a nursery, classroom corner, or kids’ room. It’s whimsical, reusable, and easy to customize.
Materials Needed
- Toilet paper rolls (6–12, depending on length)
- Colored paper or felt scraps
- Scissors, glue, and a small amount of string
- Googly eyes, pipe cleaners (optional for added character)
How to Make It
- Flatten a roll to create a base and cut shapes for animal bodies—round for fish, triangular for birds, square for bears, etc.
- Glue on colored paper or felt to form faces and features. Add eyes and tiny ears or fins with extra scraps.
- String the finished critters along a piece of twine or ribbon to hang as a garland.
Pro Tips / Styling Ideas
- Keep the color palette cohesive for a polished look, or go bold with a rainbow of critters for a playful vibe.
- Use the garland to mark a birthday banner or a baby shower backdrop.
- Mix textures—felt, paper, and metallic accents make it visually rich.
Who’ll love it: creative families, classrooms, and anyone who wants a joyful, budget-friendly décor piece that doubles as a kids’ craft project.
5. Soft Sugar-Top Snow Globes: Whimsical Winter Keepsakes
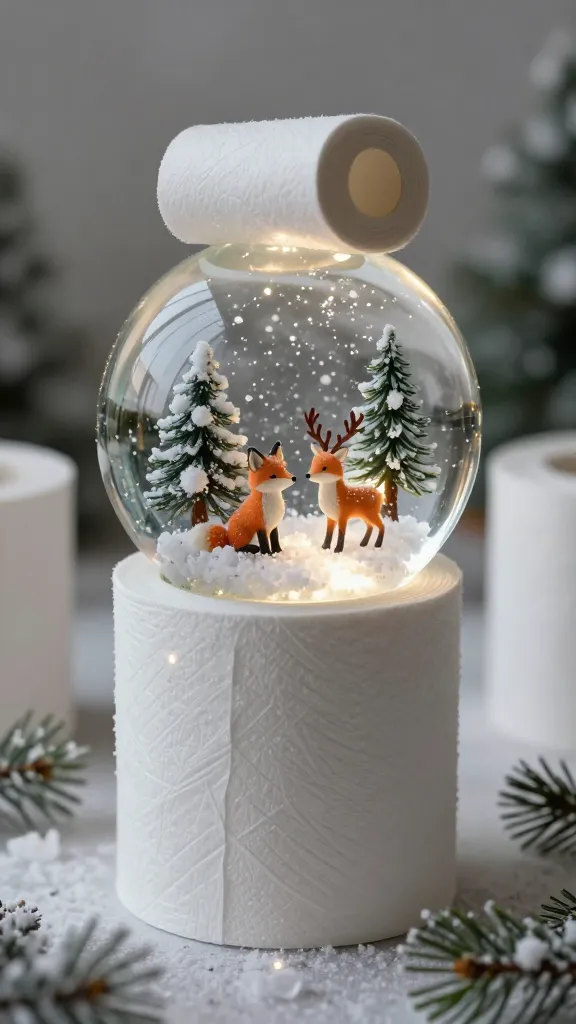
Yes, you can make tiny snow globes using toilet paper rolls instead of glass jars. Think shredded paper “snow,” a tiny ornament perched inside, and a little domed lid that you can lift to reveal the scene. It’s charming, nostalgic, and surprisingly simple to assemble.
Materials Needed
- Toilet paper rolls (4–6 per globe)
- White tissue paper or cotton batting for “snow”
- Miniature figures or scene pieces (tiny animal or reenactment miniatures)
- Clear plastic or glass-like dome (optional) or sturdy plastic lids
- Hot glue or strong craft glue
- Ribbon or twine for hanging
How to Make It
- Fill the bottom of the roll with a small pile of shredded tissue to simulate snow.
- Position a tiny scene piece inside and secure with glue so it stays upright.
- Top with a dome or cap, sealing with glue, and add a hanging loop if desired.
Pro Tips / Styling Ideas
- Keep the scenes seasonal—snowy landscapes for winter, turkey and pumpkins for fall, or celebratory miniatures for birthdays.
- Place on a mantel, shelf, or as a table centerpiece with a sprinkling of fake snow around them.
- Personalize with initials or year stamps for a keepsake gift.
Who would adore it: cozy homebodies, gift-givers seeking heartfelt mementos, and anyone who wants a touch of whimsy in their winter decor.
Conclusion
These 5 Easy Toilet Paper Roll Crafts for Beginners prove that a simple roll can spark big creativity. Each project brings charm, personality, and a sense of accomplishment without overpowering your space. Pick one (or all) and dive in—trust me, you’ll finish with a smile and a tiny treasure you’ll want to show off.