5 Mind-Blowing DIY Science Activities for Kids
Hey crafty scientists, ready to blast off into a world where mess equals magic? These five DIY science activities are kid-tested, parent-approved, and surprisingly easy to pull off with everyday goodies. Trust me, they’re the kind of projects that spark wow moments and giggles in equal measure.
1. Fizzy Ocean in a Jar: Colorful Chemical Reactions You Can See
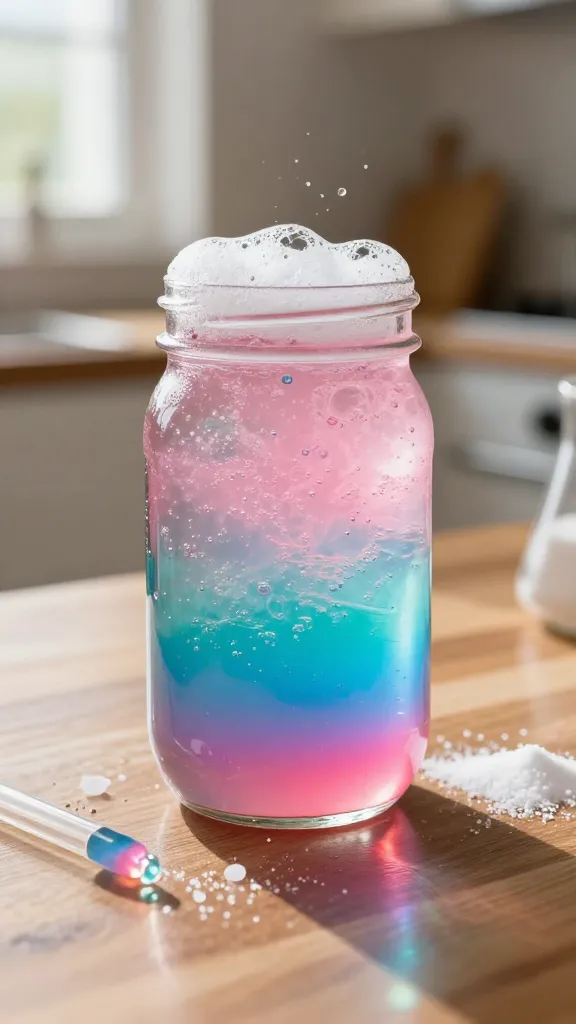
Imagine a vibrant underwater scene exploding with color as tiny bubbles race to the surface. This Fizzy Ocean in a Jar brings the science of acids and bases to life with a splash of creativity. It looks stunning on a shelf and doubles as a calming, diagnostic science moment after school.
- Materials
- Clear jar or glass container
- Water
- Baking soda
- Vinegar
- Food coloring (various bright shades)
- Dish soap (optional, for extra bubbles)
- Plastic dropper or straw
- Tools
- Measuring spoons
- Tray to catch spills
- Key steps
- Fill the jar with water, add a few drops of food coloring to create a vivid “ocean.”
- Stir in a spoonful of baking soda until it’s dissolved for the base fizz.
- Drip in vinegar slowly and watch the colored bubbles swirl and rise—color mix magic!
- Add a drop of dish soap for extra foamy waves.
Colors, bubbles, and a little science drama—what’s not to love? This makes a fantastic centerpiece for a science-themed playdate or a rainy-day experiment corner. Kids will adore pouring vinegar and watching the fizzy tide roll in. FYI, it’s a crowd-pleaser for curious tweens and younger kids alike.
Who would love it: budding chemists, mindful organizers who like pretty jars, and anyone who wants a portable, snack-free science show.
2. Solar Suncatcher Stones: Light-Activated Art That Grows With the Sun
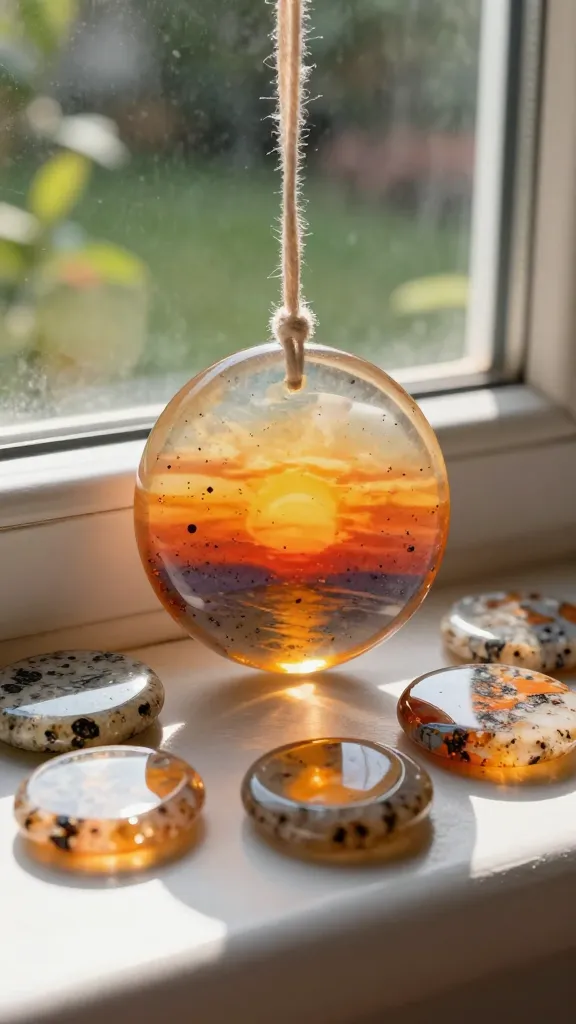
Turn ordinary stones into shimmering, sun-charged art. Solar Suncatcher Stones fuse minerals, color, and sunlight to create a glowing display you can place on windowsills, garden beds, or classroom shelves. It’s art you can literally feel the science behind.
- Materials
- Flat, smooth stones (washed and dry)
- Acrylic paints or permanent markers
- Clear UV resin or sealant (optional for extra shine and durability)
- Small paintbrushes or sponges
- Thin ribbon or twine for hanging (optional)
- Tools
- Paper towels for clean edges
- Key steps
- Wash stones and let them dry completely.
- Paint vibrant designs with sun-catching colors—think bright yellows, oranges, and blues.
- Seal with UV resin or a clear sealant to make colors pop and resist weathering (if placing outside).
- Optionally drill a tiny hole and thread ribbon for hanging.
Watch the colors “wake up” when the sun hits. The glow is subtle but mesmerizing, giving a kid-friendly lesson in how light energy stores and releases. It’s a perfect gift topper, window decor, or a sunny-day classroom display. Seriously, you’ll see the room brighten as these stones catch light.
Who would love it: visual learners who adore color, plant lovers sprucing up planters, and anyone who wants a decorative science project you can display for months.
3. Rainbow Paper Planets: DIY Orbits That Teach Gravity Without a Gravity-Fear
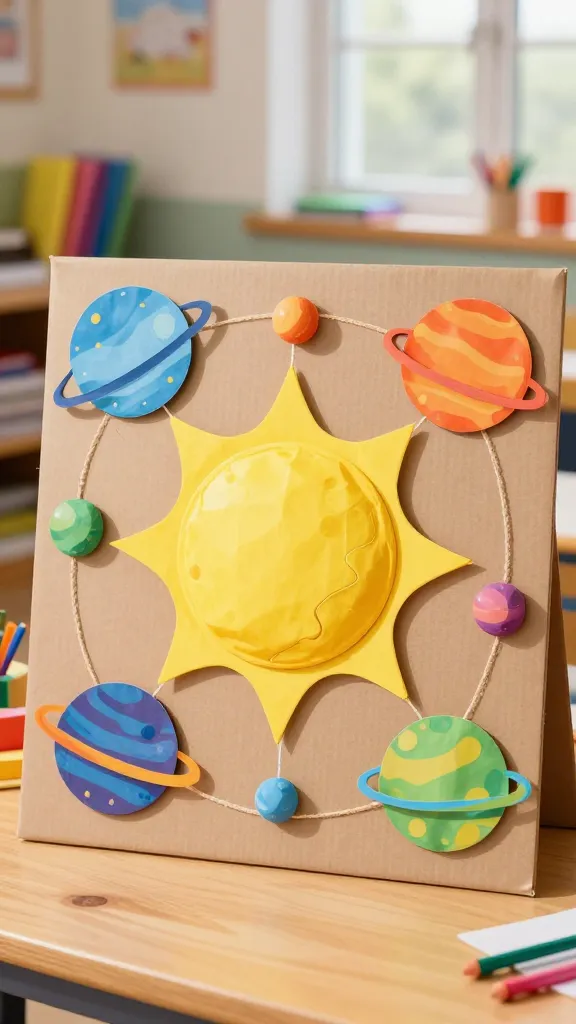
Blast off into space with a hands-on model of the solar system that doubles as a playful classroom display. Rainbow Paper Planets bring planet sizes, colors, and orbits into a single, share-worthy craft. It’s the kind of project you’ll want to photograph from every angle.
- Materials
- Colored construction paper or cardstock
- Scissors
- Markers or gel pens
- String or yarn
- Glue or glue sticks
- A large poster board or paper for the “sun”
- Tools
- Ruler
- Circle template or compasses
- Key steps
- Cut out circles of varying sizes for the planets, then color and label each one.
- Attach strings to orbit around a central “sun” circle on the poster board.
- Arrange in order by size and distance, with decorative elements like craters or rings drawn on.
The result is a charming, airy wall piece that doubles as a quick astronomy refresher. It’s a great rainy-day project that also works as a learning tool during science weeks. You’ll love how tactile and interactive it feels—plus, it makes for a seriously Pinterest-worthy display.
Who would love it: space enthusiasts, early-grade science teachers, and families who enjoy rotating wall art that educates and delights.
4. Magnetic Marble Run: Build-Your-Own Physics Playground
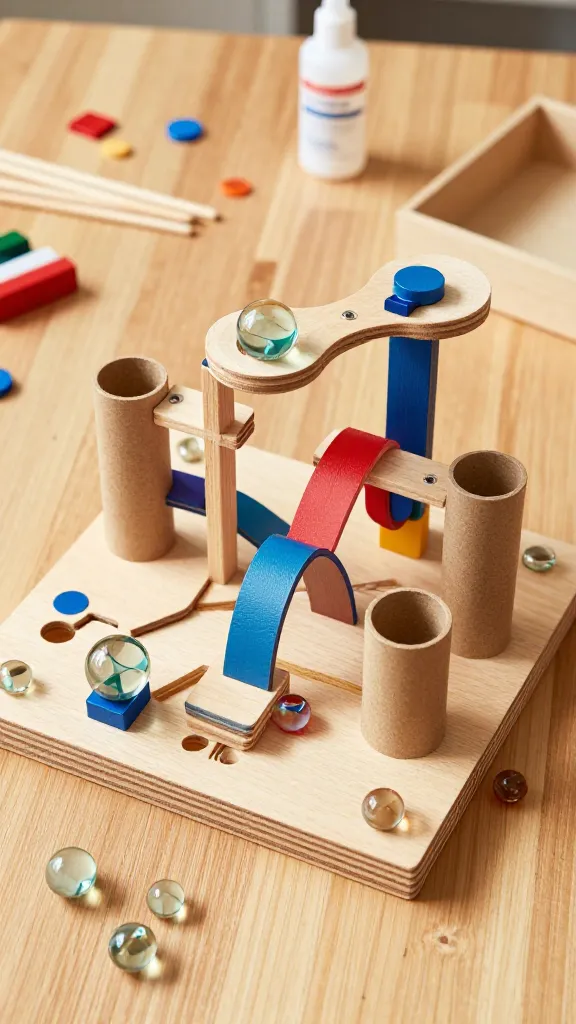
Time to assemble a hands-on physics playground with a Magnetic Marble Run. This project blends magnets, motion, and creative engineering into a portable playset that kids can customize again and again. It’s DIY engineering with a playful twist.
- Materials
- A large sheet or board as base
- Magnetic strips or magnets (strong enough to guide marbles)
- Wooden dowels or cardboard tubes for tracks
- Marbles (varied sizes if possible)
- Strong adhesive or hot glue
- Optional: small discovery cards with challenges
- Tools
- Scissors
- Ruler
- Key steps
- Lay out a base and decide on a few track sections: slopes, curves, and tunnels.
- Attach magnetic guides along the edges to steer the marble’s path.
- Experiment with different track layouts, then glue everything in place.
When the marbles roll and magnets tug the path, the room fills with a satisfying clack of success. It’s not just a craft—it’s a mini science lab where kids predict, test, and revise. Bonus: you can store this as a weekend project you return to for new track ideas. You’ll laugh at the near-misses and cheer at the perfect loops.
Who would love it: future engineers, kids who like puzzles, and families who crave tactile, open-ended play that grows with them.
5. Water-Sapien Bottle: A Pressure-Driven Sensory Science Show
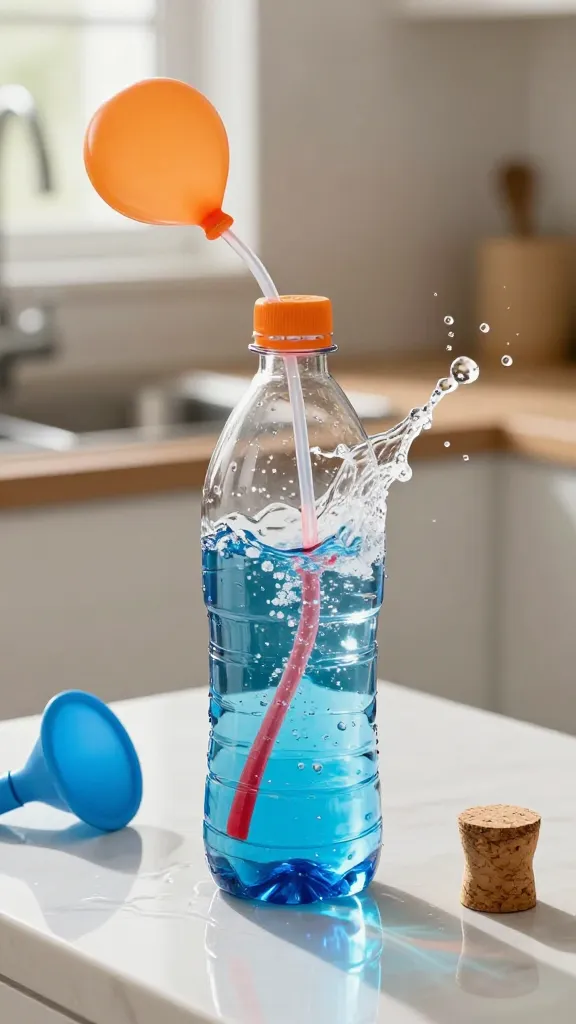
Meet the Water-Sapien Bottle, a mini bottle-rocket of color, air, and pressure that’s silly, splashy, and seriously eye-catching. Through simple physics, kids see how air pressure can push water into a dramatic fountain—no rockets required. It’s a mini science fair exhibit in your kitchen sink.
- Materials
- Plastic bottle (2-liter works great)
- Water
- Food coloring
- Wingnut (or cork) and cork or stopper for the bottle
- Balloon or rubber stopper for extra fizz (optional)
- Tools
- Scissors
- Funnel (optional for easy filling)
- Key steps
- Fill the bottle with a bit of colored water.
- Seal it tightly with the stopper or balloon system.
- Apply gentle pressure by squeezing the bottle or adding a small amount of air to launch the water fountain.
Watch as the “Water-Sapien” erupts in a bubbly plume. It’s goofy, bright, and wildly teachable about air pressure and volume. The effect is surprisingly dramatic for a simple science demo and perfect for a quick show-and-tell or a backyard science party. Seriously, parents will want to try this one again and again.
Who would love it: kinetic learners who crave movement, outdoor-loving kids, and anyone who enjoys giggly, splashy experiments.
Conclusion
These five mind-blowing DIY science activities prove that kids don’t need fancy gear to explore big ideas. They’re colorful, approachable, and infinitely customizable—perfect for a weekend of hands-on learning and playful curiosity. Give one (or all) a try, and watch your little scientists light up with wonder. You’ll love how easy and rewarding these projects are, trust me.