6 Cool Craft Ideas for 10-Year-Olds
Kids love hands-on projects that feel like treasure hunts. These six crafts are bright, easy to finish, and perfectly sized for curious 10-year-olds. Get ready to spark imagination, show off personality, and maybe even spark a little friendly competition with a “who wore it best” twist.
Trust me, these projects are approachable, fun, and totally Pinterest-worthy. Let’s dive into six completely unique ideas that will have hands busy, hearts happy, and tabletops gleaming with color.
1. Glow-in-the-Dore Dreamcatchers
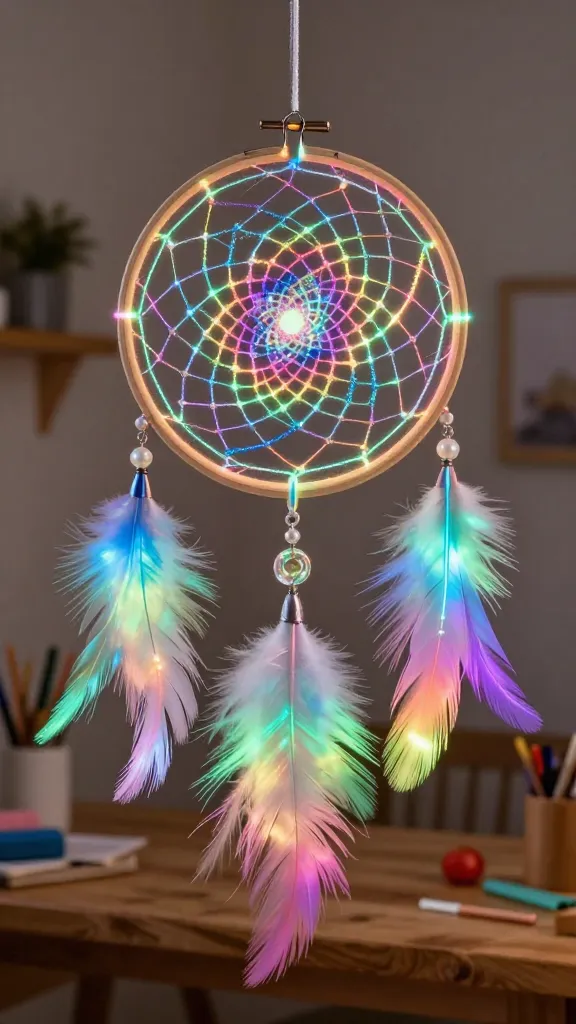
Picture this: a lightweight dreamcatcher that glows softly in the dark, swirled with glittery threads and neon accents. This isn’t your grandma’s dreamcatcher—it’s a playful, modern take that doubles as night-light décor or a desk charm. Your finished piece feels magical and ready to hang above a bed or on a backpack charm loop.
Materials Needed
- Embroidery hoop (6–8 inches)
- Cardstock or thin foam sheets in rainbow colors
- Glow-in-the-dark paint or glow cords
- Colorful embroidery floss or pearly threads
- Rhinestones, beads, or tiny mirror pieces
- Hot glue gun (adult supervision as needed)
How to Make It
- Wrap the hoop with a base color of embroidery floss for a glossy frame.
- Stretch a lightweight web of floss across the hoop in a starburst pattern. Tie off the ends securely.
- Thread small color blocks or cut-out shapes from the neon papers onto the web with thin threads for a translucent, layered look.
- Grab glow-in-the-dark accents and place them along the web or at the ends of dangling strands.
- Attach beads or tiny charms, then add a tassel of floss at the bottom for extra whimsy.
Pro Tips / Styling Ideas
- Hang near a nightlight or in a window to catch the glow when the lights go out.
- Switch up colors with seasonal palettes: pastel for spring, bold primaries for summer, metallics for fall.
Who Would Love It / When to Use It
Perfect for a kid who loves magical vibes and cozy room accents. It’s a playful room upgrade, a party favor, or a thoughtful handmade gift for a friend’s birthday.
2. Recycled Magazine Collage Desk Set
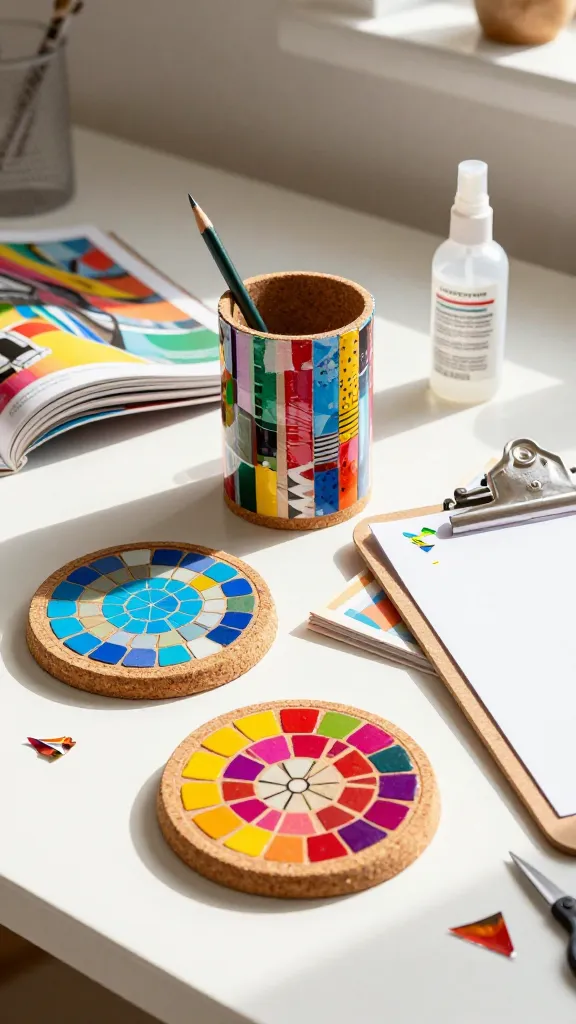
Turn everyday magazines into a fabulous, tactile desk set. This project rewards careful tearing, bold color choices, and a little DIY scribble of character. The finished trio—coaster, pencil holder, and clipboard—feels artsy-chic and totally unique to the creator.
Materials Needed
- Old magazines or colorful scrap paper
- Cardstock or thin cardboard for backing
- Mod Podge or white glue
- Scissors
- Clear sealant spray
- Small clipboard (optional) and a cork coaster set
How to Make It
- Coasters: cut out bright, overlapping shapes; glue onto cork circles; seal with a clear coat.
- Pencil holder: roll pages into tight tubes and glue around a can or a sturdy container; layer with a collage pattern.
- Clipboard: collage a large rectangle with magazine clippings on a wooden clipboard base; seal with Mod Podge.
Pro Tips / Styling Ideas
- Keep color families cohesive for a polished look, or go wildly mixed for a bold, collage vibe.
- Add a personal touch with initials or a favorite quote in chunky letter cutouts.
Who Would Love It / When to Use It
Great for kids who love paper crafts and upcycling. It makes a colorful desk setup for study zones or a standout gift for a friend who loves handmade stationery.
3. Mini Terrarium Sundial Suncatchers
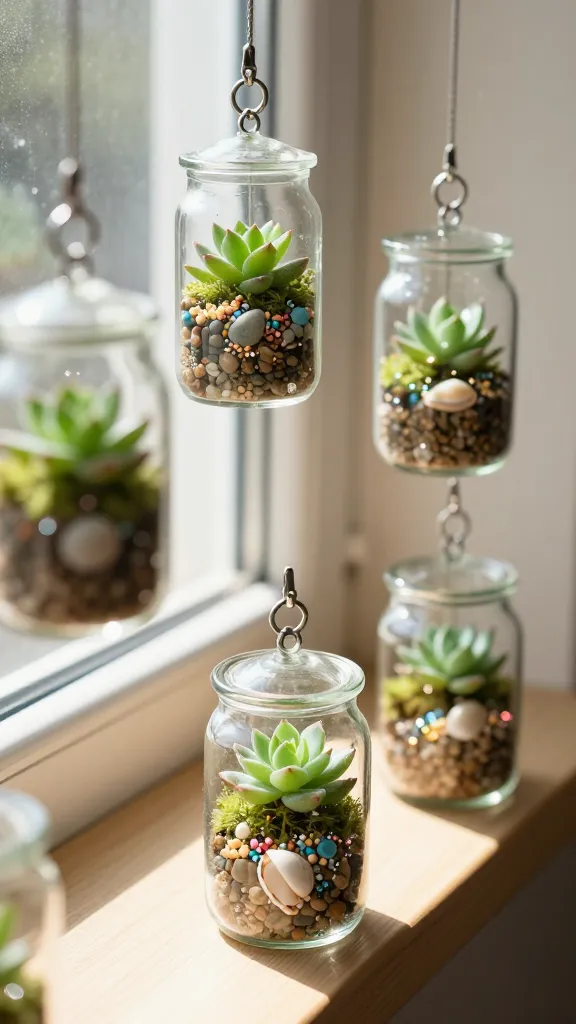
Tiny glass jars, real or faux succulents, and sunlight become a tiny garden you can hang in a window. These terrarium suncatchers sparkle when light pours through them, turning any room into a glittering mini conservatory.
Materials Needed
- Small glass jars with lids (or plastic mini terrariums)
- Assorted faux moss, pebbles, tiny plastic figurines
- Glitter, tiny shells, beads
- Glued-on metal or plastic hooks for hanging
- Clear adhesive or hot glue
How to Make It
- Layer a base of pebbles, then add moss and tiny decorations inside each jar.
- Seal the lid tightly and decorate with ribbon or twine around the neck.
- Hang by a sunny window; watch how light refracts through the glass and creates sparkles on the walls.
Pro Tips / Styling Ideas
- Choose a color theme per terrarium—cool blues and greens, warm sunset tones, or pinks and purples for a dreamy look.
- Group three different sizes at varying heights for a mini “garden corner.”
Who Would Love It / When to Use It
For kids who love nature and a little bit of magic. It’s a perfect windowsill project, party favor, or charming room accent.
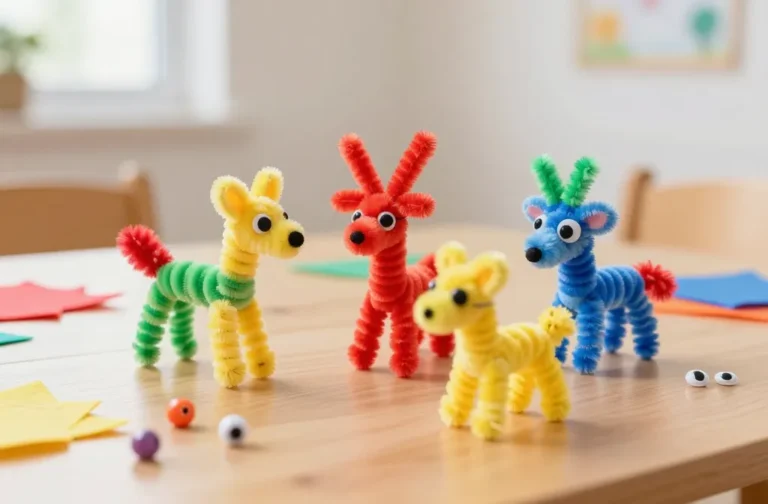
4. Fabric-Printed Tote Bags With Stencil STIX
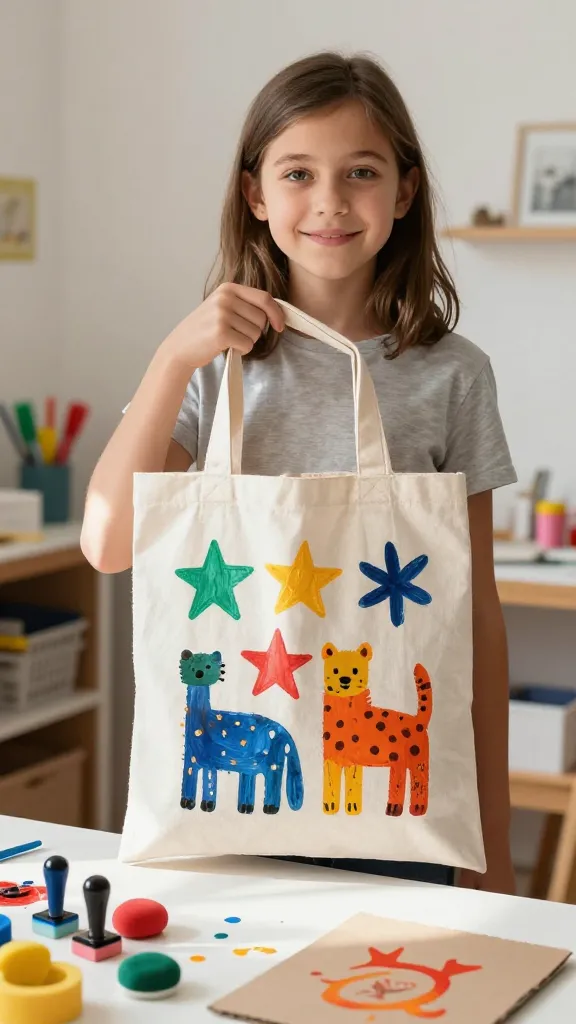
Simple tote bags get a serious style upgrade with DIY fabric prints. This project blends painting, stamping, and a dash of superhero-level creativity. Your 10-year-old designer will end up with a one-of-a-kind tote that’s ready for library runs, art class, or weekend market visits.
Materials Needed
- Plain cotton tote bag
- Fabric paints or acrylic paint mixed with textile medium
- Stencils (stars, animals, letters) or DIY cutouts
- Sponge brushes or foam stamps
- Cardboard insert (to keep paint from bleeding)
How to Make It
- Place cardboard inside the bag to prevent bleed-through.
- Position stencils and dab paint with a sponge, applying gentle, even pressure.
- Remove stencils carefully and let dry; Add extra patterns or hand-letter a name or motto if desired.
Pro Tips / Styling Ideas
- Mix two colors per stencil to create ombré effects.
- Seal with a fabric-safe spray to improve durability, especially for regular wear.
Who Would Love It / When to Use It
Ideal for budding fashion designers, library-loving kids, or anyone who loves a practical, artistic accessory. It’s a great gift for a friend, grandma, or a busy mom who appreciates a cute, reusable bag.
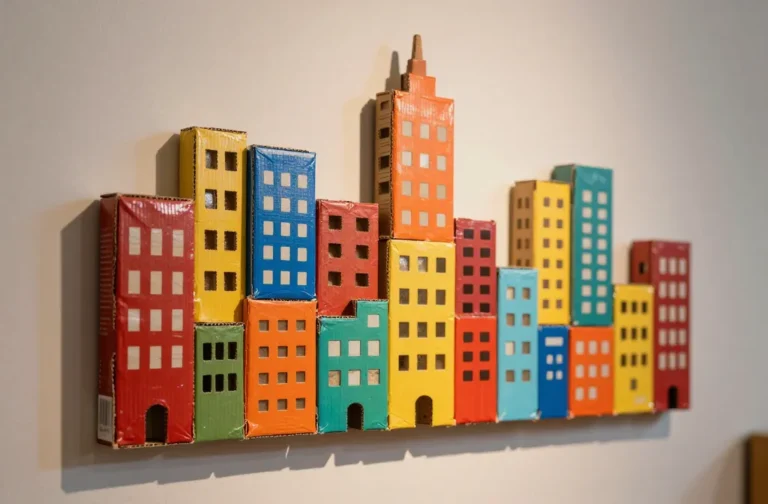
5. Cardboard Cityscapes: Build-and-Glow Wall Art
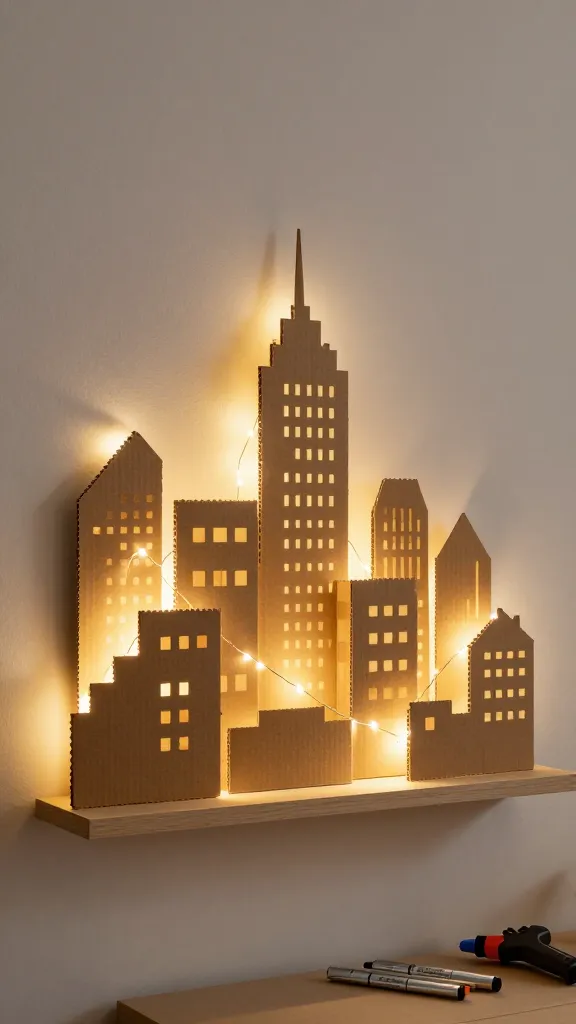
Turn recycled cardboard into a tiny skyline ready to glow at night. This is architecture-meets-craft in the friendliest way. The finished wall art creates depth and color that looks like a tiny, cozy city scene illuminated from within.
Materials Needed
- Sturdy cardboard pieces
- Acrylic paints in various colors
- White LED fairy lights or a small LED strip
- Hot glue gun or strong craft glue
- Metallic markers or paint pens for details
How to Make It
- Cut cardboard into various building shapes, then layer them in a dynamic skyline on a backing board.
- Paint buildings in bright colors, adding windows with a fine brush or markers.
- Thread LED lights along the back edge and secure edges with glue. Add a small “star” line above the skyline with dots of white paint or paint pen.
Pro Tips / Styling Ideas
- Use a black backing to make colors pop, or choose a sunset gradient for a dramatic effect.
- Mount off the wall with small spacers to create a shadow box effect.
Who Would Love It / When to Use It
For the kid who loves cityscapes, night skies, or science fiction. It’s a striking feature wall piece for a bedroom or playroom, and it doubles as a neat nightlight.
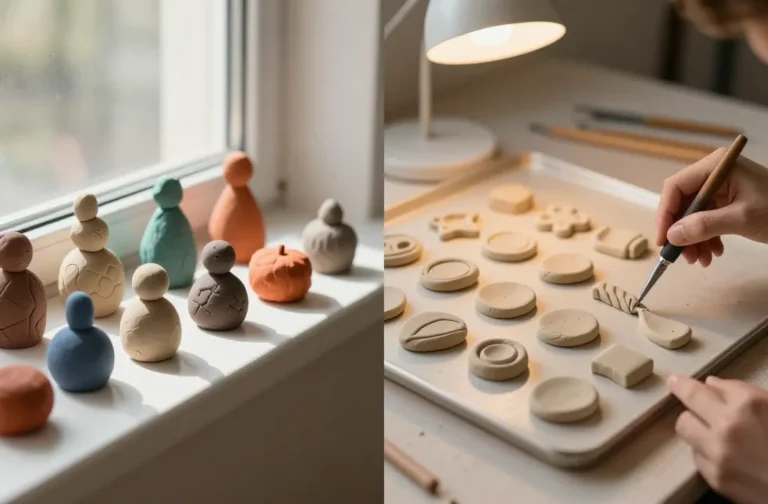
6. Salt Dough Trinket Jars With Personal Stamps
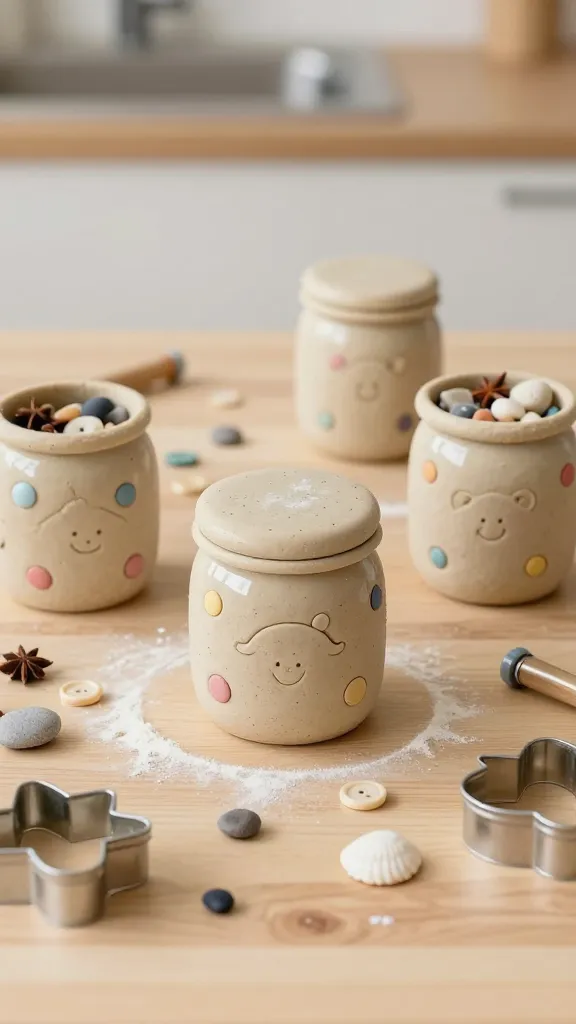
hands-on, tactile, and instantly satisfying, salt dough crafts give kids the freedom to mold and stamp their own mini keepsake jars. Bake them to harden, then seal and fill with tiny treasures or spices. These jars look adorable on a dresser or beside a sink as a station-worthy catch-all.
Materials Needed
- Salt dough mix (or homemade: 1 cup flour, 1/2 cup salt, 1/2 cup water)
- Food coloring or acrylic paints
- Small jars with lids
- Cookie cutters or stamps for patterns
- Clear sealant or nail polish for glaze
How to Make It
- Knead dough until smooth, color as desired, then roll out or shape by hand into small jar toppers or lids.
- Stamp designs or press fun shapes into the dough; bake according to recipe until hard.
- Paint and seal with a clear glaze to give a glossy, durable finish.
Pro Tips / Styling Ideas
- Use the jars as mini candy holders, jewelry trinkets, or spice jars for a kitchen counter display.
- Create a mismatched set by using different stamps and colors for each jar.
Who Would Love It / When to Use It
Perfect for kids who love tactile play, moldable crafts, and a dash of whimsy in their surroundings. They’re ideal as gift sets for friends or family who adore handmade decor.
Conclusion
Six bold, unique crafts crafted with a kid’s curiosity in mind. Each project emphasizes creativity, texture, and color while keeping things simple, quick, and incredibly satisfying. Ready to dive in? Pick one, or go for all six and create a mini DIY gallery worth saving, pinning, and sharing.
So which craft are you itching to start first? Grab a friend, set aside a afternoon, and turn a kitchen table into a creativity hub. You’ll love this, I promise—these ideas are fun, doable, and absolutely shareable. Happy crafting!