8 Smart Cardboard Craft Ideas to Upcycle at Home
Ready to turn humble cardboard into something wow-worthy? These eight ideas prove you don’t need fancy materials to create oustanding, Pinterest-worthy pieces. Trust me, you’ll love how fast, fun, and satisfying upcycling can be.
1. Cardboard Botanical Wall Panel: Paper-Leaf Garden
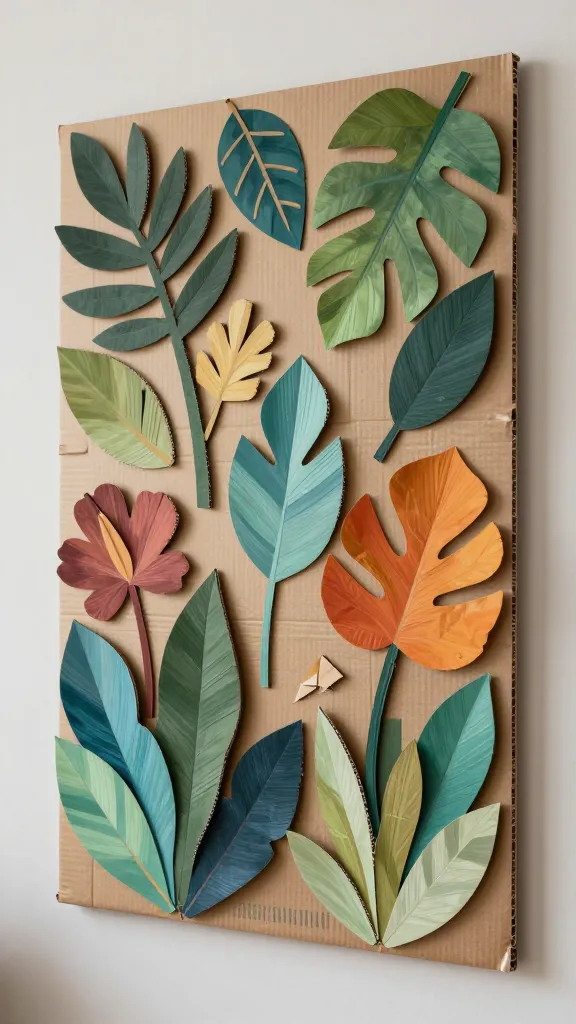
Imagine a living wall you can customize in minutes with zero plant care—just cardboard, a splash of color, and your imagination. This floral panel feels airy, modern, and totally frame-worthy.
Materials:
- Thick cardboard sheet or a few layers taped together
- Acrylic paints or markers
- Scissors or craft knife
- Mod Podge or clear glue
- Optional textures: shredded paper, tissue, or fabric scraps
- Double-sided tape or hot glue
How to Make It:
- Cut a clean large rectangle from cardboard as your base. Shape a few staggered, irregular “leaf” cutouts to create depth.
- Paint a soft, botanical color palette—sage, blush, coral, and ivory work nicely.
- Layer leaf silhouettes onto the base using glue, overlapping for dimension. Add shading with darker tones.
- Seal with a light Mod Podge coat for a subtle sheen and durability.
Pro Tips / Styling Ideas:
- Add pressed flowers or fabric scrap textures for extra tactility.
- Hang in a sunlit corner or above a sofa for a breezy focal point.
- Switch out colors seasonally to keep it fresh.
Who will love this? Design lovers seeking a lightweight, DIY wall feature that feels lush without real plants. It’s an instant cheery mood-booster.
2. Cardboard Photo Carousel: Mini Gallery Ring
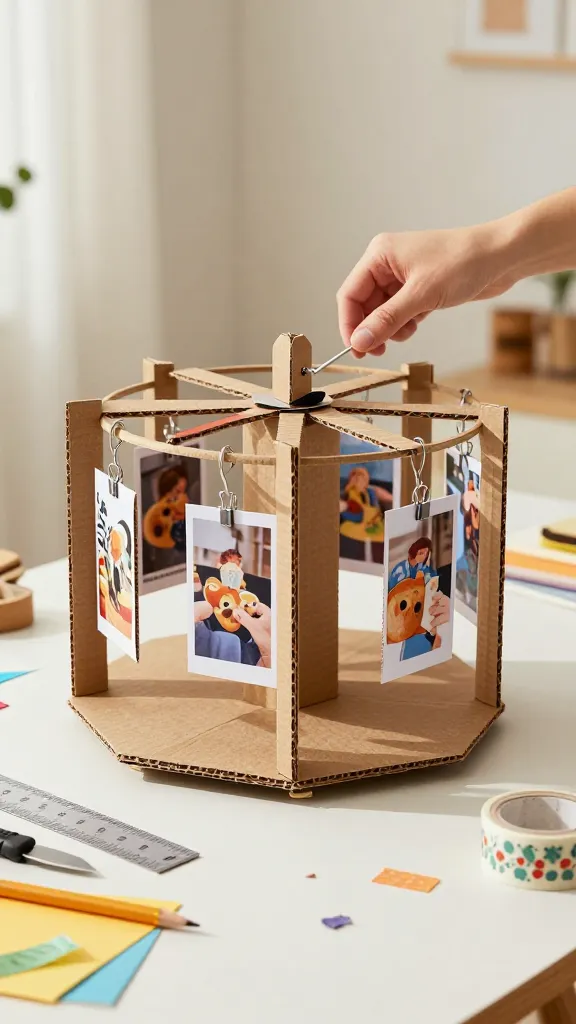
Turn a simple cereal-box panel into a rotating mini gallery that shifts with your mood or season. It’s quirky, interactive, and incredibly gift-ready.
Materials:
- Sturdy cardboard (a large cereal box or shipping box)
- Small binder rings or a metal keyring
- Printer photos or printed mini art
- Craft knife, ruler, pencil
- Decorative washi tape or colored paper
How to Make It:
- Cut a wide strip of cardboard about 2–3 inches tall, plus a back support piece for stability.
- Punch evenly spaced holes along the top edge for the ring or use a circular paper fastener on the side to hinge photos.
- Print small photos or art, then slide them into the slots. Attach to the ring so the carousel can spin freely.
- Decorate with washi tape, doodles, or decorative corner stamps for personality.
Pro Tips / Styling Ideas:
- Place on a dresser, desk, or kitchen shelf where it can be spun for a quick mood refresh.
- Rotate photos monthly to keep the vibe fresh.
- Use bold black-and-white prints for a chic, modern look.
Who will love this? A playful twist on wall art or a thoughtful, customizable gift for grandparents or newlyweds.
3. Cardboard Lanterns With Fairy Lights: Cozy Glow Duo
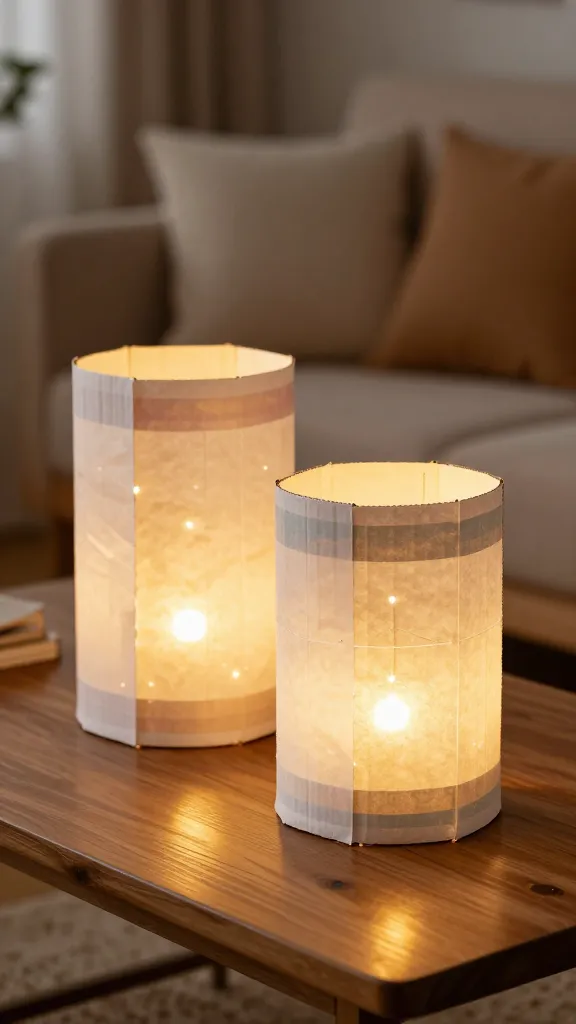
Soft, warm, and glow-up gorgeous, these lanterns turn ordinary evenings into magical moments. They’re lightweight, spill-proof, and surprisingly chic.
Materials:
- Cardboard tubes or a thick cardboard sheet shaped into a cylinder
- White printer paper or tissue for lantern sleeves
- LED fairy lights
- Glue, scoring tool, craft knife
- Decorative paint or washi tape
How to Make It:
- Create a cylinder or cylindrical lantern shell from cardboard. Score and fold to keep it sturdy.
- Wrap with thin paper or tissue from top to bottom, leaving a gap at the base for vents.
- Decorate with paint, tape, or a stencil pattern, then insert a string of fairy lights inside.
- Place a battery pack behind the lantern for a clean, cable-free look.
Pro Tips / Styling Ideas:
- Group a few lanterns on a coffee table for ambience or hang them along a porch railing.
- Use perforated patterns to create cloud-like shadows when lit.
Who will love this? Sleepover planners, romantic dinner setups, and anyone wanting soft lighting without real candles.
4. Cardboard Desk Organizer: Modern Minimalist Tray
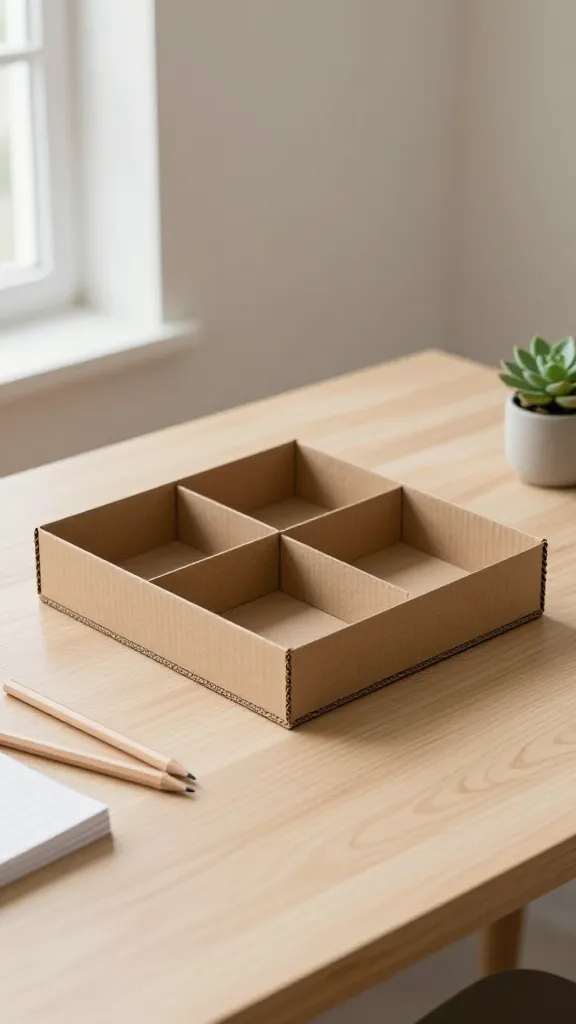
Say goodbye to scatter with a sleek, customizable desk organizer carved from cardboard. It’s sturdy, stackable, and ready for pencils, notes, and tiny plants.
Materials:
- Rigid cardboard panels
- Ruler, pencil, utility knife
- Craft glue or hot glue
- Decorative paper or paint for accents
- Optional small magnets or Velcro tabs for modularity
How to Make It:
- Cut panels to form a tray base with two or three compartments. Use glue to assemble into a neat grid.
- Reinforce corners with extra cardboard strips for extra strength.
- Finish with a coat of paint or decorative paper on exterior faces.
Pro Tips / Styling Ideas:
- Label each compartment with minimal typography or cute icons.
- Make it modular—connect multiple trays with Velcro or magnets for a larger setup.
- Place near a plant for a calm, creative desk vibe.
Who will love this? Students, freelancers, or anyone who dreams of tidy, stylish, budget-friendly workspace organization.
5. Cardboard Play Kitchen: Little Chef’s Island
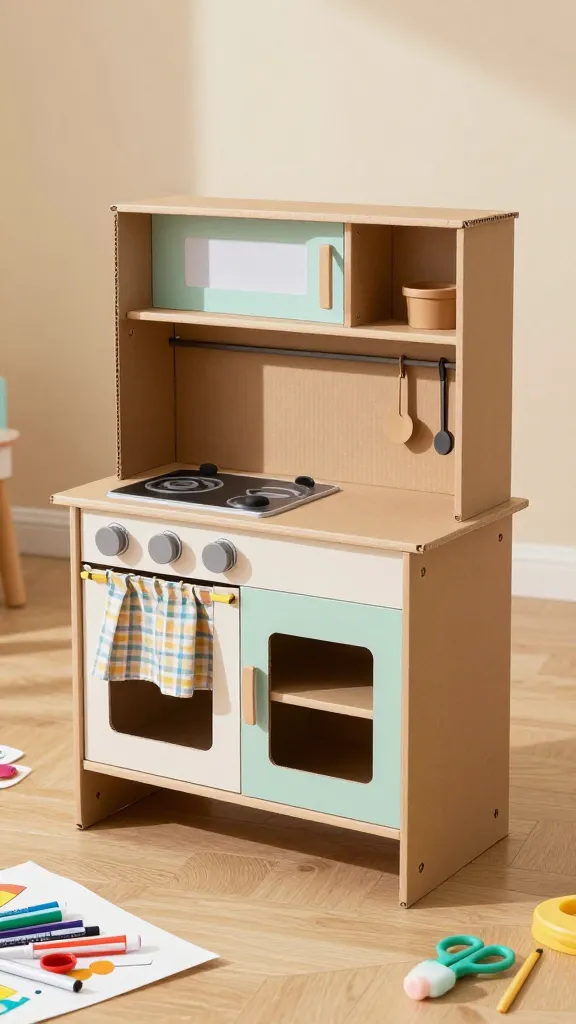
Channel your inner kid and craft a pretend-play kitchen that looks adorable in photos and tough enough for hours of imagination. It’s a timeless gift for toddlers that grows with them.
Materials:
- Cardboard boxes (one large, several small)
- Non-toxic paints, markers, and brushes
- Glue, scissors, cutting mat
- Small cardboard shelves, knobs from bottle caps, paper curtains
How to Make It:
- Assemble a compact “island” with a base box and vertical panels to mimic a stove and counter.
- Cut faux burners, oven door, and shelves from extra cardboard, glue on, and add knobs from bottle caps.
- Paint with realistic colors and add paper curtains or fabric for a cozy kitchen vibe.
Pro Tips / Styling Ideas:
- Label pretend foods with handwritten tags for extra play value.
- Pair with other small cardboard accessories for a complete set (pots, pans, utensils).
- Use warm, inviting colors to invite long, imaginative play sessions.
Who will love this? Little builders, pretend-chef fans, and parents who want durable, screen-free toys that are easy to store.
6. Cardboard Magnetic Chalkboard Wall Decor: Note Nook
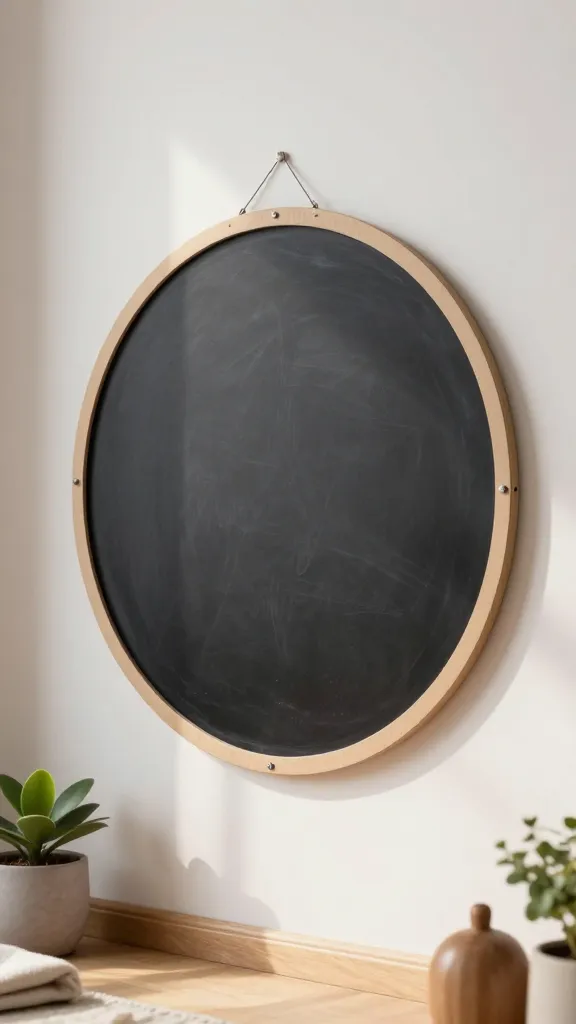
Turn a slice of wall into a magnetic, chalk-friendly canvas that hosts reminders, doodles, and daily vibes. It’s practical, playful, and surprisingly stylish.
Materials:
- Cardboard base (thin but sturdy)
- Magnetic paint or magnet sheets
- Black chalkboard paint or chalkboard vinyl
- Chalk or white chalk markers
- Magnets or adhesive dots
How to Make It:
- Coat the cardboard with magnetic paint or affix magnet sheets behind the surface.
- Cover the front with chalkboard paint or vinyl so you can write with chalk or markers.
- Decorate with a decorative border using colored paper or paint for a finished look.
Pro Tips / Styling Ideas:
- Use it in a kitchen, entryway, or craft corner for quick notes and doodles.
- Wipe clean and re-theme weekly—seasonal messages or family reminders keep it fresh.
Who will love this? Busy households, students, and anyone who loves a quick, reusable note board with a charming cardboard vibe.
7. Cardboard Garden Planters: Tiered Terrace
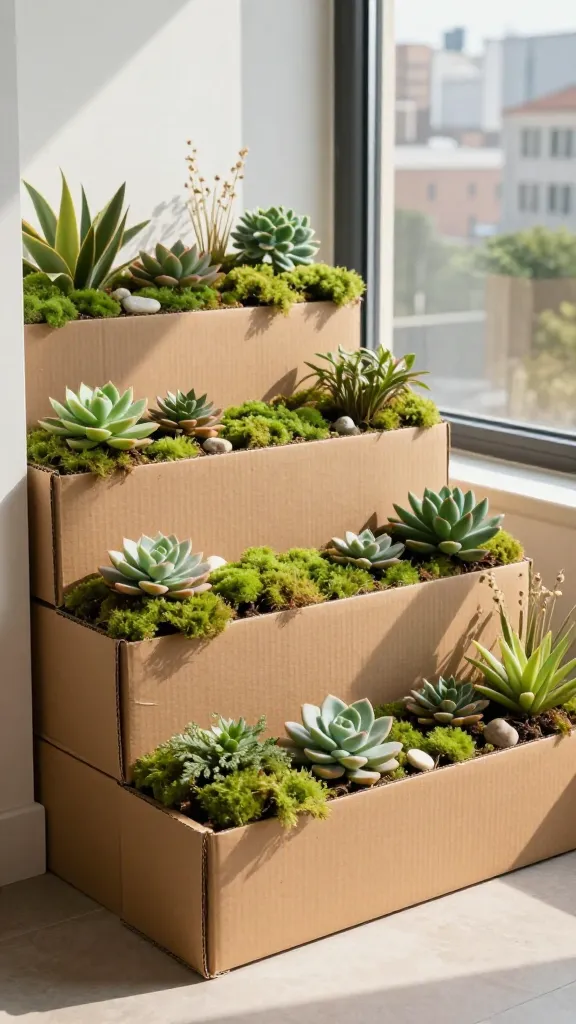
Green thumbs meet upcycled chic in a tiered planter system crafted from cardboard. It’s lightweight, adaptable, and perfect for urban windowsills.
Materials:
- Thick cardboard sheets
- Colored paints, moss, faux succulents or small real plants
- Scissors, utility knife
- Hot glue or sturdy craft glue
How to Make It:
- Cut several shallow box-shaped planters in different heights. Stack and glue to form a tiered “terrace.”
- Line the inside with waterproof barrier if using real soil.
- Paint and decorate the outer faces; tuck moss or decorative stones between levels.
Pro Tips / Styling Ideas:
- Arrange trailing plants or faux succulents for a lush, modern look.
- Place on a balcony, balcony rail, or sunny kitchen sill to maximize light exposure.
Who will love this? Apartment dwellers seeking a green corner and crafters who adore modular, scalable plant displays.
8. Cardboard Time Capsule Box: Memory Keeper
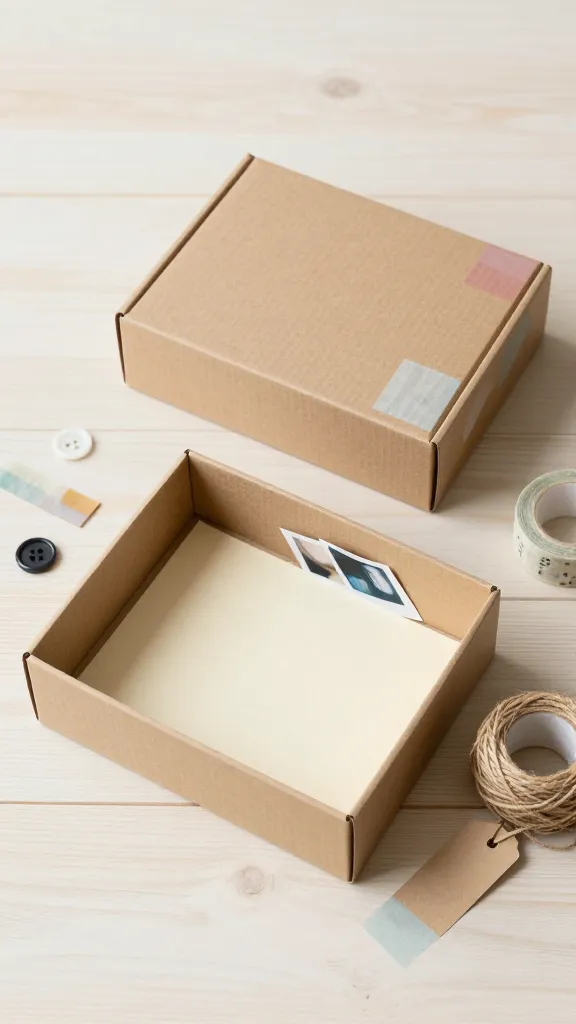
Seal a year’s memories in a stylish, compact box you can open years later. It’s a sentimental project with a clean, minimalist finish that ages beautifully.
Materials:
- Sturdy cardboard box with lid
- Acid-free paper, washi tape, string tags
- Decorative items: buttons, fabric scraps, photos
- Glue and scissors
How to Make It:
- Line the box with a layer of acid-free paper to protect keepsakes.
- Decorate the exterior with washi tape, fabric scraps, or painted patterns.
- Place mementos inside: photos, ticket stubs, small notes—then seal with a simple lid or tied ribbon.
Pro Tips / Styling Ideas:
- Include a “Do not open until” date tag for a fun future reveal.
- Store in a closet or under the bed for a hidden, cozy time capsule.
Who will love this? Nostalgia seekers, families, and anyone who wants a thoughtful, low-cost keepsake project.
Conclusion
These eight smart cardboard craft ideas prove that you don’t need expensive supplies to create something charming, functional, and totally share-worthy. Pick one (or all) and start upcycling today—your home, your creativity, and your Pinterest board will thank you.
Happy crafting, and have fun turning plain cardboard into standout pieces you’ll proudly display, gift, or reuse. Seriously, you’ll love how fast they come together and how much personality they add to your space.