5 Clever Toilet Paper Roll Crafts That Are Super Easy
Looking for quick, budget-friendly projects that spark joy and brag-worthy photos? You’re in the right place. These 5 clever toilet paper roll crafts prove you don’t need fancy supplies to make something fabulous—and trust me, they’re super easy.
Grab a few rolls, a splash of color, and your inner creative side. You’ll love how each project doubles as adorable decor or a thoughtful little gift. Ready to roll? Let’s dive in!
1. Whimsical Paper Roll Flower Wall Decor
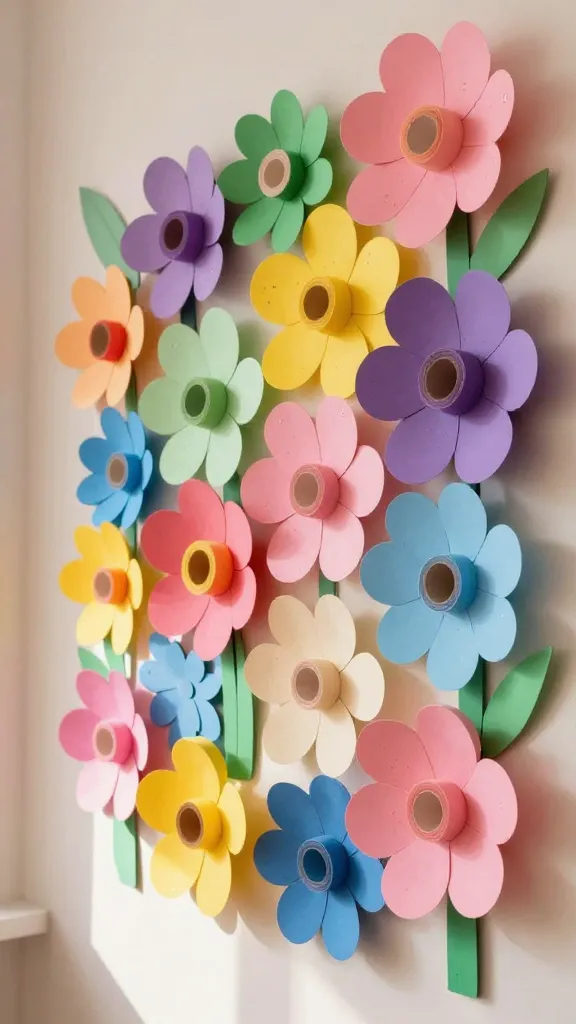
Picture a bright wall covered in cheerful, multi-hued flowers—no garden required. This toilet paper roll flower wall art adds a pop of color and a playful texture to any room. It’s sculptural, affordable, and surprisingly gallery-worthy.
Think bold color combos, or soften with pastels for a dreamy, pastel-filled vibe. Each bloom is tiny yet mighty, and the arrangement feels like a sweet spring bouquet that never wilts. Seriously, it’s addictive to make and easy to customize.
Materials Needed
- Toilet paper rolls (about 8–12 for a medium piece)
- Acrylic paints or craft spray paints
- Paintbrushes and/or foam brushes
- Hot glue gun and glue sticks
- Cardboard or a wooden dowel as the mounting base
- Twine or string for hanging
- Optional: glitter, sequins, and leaf-shaped embellishments
How to Make It
- Cut each roll into rings if you want petal-like shapes, or keep them whole for a more circular flower with petals created by paint and texture.
- Paint each piece in vibrant colors. Mix shades to mimic a lively garden palette, then let dry completely.
- Glue individual flowers onto the base, layering for depth. Build a bouquet-like cluster, then secure the base to the wall or a dowel for a hanging piece.
Pro Tips / Styling Ideas
- Vary the size of your “flowers” by using whole rolls and cut rings—the contrast looks delightful.
- Pair with a soft neutral background wall to let the colors pop, or go maximal with a rainbow mural vibe.
- Hang in a cluster for a bold focal point, or spread as a themed gallery wall.
Who will love it? Anyone craving a bright, cheerful accent in a living room, bedroom, or entryway. It’s a playful, artsy statement piece that says you’re the kind of person who says yes to DIY joy.
2. Cozy Painted Rope Lanterns (Using Toilet Paper Rolls)
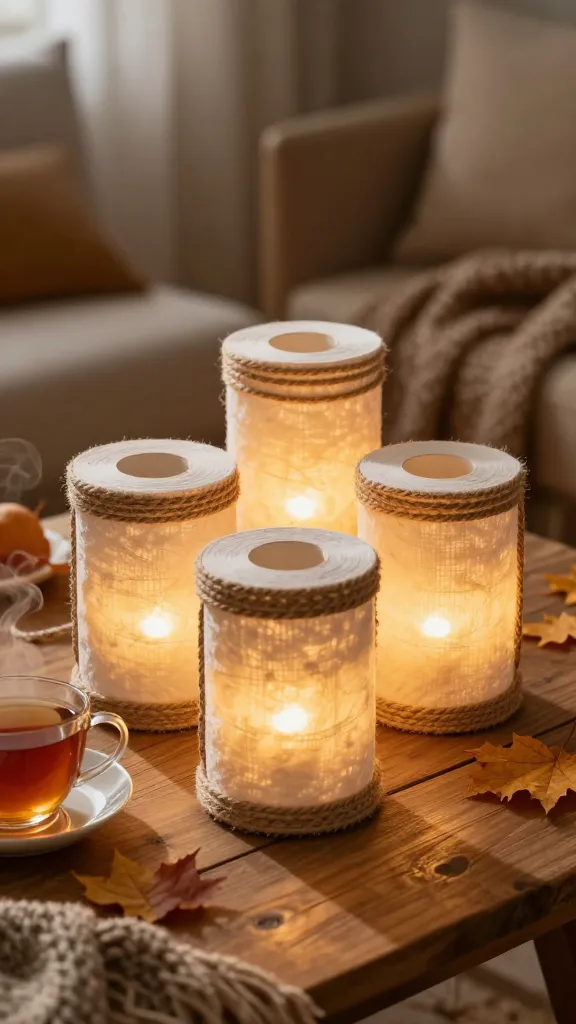
Transform simple toilet paper rolls into warm, lantern-like accents that glow with cozy ambiance. These lanterns are perfect for a hygge-inspired tablescape, balcony soirée, or a fall centerpiece. The finish is soft, the glow mesmerizing, and they’re surprisingly sturdy when wrapped with cord or rope.
Imagine soft amber lighting casting gentle shadows as you sip tea. That’s the vibe you get here—warm, inviting, and totally doable in an afternoon. FYI, they look fantastic in clusters of three or lined along a mantle.
Materials Needed
- Toilet paper rolls
- Acrylic paint or chalk paint in warm tones
- Porous paper or tissue paper (optional for extra glow)
- Warm white string lights or fairy lights
- Jute twine for hanging, scissors
- Mod Podge or spray adhesive (optional for sealing)
How to Make It
- Paint the rolls in your chosen warm hues. You can brush on a single color or do a subtle ombre from top to bottom.
- Seal lightly with Mod Podge if you’re using tissue for extra glow—this helps the light shine through more evenly.
- Wrap a string of lights around or inside the roll, then secure with a little glue at the ends. Add twine to create a hanging loop.
Pro Tips / Styling Ideas
- Place soft tissue over the roll before painting to preserve the translucent glow when lit.
- Group in a trio at different heights for a moody, candle-like centerpiece.
- Use white or warm ivory lights for a classic, cozy look, or mix in a few color-tinted bulbs for whimsy.
Who would love it? Cozy homebodies, stylish hosts, and anyone wanting a gentle, later-evening glow without burning candles. These lanterns are the kind of project you’ll want to leave on display all season.
3. Mini Shadow Box Scenes From Reclaimed Rolls

Turn ordinary decor into storytelling with tiny, whimsical scenes tucked into a shallow shadow box made from a toilet paper roll. It’s a tiny theater—perfect for desk, shelf, or coffee table display. The best part? You can customize every scene to reflect a favorite memory, animal friend, or imaginary world.
Think micro landscapes, tiny creature figurines, and a dash of texture with yarn, felt, or paper cutouts. It’s playful, charming, and surprisingly satisfying to assemble in a quiet, creative mood. You’ll love the instant sense of whimsy it adds to any space.
Materials Needed
- Toilet paper rolls (cut in half to create shallow boxes)
- Small scraps of paper, felt, fabric, and yarn
- Glue, scissors, and a craft knife
- Miniature decorations (buttons, beads, tiny figurines)
- A small display shelf or wall space for hanging
- Optional: white glue and a drop of acrylic paint for background shading
How to Make It
- Cut the roll to create a shallow box, then seal edges with glue or tape.
- Paint a simple background inside the box (sky, grass, or a moonlit night). Let dry.
- Arrange your tiny scene: a felt tree, a paper-cut bird, or a miniature chair made from a toothpick and cardboard bits.
- Glue everything in place and close the lid or leave open like a tiny diorama.
Pro Tips / Styling Ideas
- Mix textures by combining felt, cotton, and scrap fabric for a tactile scene.
- Create a cohesive set by using the same color palette across several shadow boxes.
- Use these as gift toppers or as a collectible series for a child’s bookshelf.
Who would love it? Story lovers, miniature collectors, and anyone who enjoys a little narrative in decor. It’s a pocket-sized world you can curate one scene at a time.
4. Forest-Gnome Door Signs From Toilet Paper Rolls
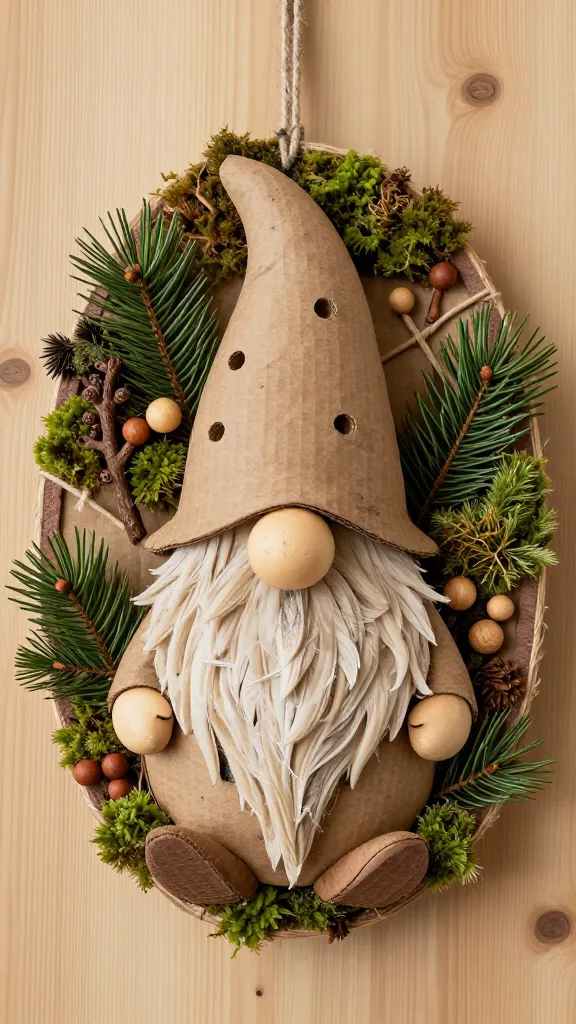
Invite a touch of whimsy to your home with door signs featuring friendly gnomes and forest motifs. These little signs made from toilet paper rolls are charming, rustic, and perfect for gifting to a friend who loves quirky, nature-inspired decor. They look especially adorable on a wreath, door knob, or entry table.
The magic lies in the details: tiny beards, pointy hats, and little woodland accents. The result is a playful, rustic piece that instantly feels handmade and heartwarming. You’ll be surprised how quickly you can assemble a tiny forest world right at your doorstep.
Materials Needed
- Toilet paper rolls
- Acrylic paints (earthy greens, browns, and muted reds)
- Fine-tip brush or Sharpie for facial features
- Miniature wooden beads or buttons for eyes
- Cardstock or felt for hats and beards
- Twine or ribbon for hanging
- Hot glue gun
How to Make It
- Cut a roll into a small tag shape for a sign or carve a wood-grain look on the surface with paint.
- Paint a tiny gnome face on one end and a hat on top. Use beads or buttons for eyes for extra charm.
- Attach a miniature beard from felt or paper. Add a note or name on the sign with a fine Sharpie or paint.
- Hang by a loop of twine on your door or wall, or prop against a wreath for a woodland vibe.
Pro Tips / Styling Ideas
- Keep the color palette earthy to maximize rustic appeal; mix in forest greens and warm browns.
- Pair with pinecone accents or dried moss for a cozy forest aesthetic.
- Create a little family of signs for a charming doorway greeting.
Who would love it? Nature lovers, rustic decor enthusiasts, and anyone who wants a playful, welcoming entryway detail. It’s the kind of tiny craft that feels big in personality.
5. Quirky Animal Pods (Toilet Paper Roll Critters) For Shelfie-Worthy Decor
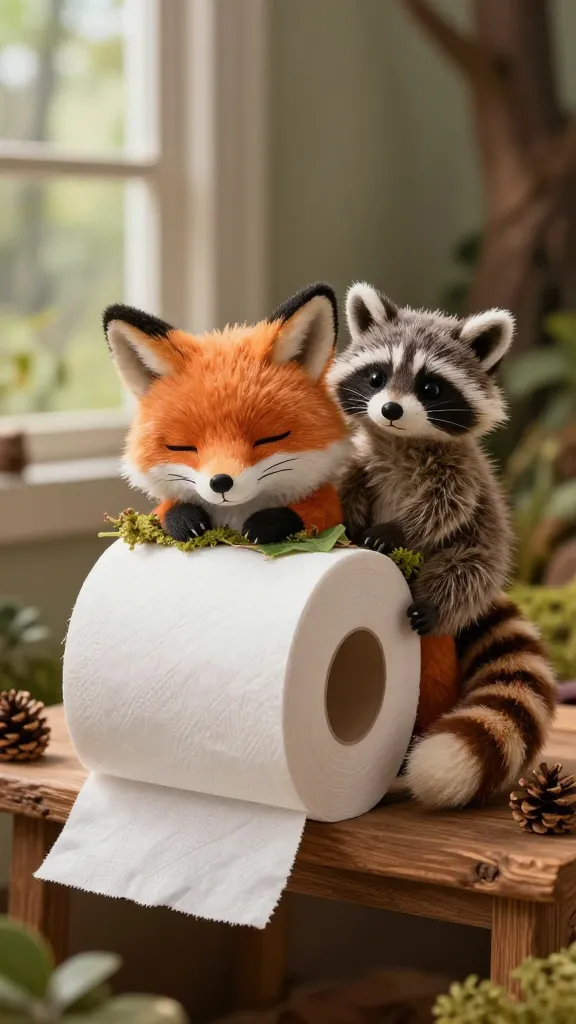
Turn plain rolls into adorable animal figures that perch on shelves, desks, or windowsills. From a sleepy fox to a curious raccoon, these little critters bring whimsy and personality to any space. They’re soft, silly, and surprisingly sturdy once finished with a touch of paint and sealant.
Think about a mini menagerie—each creature with its own expression and tiny accessories. The charm lies in the little details: ears, noses, whiskers, and a tiny bed of moss for a forest vibe. It’s a project you’ll want to show off to friends and family—trust me, your feed will thank you.
Materials Needed
- Toilet paper rolls
- Acrylic paints in natural tones
- Fine-tipped brushes and a small detail brush
- Googly eyes or painted eyes
- Fabric scraps or felt for ears and tails
- Hot glue gun and glue sticks
- Optional: cotton for a fluffy tail or beard
How to Make It
- Shape the roll into the animal form by trimming and scoring edges, then paint a base coat.
- Attach ears, snouts, tails using felt or fabric. Add eyes and small facial features with a fine brush or marker.
- Finish with a light wash of color or a weathered look for added character. Seal with a clear finish if you like.
Pro Tips / Styling Ideas
- Create a little animal family with a shared color palette to keep a cohesive shelf display.
- Place on a lightweight wooden slice or hut-style stand for extra whimsy.
- Add a tiny “name tag” on a mini sign beside each critter for a personalized touch.
Who would love it? Kids and adults who adore playful decor, nature-inspired accents, and tiny, huggable-looking creatures. It’s a cheerful, storybook-inspired addition that’s both cute and conversation-starting.
Conclusion
These five clever toilet paper roll crafts prove you don’t need a big budget or a full craft studio to create eye-catching, Pinterest-worthy pieces. Each project is unique, approachable, and totally customizable to your style. So pick a favorite, gather a few supplies, and start rolling—your home will thank you with instant personality and charm.
Ready to dive in? Try one project today, or go wild and complete the whole mini collection. You’ll discover there’s something incredibly satisfying about turning simple everyday items into handmade treasures. Have fun, be fearless, and enjoy the creative journey!