7 Creative Button Craft Ideas for Kids & Adults
Ready to flip that button stash into jaw-dropping, share-worthy keepsakes? These 7 ideas are playful, approachable, and totally Pinterest-friendly. Trust me, you’ll love how quick and satisfying each project is.
Let’s dive into seven completely unique crafts that celebrate color, texture, and a touch of whimsy. No repeats, no fuss—just seven standout projects you can actually finish this weekend.
1. Button Mosaic Wall Art: A Burst of Color in Mini Tiles
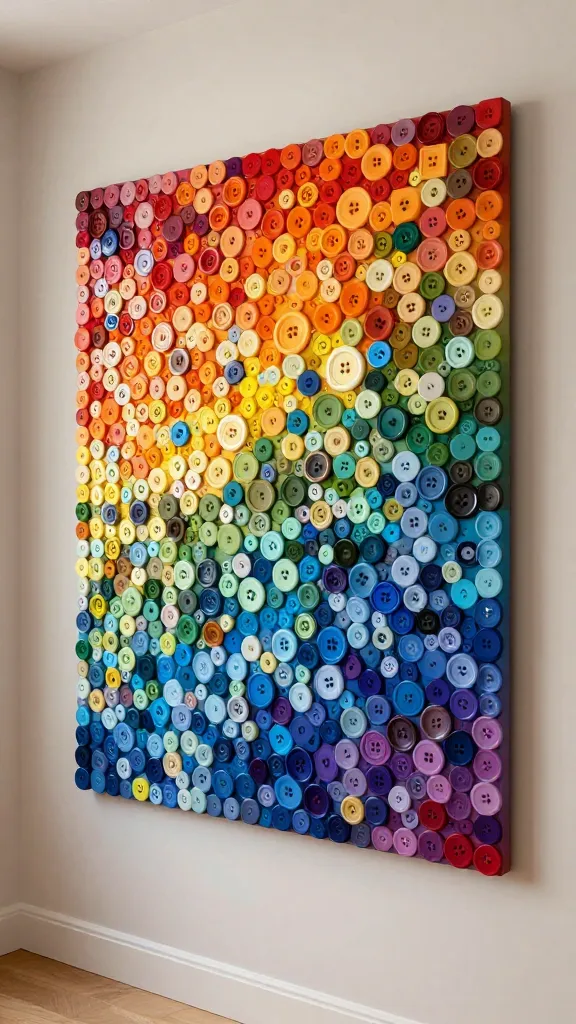
Imagine a bold canvas where every button becomes a tiny tile in a vibrant mosaic. The finished piece sings with color and texture, like a mini rainbow exploded into a modern abstract. It’s wall art that feels both kid-friendly and chic enough for grown-up spaces.
Materials Needed
- Canvas or wooden board (large enough for your design)
- Assorted buttons in a cohesive color palette
- Strong craft glue or hot glue gun
- Pencil and ruler for planning
- Optional: clear sealing spray
How to Make It
- Sketch a simple geometric design or abstract shape on the board.
- Sort buttons by color family to keep the palette cohesive.
- Glue buttons down row by row, focusing on texture and balance rather than perfect edges.
- Let glue dry fully, then seal if desired to protect the finish.
Pro Tips / Styling Ideas
- Choose a metallic or matte palette depending on your space—gold or copper accents look especially luxe.
- Frame the piece for a polished gallery-wall vibe or mount it directly for a more quirky, DIY look.
- Switch out buttons for seasonal hues (pastels in spring, deep jewel tones for fall).
Who will love it: A bold wall statement that works in bedrooms, living rooms, or hallways. Great for kids who love arranging colors and adults who crave a modern art piece with a handmade heart.
2. Button-Stamped Greeting Cards: Tiny Fabrics, Big Warm Fuzzies
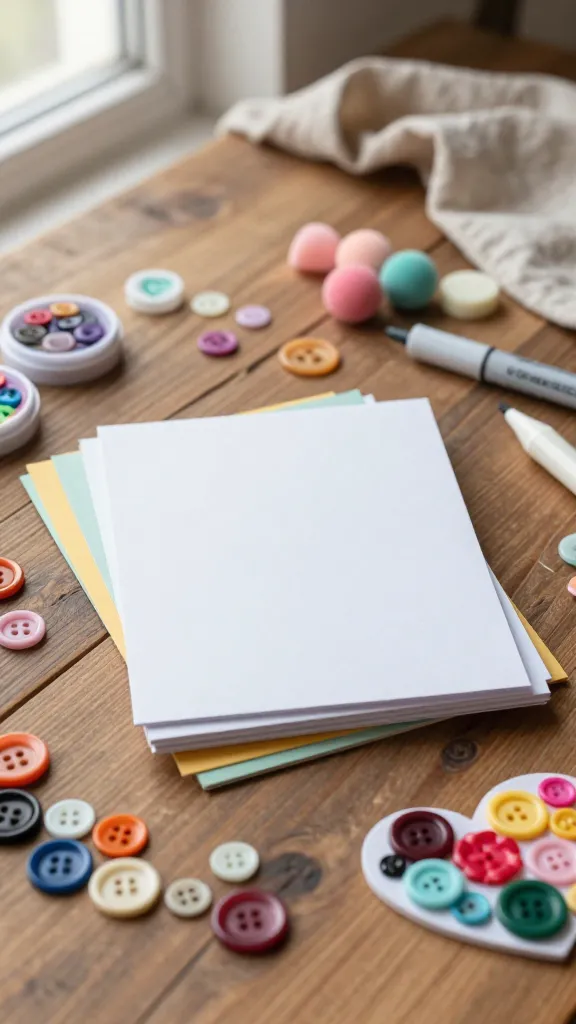
Card-making meets button craft in this cheerful, tactile project. Each card bursts with texture and tiny pop of color, turning a simple note into a keepsake worth saving. It’s like giving a hug in a folded piece of cardstock.
Materials Needed
- Blank folded cards or heavy cardstock
- Assorted buttons (small to medium)
- Fabric ink pads or acrylic paint and small sponge brushes
- Glue dots or light adhesive
- Fine-tip marker for lettering (optional)
How to Make It
- Plan a simple button bouquet, heart, or sunburst on the card front.
- Dip buttons in fabric ink or dab with paint to create color variety.
- Press buttons onto the card in your design and let dry.
- Add a handwritten message or a tiny draw outline for extra charm.
Pro Tips / Styling Ideas
- Use a consistent glue dot to keep buttons from shifting during shipping if sending as a gift.
- Keep a neutral card base and let the buttons do the talking with pops of color.
- Laminate or seal the card edges for a more premium feel if gifting to ensure longevity.
Who will love it: Perfect for birthdays, thank-you notes, or DIY wedding RSVP cards. It’s a sweet way to show you put thought into a tiny, handmade detail.
3. Button Embroidered Hoop Art: Cozy Threads Meet Button Bliss
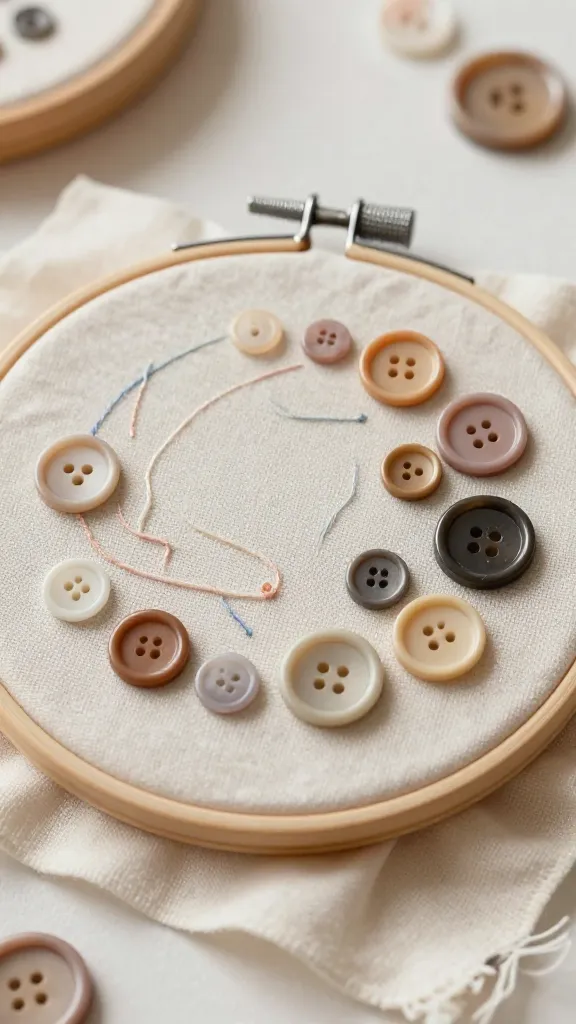
Picture a small embroidery hoop layered with stitched lines and button accents. It’s retro-cute, tactile, and surprisingly simple—like a cozy textile hug for your walls. The combination of thread and button textures gives depth you can practically reach out and touch.
Materials Needed
- Embroidery hoop (6–8 inches works well)
- Felt or cotton fabric to fit the hoop
- Assorted buttons and embroidery floss
- Needle and scissors
- Fabric glue (optional)
How to Make It
- Prepare fabric by stretching it in the hoop and securing edges.
- Create a simple line pattern with embroidery floss (waves, zigzags, or a sunbeam motif).
- Stitch the design and randomly anchor a few buttons at focal points for texture.
- Finish with a neat knot and trim loose threads.
Pro Tips / Styling Ideas
- Pick a color story that matches your room—calm neutrals with a pop of teal, or warm earth tones with a brass button cluster.
- Layer multiple hoops for a gallery effect on a larger wall.
Who will love it: A friendly project for embroiderers who want to dabble in button accents, ideal for nurseries, laundry rooms, or cozy reading nooks.
4. Button Bottle Cap Magnets: Tiny Dotes with Big Display Power
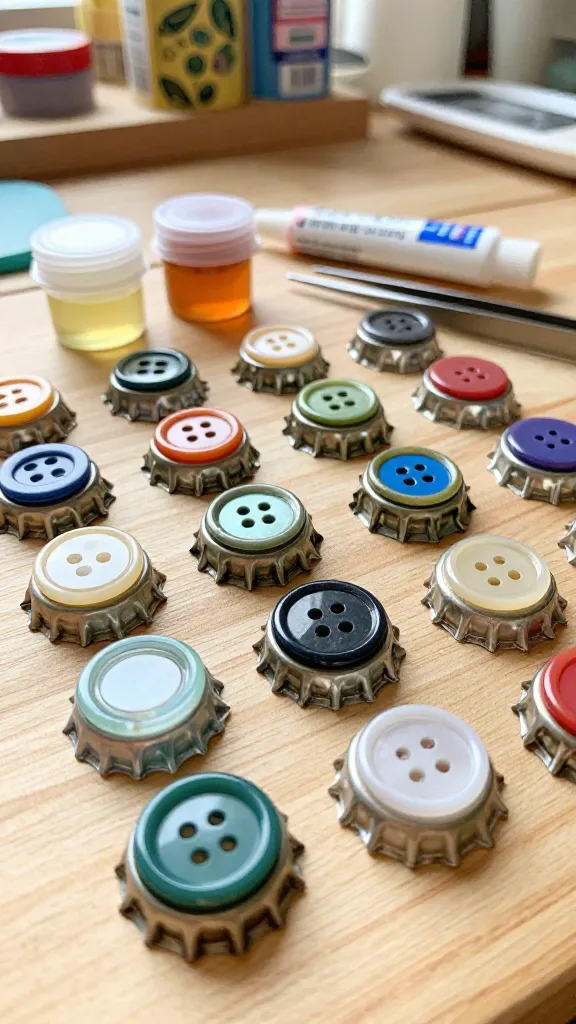
Transform ordinary bottle caps into glossy, magnetic little art pieces. This project is fast, satisfying, and endlessly customizable, making fridge display feel like a curated gallery. Plus, it’s a great family activity that yields many tiny, usable souvenirs.
Materials Needed
- Empty metal bottle caps
- Assorted buttons
- Strong glue or epoxy
- Strong magnets (neodymium work well)
- Optional: clear resin or doming epoxy for a glossy seal
How to Make It
- Glue a button to the center of each cap for a focal point.
- Seal with resin or let the surface dry if not using resin.
- Attach a magnet to the back with glue and let set fully.
Pro Tips / Styling Ideas
- Create a color-coordinated set (pastels for a kitchen, brights for a craft room).
- Arrange magnets in a grid or an organic cluster for a quirky display.
Who will love it: Kids adore this one for the tactile play of buttons, while adults will appreciate the compact, practical decor—perfect for the fridge, office corkboard, or magnetic whiteboard.
5. Button Jewelry Mini-Curse: Playful, Wearable Art
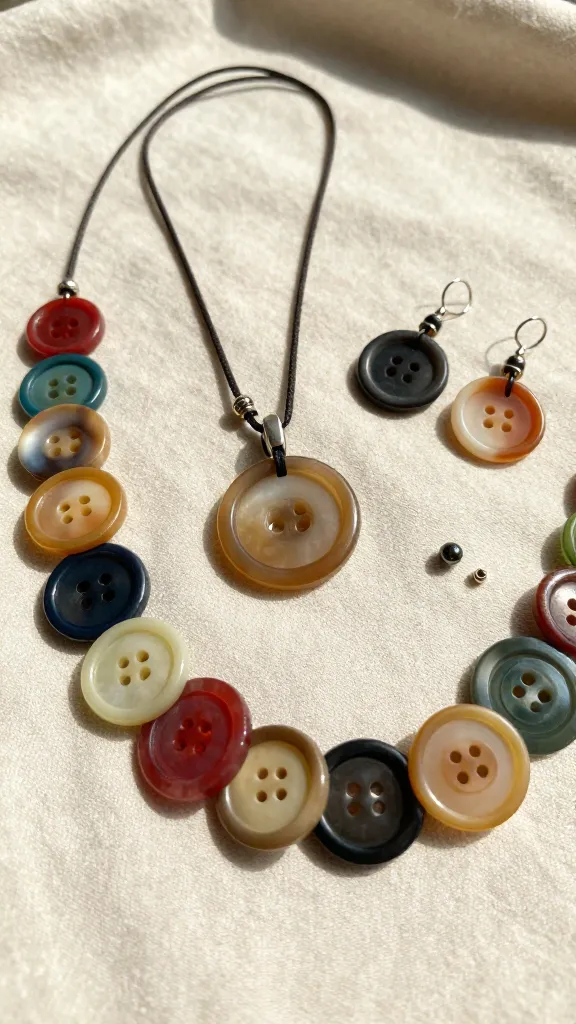
Yes, you can actually wear buttons as bold, quirky jewelry. Think button pendant necklaces, earrings, or a chunky bracelet. This idea turns everyday buttons into stylish, conversation-starting pieces that feel both playful and artistic.
Materials Needed
- Assorted buttons (varied shapes and sizes)
- Jewelry cord, chain, or earring hooks
- Jump rings and pliers
- Strong adhesive or jewelry resin
- Optional: bead caps or small charms for extra flair
How to Make It
- Thread or glue buttons onto a cord, layering for texture and color.
- Attach a clasp or earring hooks with jump rings.
- Seal with a light resin coat if needed for durability.
Pro Tips / Styling Ideas
- Keep a consistent theme (e.g., all metallic-toned buttons) for a cohesive look.
- Pair a button pendant with neutral outfits to let the piece pop.
Who will love it: Fashion-forward crafters who want unique, lighthearted accessories. Great gifts for teens or a cheeky set for a handmade jewelry swap.
6. Button Plant Markers: Cute, Clever, and Garden-Ready
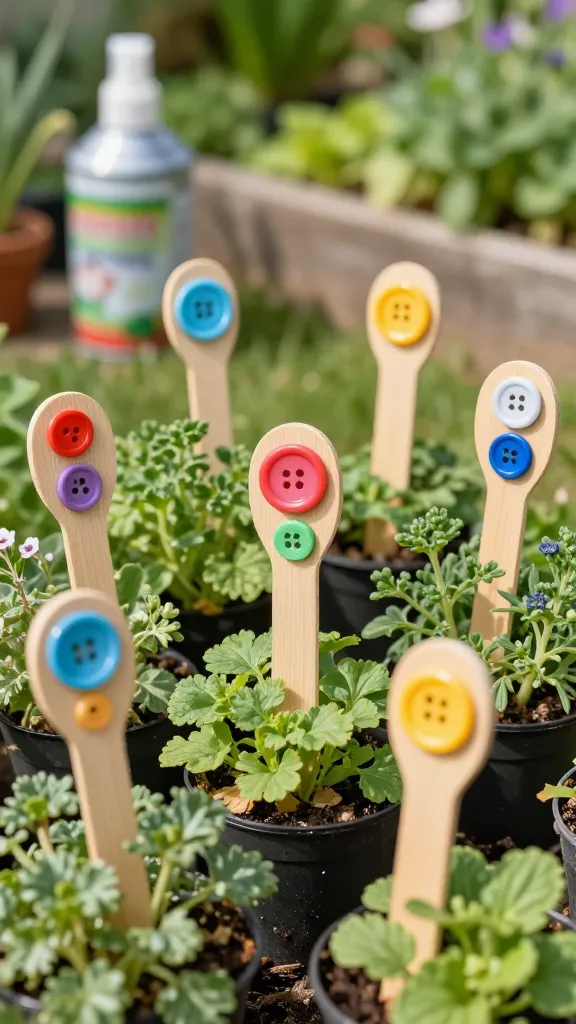
Bring whimsy to your herb garden or indoor pots with charming button plant markers. These little signals point to what’s growing and add a dash of personality to your green space. They’re especially perfect for kids learning to label plants while getting hands-on with crafts.
Materials Needed
- Flat wooden or plastic plant markers (or popsicle sticks)
- Assorted buttons
- Waterproof paint or permanent markers
- Hot glue or strong craft glue
- Clear sealant spray (optional for outdoor durability)
How to Make It
- Paint the markers with a light base color and label with the plant name or a cute icon.
- Glue a horizontal row of buttons along the top edge for a decorative touch.
- Seal and let dry before planting.
Pro Tips / Styling Ideas
- Use weatherproof markers if markers will be outside year-round.
- Coordinate with planter colors or a garden theme (pastels, nautical blues, or sunny yellows).
Who will love it: Gardeners of all ages who want to add personality to pots and make plant IDs more fun. It’s also a cute desk label idea for indoor greenery shelves.
7. Button Coaster Set: Colorful Floors for Your Cup of Tea
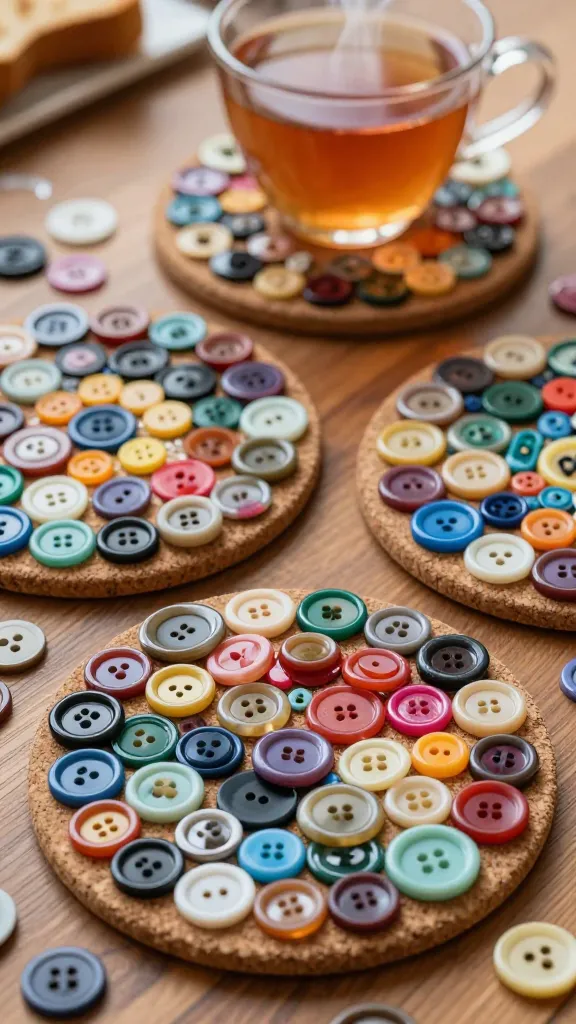
Coasters get an upgrade with a patchwork of buttons. Durable, charming, and surprisingly easy to customize, these coasters turn a practical kitchen essential into a tiny piece of art. They’ll brighten up coffee corners and are perfect as thoughtful gifts.
Materials Needed
- Round cork or wood coasters (or cut your own from plywood)
- Assorted buttons
- Strong craft glue or epoxy
- Felt or cork backing for grip
How to Make It
- Plan a simple pattern or color gradient on the coaster surface.
- Glue buttons down in a tidy, mosaic-like arrangement.
- Let dry completely, then add a backing to prevent snagging surfaces.
Pro Tips / Styling Ideas
- Mix button sizes for a dynamic look, or keep uniform for a minimalist feel.
- Create a set with a coordinated palette—great for a housewarming gift or a hostess gift.
Who will love it: Hosts or DIY enthusiasts who want practical, pretty items. These coasters are sturdy, washable-friendly, and endlessly customizable.
Conclusion
If you’re hunting for fast, joyful, photo-ready crafts, these seven ideas prove that buttons aren’t just for clothing. They’re tiny portals to color, texture, and personality you can wear, hang, or use every day. Pick one (or all seven) and start crafting this weekend—the results are charming, shareable, and totally you.
Happy crafting! You’ll love how each simple button becomes a gateway to something beautiful and personal. Seriously, you won’t want to stop at just one.