8 Engaging Craft Ideas for a 5-Year-Old
Ready to spark tiny imaginations and big smiles? These eight crafts are perfect for little hands, big giggles, and a whole lot of DIY magic. They’re simple, sensory, and seriously satisfying to complete with a short attention span in tow—trust me, your mini-workshop will be buzzing.
Grab some supplies, set up a cozy crafting nook, and dive in. Each idea feels like a tiny celebration, with colorful textures, easy steps, and room for personality. Seriously, you’ll want to try them all.
1. Rainbow Pebble Fairy Garden in a Jar
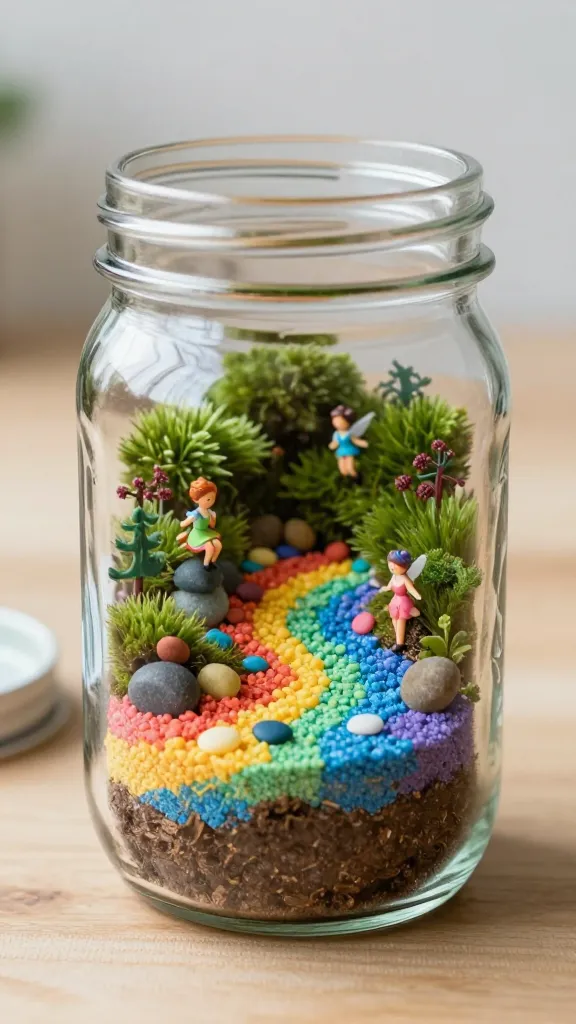
Picture a miniature world tucked inside a clear jar, where every pebble is a tiny story. This isn’t just a craft—it’s a tiny adventure you and your child can create and rearrange again and again. The textures, colors, and whimsy make it a sensory delight.
Materials Needed
- Clear jar or mason jar with lid
- Flat decorative pebbles in assorted colors
- Miniature figurines (fairy or woodland critters)
- Colored sand or potting soil (for base)
- Artificial moss or felt greenery
- Waterproof glue or hot glue (adult supervision)
How to Make It
- Layer a bit of colored sand or soil in the jar to create a ground map.
- Arrange pebbles to form stepping stones and build a tiny landscape around them.
- Press moss and greenery along the edges for a lush, enchanted look.
- Place the miniature figures amid the pebbles and moss, then seal the lid if you like.
Pro Tips / Styling Ideas
- Use translucent beads to simulate dew on the moss for a magical vibe.
- Swap out pebbles for seasonal colors—pastel spring, sunset autumn, or frosty winter hues.
- Create a bookend or shelf decor by displaying a pair of jars side by side.
Who will love it? Kids who adore tiny worlds, fantasy tales, and quiet playtime. It’s a cozy, collectible project you’ll keep returning to.
2. Texture-Collage Storyboard Cards
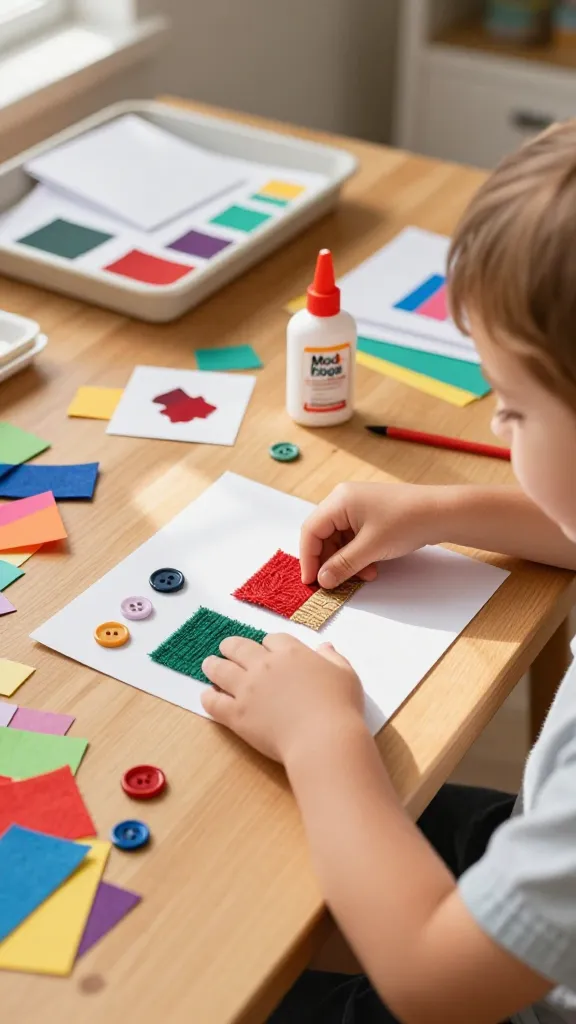
Turn a stack of plain cards into a tactile storytelling deck. Your child will press, peek, and narrate as textures cue their imagination. It’s literacy- and creativity-boosting without feeling like work.
Materials Needed
- Index cards or sturdy cardstock
- Craft glue or mod podge
- Fabric scraps, yarn, felt, buttons
- Colored papers, ribbon, glitter (optional)
- Pens or markers
How to Make It
- Glue a small texture patch onto each card (one texture per card works best).
- Decorate the edges with doodles and color blocks that hint at a story hook.
- On the back, write a simple prompt like “A brave bear visits the jellybean forest.”
Pro Tips / Styling Ideas
- Laminate or seal with mod podge to keep textures intact after playful use.
- Create a set of adventure themes (forest, ocean, space) for variety.
- Store in a decorated tin or small clipboard for on-the-go storytelling.
Who would love it? Kids who love making up tales, guessing the next scene, or needing a gentle, creative prompt before bedtime.
3. DIY Painted Plant Markers With Whimsical Faces
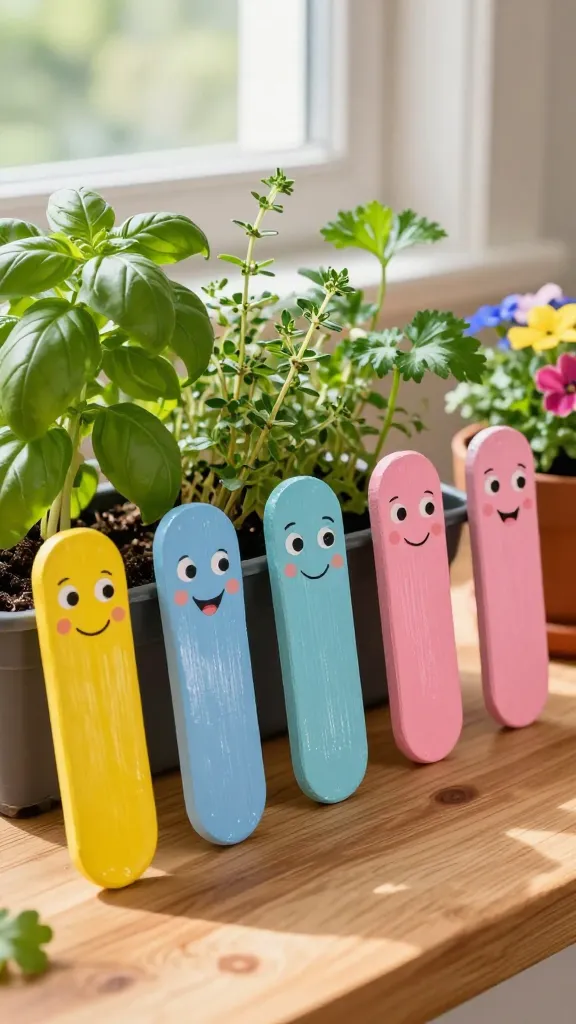
Turn plain wooden craft sticks into cheerful plant markers that double as mini characters. They’re adorable in a potted herb garden or a windowsill display, and their smiling faces spark joyful conversations between you and your kiddo.
Materials Needed
- Wooden craft sticks
- Acrylic paints in bright colors
- Paint brushes (fine for faces)
- Permanent marker
- Clear sealant (optional, for longevity)
How to Make It
- Paint the sticks as backgrounds—sunny yellow, sky blue, bubblegum pink.
- Add facial features with a fine brush or marker to create friendly faces.
- Let dry, then add a sealant if you plan to keep them outdoors or water-friendly.
Pro Tips / Styling Ideas
- Let kids choose expressions: surprised, winking, sleepy—whatever makes them smile.
- Attach a small label with the plant name for a mini science boost.
- Group in a bowl or herb tote by color family for a bright display.
Who would love it? Garden-loving families and curious learners who enjoy adding personality to their greens. They’re a bright touch that makes gardening feel magical.
4. Felt Animal Glove Puppets
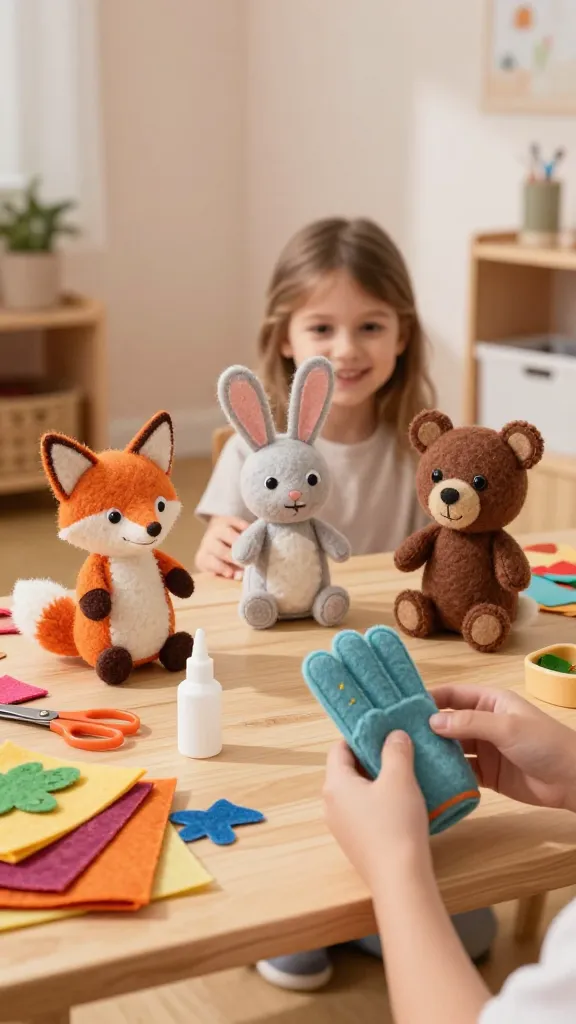
Craft little animal pals from felt so your child can put on a mini show with their own voice and stories. Soft textures and simple shapes make these puppets perfect for mini performances and imaginative play sessions.
Materials Needed
- Assorted felt sheets
- Fabric scissors
- Glue or fabric glue
- Googly eyes or felt to cut eyes
- Optional embroidery thread for noses and mouths
How to Make It
- Cut simple animal shapes (fox, bunny, bear) with a small mouth opening for the puppet.
- Glue eyes and noses in place, then add small details with embroidery or markers.
- Slip the finished puppet onto a finger or hand model for a quick show.
Pro Tips / Styling Ideas
- Match a color theme to a favorite book or show for cohesive storytelling.
- Keep patterns simple for younger kids to replicate on their own.
- Use as puppets during bedtime stories to bring characters to life.
Who would love it? Kids who adore theatre, animal friends, and a cozy, hands-on playtime that invites dialogue and pretend play.
5. Salt Dough Clip Magnets With handmade Mosaics
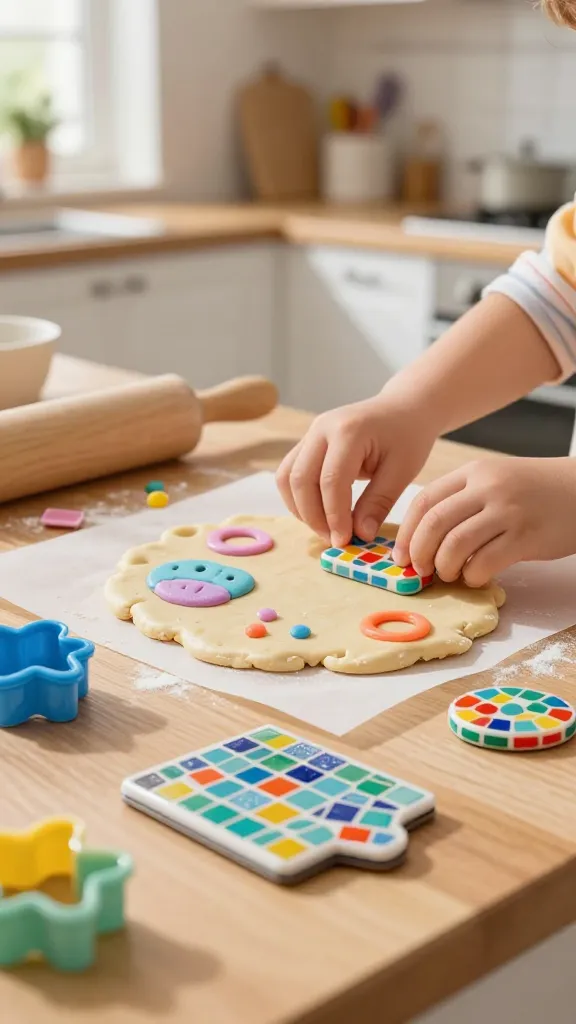
A crunchy, crunchy dough that bakes into sturdy magnets—perfect for fridge art that actually sticks around. Kids can sculpt, stamp, and press tiny mosaic tiles into the dough for a colorful, durable keepsake.
Materials Needed
- 1 cup flour, 1/2 cup salt, 1/2 cup water (classic salt dough)
- Acrylic paints
- Small magnet pieces or strips
- Stampers, rollers, and cookie cutters (optional)
- Nonstick mat or parchment paper
How to Make It
- Knead dough until smooth, then roll to about 1/4 inch thick.
- Cut shapes or press textures, and stamp tiny patterns.
- Bake according to dough recipe until hard, then paint and seal.
- Attach magnets with glue on the back.
Pro Tips / Styling Ideas
- Use color-blocked mosaics or tiny stamped stamps to add personality.
- Seal with a clear varnish to make it shiny and fridge-friendly.
- Combine seasonal shapes for a rotating gallery on the fridge.
Who would love it? Fridge decor fans and budding artists who enjoy tactile activities and functional crafts.
6. Marbled Egg Cardboard Creations
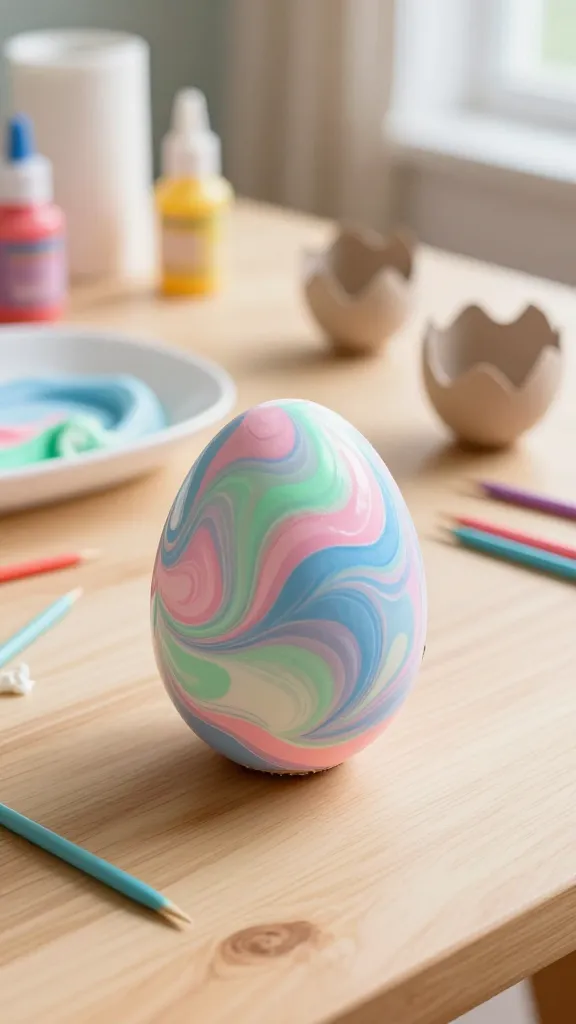
Turn cardboard into whimsical, marbled eggs ready for display or gifting. The marbling is mesmerizing to watch and surprisingly easy for little hands to control, especially with a little coaching from you.
Materials Needed
- Cardboard eggs or shapes cut from thin cardboard
- Shaving cream or bubble paint and a tray
- Food coloring or acrylic paint
- Toothpicks or skewers
- Paper towels for cleanup
How to Make It
- Spread shaving cream in a tray and drizzle colors on top.
- Swirl colors with a stick to create a marbled pattern.
- Dip the cardboard egg in the marbled mix, press lightly, then lift and let dry.
Pro Tips / Styling Ideas
- Use pastel tones for a spring vibe or neon hues for a bold display.
- Cut out extra shapes and hang them as a garland for a party vibe.
Who would love it? Kids who enjoy science-ish activities, color play, and a fun way to decorate for holidays or birthdays.
7. Cardboard Creature City Garland
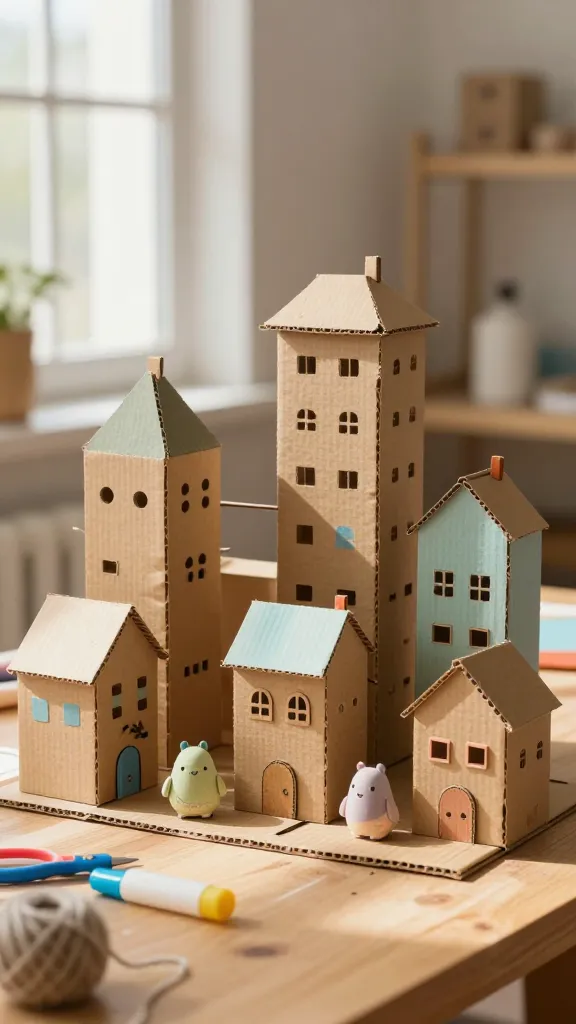
Build a tiny, portable city from cardboard where each building hides a small creature. It’s a collaborative storytelling project that doubles as whimsical wall decor when you’re finished. The scale is perfect for little hands and big imagination.
Materials Needed
- Corrugated cardboard scraps
- Acrylic paints or marker colors
- Scissors and glue
- Optional string or yarn for hanging
How to Make It
- Cut cardboard into simple building shapes—tall towers, cozy cottages, quirky shops.
- Paint and decorate with tiny windows, doors, and doodles.
- Glue a little creature figure on each building and string them into a line.
Pro Tips / Styling Ideas
- Use a consistent color palette to keep the city cohesive and Pinterest-worthy.
- Hang across a playroom wall or over a child’s bed for a magical skyline.
Who would love it? Little architects, animal lovers, and kids who adore imaginative neighborhood plays that travel around the room.
8. Seashell Stamped Tote Bags
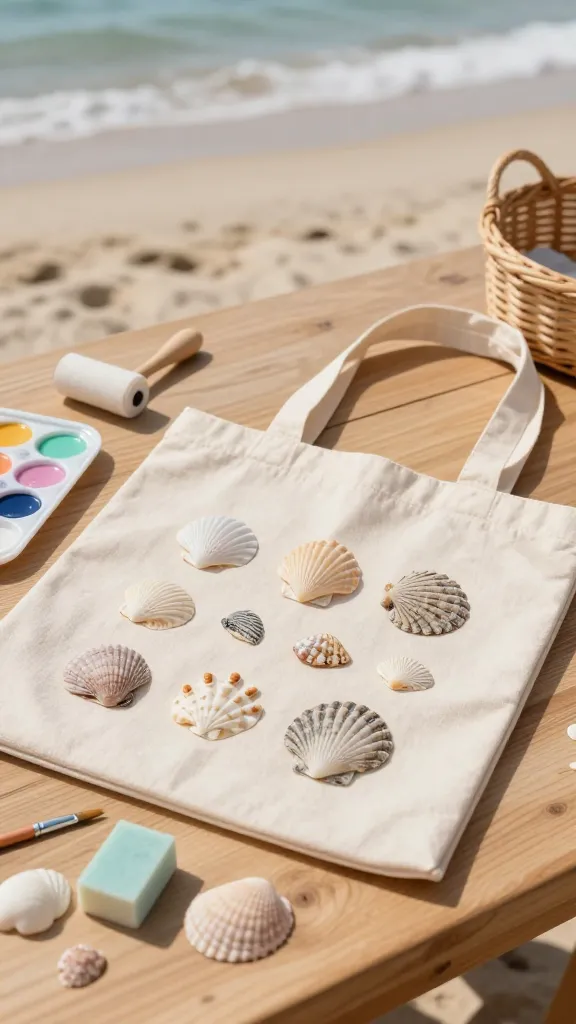
Breezy, beachy, and incredibly fun to stamp with natural textures. A tote bag becomes a wearable craft piece and a practical companion for trips to the park or library. It’s a quick win with a big payoff.
Materials Needed
- Plain fabric tote bag (canvas works great)
- Shells (or shell stamps), sponges, and fabric paint
- Palette or plate for paints
- Paintbrush or stamp roller
How to Make It
- Pour a small amount of fabric paint onto a plate.
- Stamp shells or stamp shapes onto the bag in fun patterns or a repeating motif.
- Let dry, then set with heat if the paint label requires it (check your paint’s instructions).
Pro Tips / Styling Ideas
- Pair with a matching shell jewelry piece for a coordinated look.
- Create a seasonal pattern—starfish for summer, leaves for fall, etc.
Who would love it? Beach lovers, budding fashion designers, and anyone who enjoys a practical, stylish craft that travels well.
Conclusion
There you have it—eight completely unique, delightful crafts that are perfect for a 5-year-old sidekick and a crafty adult. Each project is designed to be tactile, colorful, and doable in short bursts of focus, with room for imagination to run wild. Pick one, or tackle them all this weekend; you’ll end up with charming keepsakes, playful decor, and a happy, inspired kiddo who can’t wait to create again.
Ready to start? Gather your supplies, pick a favorite idea, and dive in. You’ll love the shared laughter, the proud little smiles, and how easy these projects are to fit into any day. The best part? Crafting together makes memories that last far longer than the glue on your fingers.