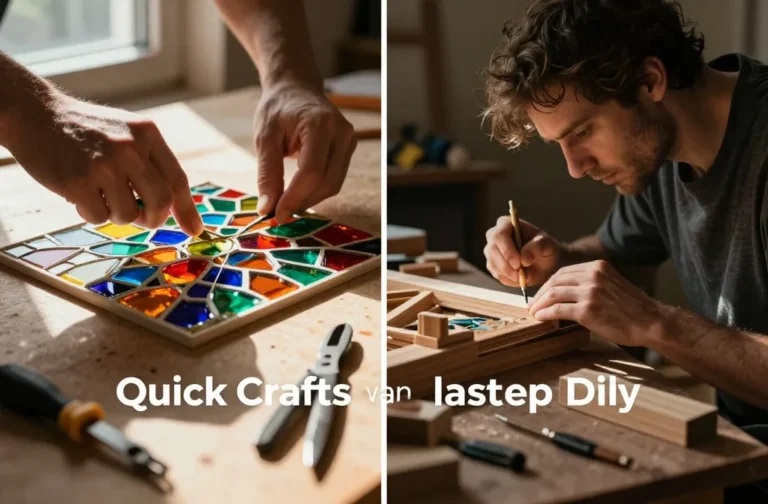
8 Quick Crafts Trash to Treasure Ideas
Ready to turn everyday junk into jaw-dropping gems? These eight trash-to-treasure projects are fast, fun, and totally doable with materials you’ve probably got lying around. Trust me, you’ll love how satisfying it is to breathe new life into what you’d toss aside.
1. Upcycled Door-Panel Wall Organizer with Botanical Touch
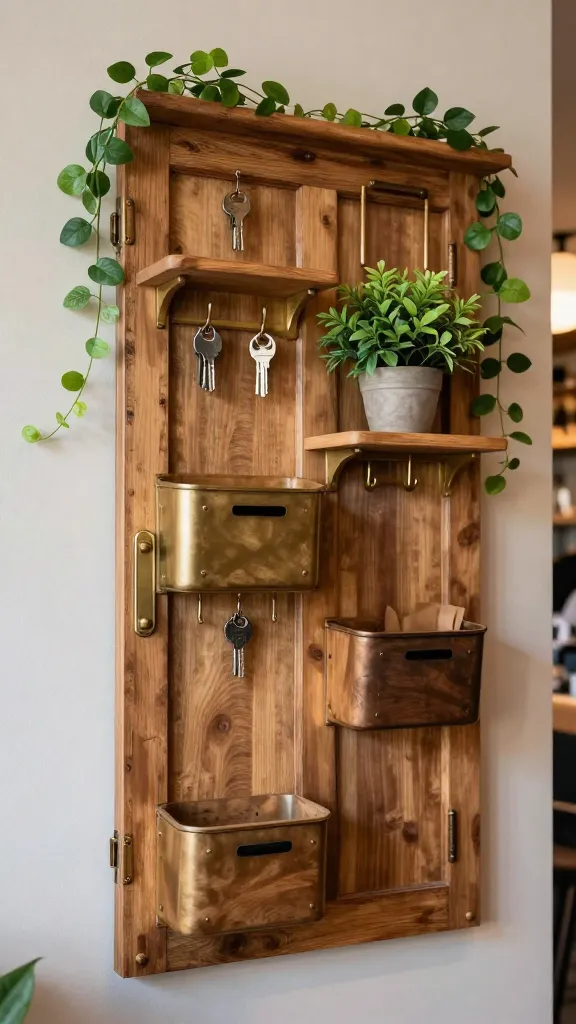
Imagine a chic wall organizer made from an old door panel, wandering vines, and a pinch of brass hardware. It’s rustic, stylish, and incredibly practical for mail, keys, and little trinkets. Seriously, it looks like it wandered in from a boutique hotel lobby.
Materials Needed
- Old door panel (hollow-core works too)
- Sandpaper
- Mini shelves or wooden ledges
- Brass or copper hardware (hooks, bins)
- Paint or stain (optional)
- Potted plant or faux greenery for the botanical flair
How to Make It
- Sand the door panel until smooth. If it has raised panels, lightly flatten to ensure a flat back.
- Paint or stain to your vibe—think warm white and natural wood tones, or a moody charcoal for drama.
- Attach small shelves or ledges to create little nooks for mail or decor. Add hooks underneath for keys.
- Install a vine or cascading greenery along the top edge for that effortless botanical vibe.
Pro Tips / Styling Ideas
- Keep a tiny chalkboard label above each bin for quick reminders.
- Line the shelves with birch bark or fabric for extra texture.
- Place near the entryway so you can grab keys on the way out—no more rummaging!
End Note
Who would love it: fans of farmhouse chic and busy families who need a decluttered, styled space. The finished piece feels curated, not cluttered.
2. Tin Can Lanterns with Painted Patterns
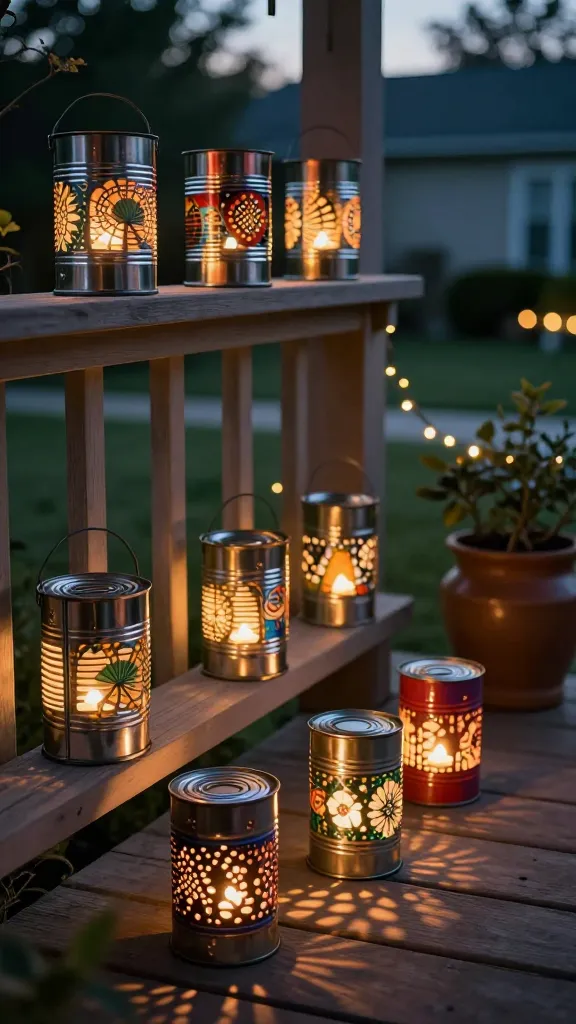
Shipping the dull into dazzling, these tin-can lanterns glow like tiny moons. The best part? They’re made from recyclable cans, so you can craft a whole constellation for your porch or dining table. You’ll be surprised how easy it is to customize with color and cutouts.
Materials Needed
- Empty tin cans (smooth edges or a can opener lid for safety)
- Metal snips or nail and hammer for holes
- Acrylic paint or chalky finish
- Tea lights or LED candles
- String or ribbon for hanging (optional)
How to Make It
- Clean cans thoroughly and dry completely.
- Punch small holes in patterns around the can or cut shapes for light play. FYI, simple geometric or floral designs look great.
- Paint the outside in your favorite colors; let dry, or distress for vintage vibes.
- Place a tea light inside and set on a tray or hang outdoors for atmospheric evenings.
Pro Tips / Styling Ideas
- Create a mixed-color set: blues, golds, and soft whites for a coastal/boho look.
- Group several at different heights for a magical focal point on a table or mantel.
End Note
Who would love it: party hosts, balcony dwellers, and anyone who adores warm, twinkling light without much fuss.
3. Fabric Scrap Wall Tockets: Woven Memory Orbs
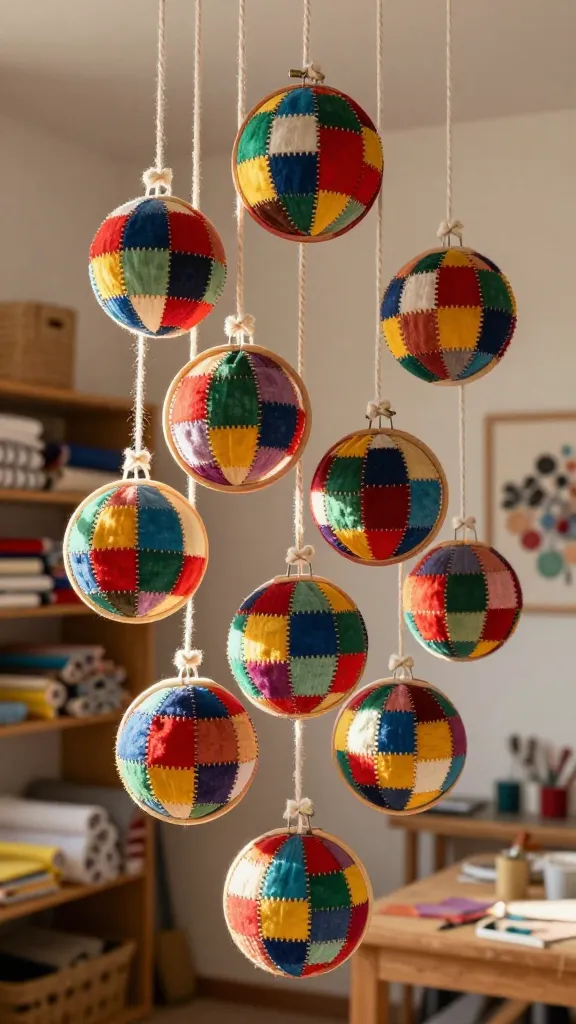
Turn fabric scraps into tactile, colorful orbs that hang like festive, lightweight sculptures. They’re a conversation starter and super forgiving—perfect for crafters of all levels. You’ll smile every time you pass by the soft, patchwork glow.
Materials Needed
- Assorted fabric scraps
- Cotton cord or thick thread
- 3–4 embroidery hoops (or skip hoops and just knot layers)
- Hot glue or fabric glue
- Needle
How to Make It
- Cut fabric into uniform squares or circles. The more variety, the cooler the texture.
- Fold and wrap the fabric around cords, knotting as you go to form a skein of soft layers.
- Seed the fabric bundles into embroidery hoops or tie them into a hanging lattice.
Pro Tips / Styling Ideas
- Pick a color story—earthy tones for a cozy den, or jewel tones for a playful living room.
- Vary the lengths for a mobile-like effect that dances with air currents.
End Note
Who would love it: textile lovers, playful kids’ rooms, and anyone who wants a tactile art piece with a warm, handmade feel.
4. Glass Jar Apothecary Set Reimagined
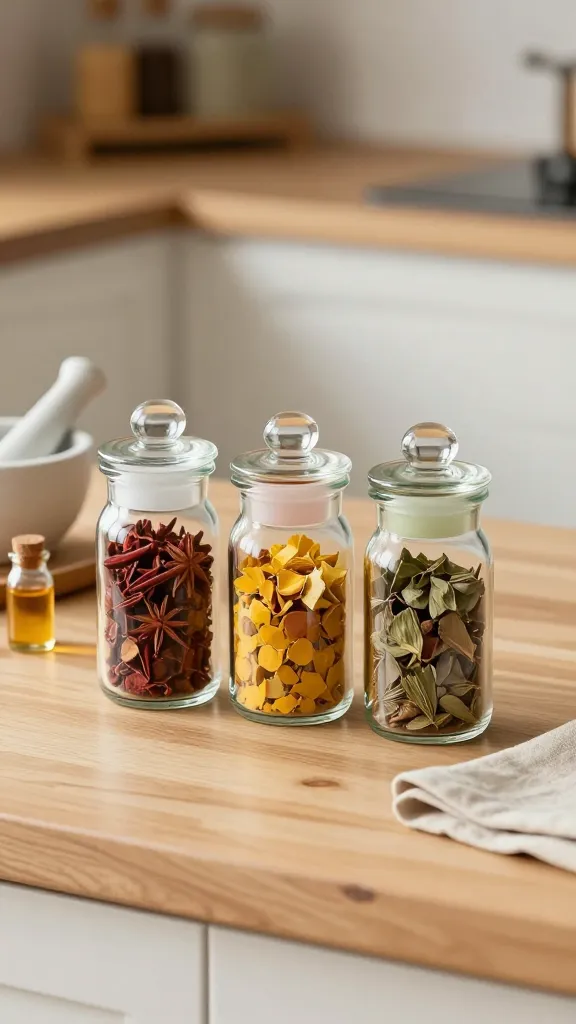
Small glass jars get a major upgrade with color, character, and clever labeling. This set becomes a stylish kitchen stash, a bathroom saver, or a charming gift trio. It’s the kind of project that looks store-bought but feels personal and homey.
Materials Needed
- Old glass jars with lids
- Paint pens or glass paint
- Washed, dried spices or dry goods for inside (optional)
- Chalkboard labels or printed labels
How to Make It
- Clean jars well and dry completely. Add a splash of color with paint pens or a light coat of glass paint.
- Label with cute titles: “Herbs,” “Tea,” “Candy”—and cover lids with faux leather or fabric for texture.
- Optional: fill a few with decorative items like dried lavender or colorful pasta.
Pro Tips / Styling Ideas
- Group with a wooden tray and a small potted plant for a vignette on the countertop.
- Use a chalkboard tag for easy updating of contents.
End Note
Who would love it: kitchen stylists, organizing gurus, and anyone who loves cute, compact storage with a touch of whimsy.
5. Vintage Suitcase Plant Stands
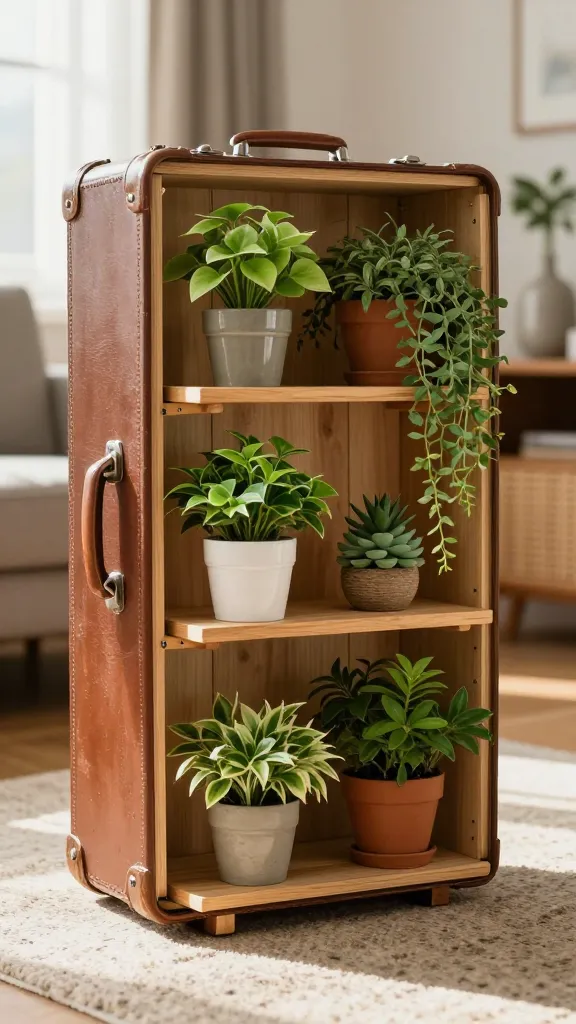
Turn a tired suitcase into a chic, multi-tiered plant stand. It’s retro, functional, and a delightful surprise in any room. You’ll feel like you found a treasure at a flea market—even if it came from your attic.
Materials Needed
- Old suitcase with a sturdy base
- Small wooden boards or planks for shelves
- Wood screws and a drill
- Non-slip pads or felt feet
How to Make It
- Open the suitcase and clean inside and out. Remove any torn lining.
- Measure and cut small shelves to fit inside, then attach with screws in an even, staggered pattern.
- Add felt feet to the bottom to protect floors and keep the stand steady.
Pro Tips / Styling Ideas
- Paint the exterior in a glossy emerald or dusty rose to modernize the vibe.
- Place trailing plants on the top shelf and compact pots on the lower levels for a lush, layered look.
End Note
Who would love it: plant lovers, vintage enthusiasts, and anyone who wants an eye-catching, conversation-starting piece.
6. Egg Carton Bloom Lights
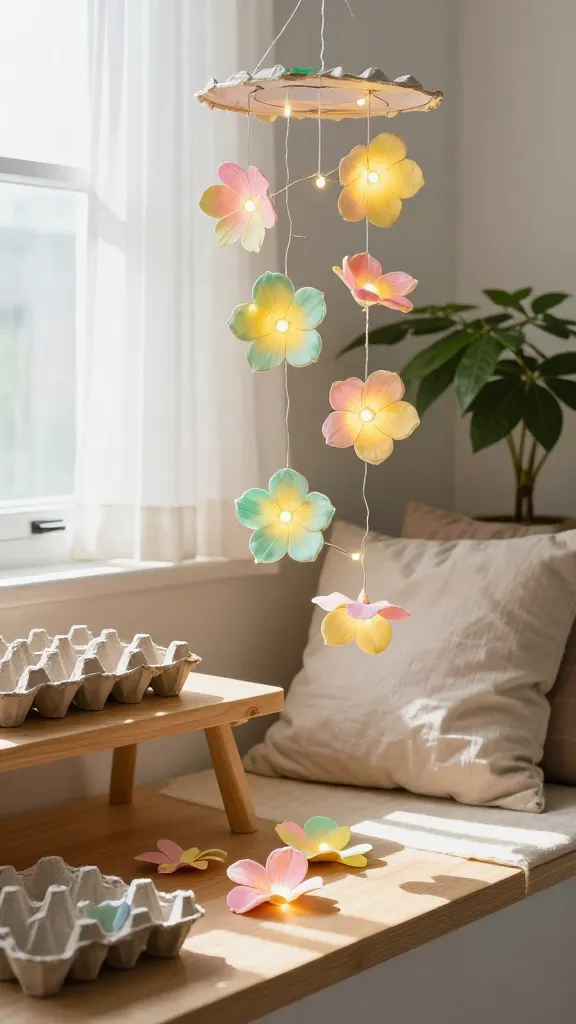
Eco-friendly decor meets playful whimsy with blooms made from repurposed egg cartons. String them into a garland or hang as a mobile; they cast a soft, floral glow that brightens every corner. You’ll be surprised how quickly this comes together and how charming it looks in a sunlit corner.
Materials Needed
- Egg cartons (recycled paper cartons work best)
- Acrylic paint and brushes
- Wire or twine for string lights
- LED fairy lights or a small battery pack
How to Make It
- Cut the cup sections from the carton and shape into flower petal clusters. Paint in pastel hues or vibrant tones.
- Attach to a string or wire loop, spacing evenly.
- Wrap the lights through the petals so the bulbs peek through for a magical glow.
Pro Tips / Styling Ideas
- Combine several colors for a garden-party vibe.
- Hang over a dining table or in a bedroom corner for a soft focal point.
End Note
Who would love it: DIY lovers, sunlit spaces, and anyone who enjoys warm, whimsical lighting.
7. Surplus Curtain Panels into Modern Wall Art
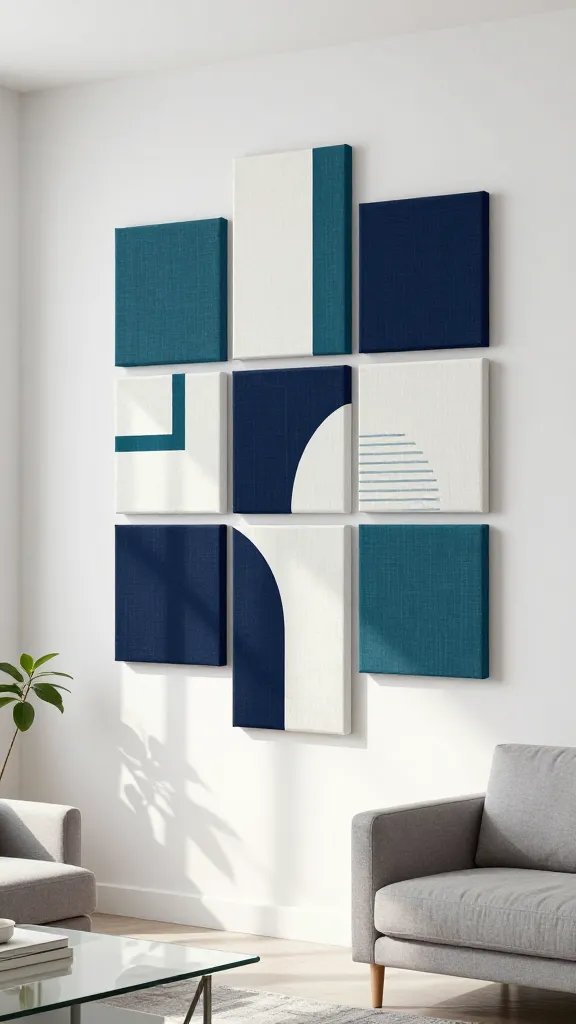
There’s nothing dull about transforming tired curtains into bold wall art. This project yields large, graphic panels that feel contemporary, lightweight, and totally inexpensive. It’s a chic upgrade with zero drama and all the style.
Materials Needed
- Old curtain panels or fabric remnants
- Stretch canvases or a wooden frame
- Fabric glue or hot glue
- Paint, stencils, or fabric dye
How to Make It
- Cut fabric into large rectangular shapes to fit your canvases.
- Adhere fabric to canvases with glue, pulling tight for a clean finish.
- Add color accents with paint or dye. Create a bold pattern or a subtle ombre.
Pro Tips / Styling Ideas
- Hang as a pair or trio for a gallery wall effect.
- Lightly seal with a matte fixative to prevent colors from running.
End Note
Who would love it: interior stylists, apartment dwellers, and anyone chasing a high-impact wall without heavy framing.
8. Cardboard City Plan Stencil Tray
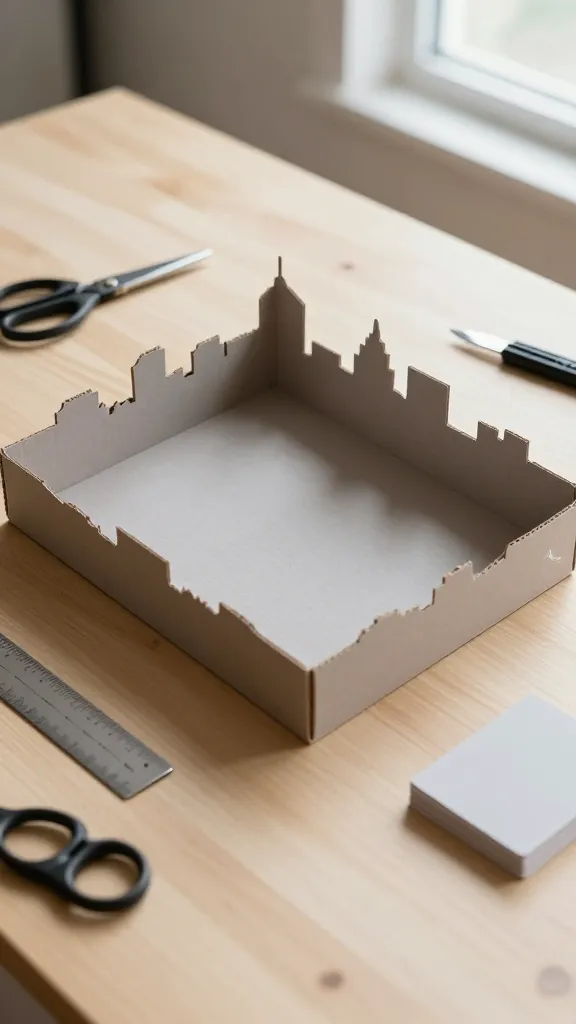
Repurpose sturdy cardboard into a sleek, city-inspired tray perfect for desk essentials or a snack station. It’s minimalist, practical, and a satisfying win for anyone who appreciates clever recycling. FYI, you’ll be surprised how sturdy a well-cut piece can feel.
Materials Needed
- Thick cardboard or foam board
- Ruler, craft knife, and scissors
- Paint or decorative paper
- Clear sealant or Mod Podge
How to Make It
- Cut cardboard into a shallow rectangular tray with raised edges.
- Decorate the exterior with paint or decorative paper, then seal for durability.
- Line the inside with a decorative napkin or fabric for a finished look.
Pro Tips / Styling Ideas
- Use as a desk catch-all or a bedside tray for the morning routine.
- Pair with a small plant and a candle for a cozy, modern vignette.
End Note
Who would love it: minimalist design lovers, students, and anyone who enjoys inventive, budget-friendly decor.
Conclusion
These 8 Quick Crafts Trash to Treasure Ideas prove you don’t need a big budget to craft big style. Grab a few stray scraps, unleash your imagination, and you’ll have standout pieces that feel personal and totally livable. So, which one will you start first—or will you conquer all eight and turn your space into a magnetic, handmade haven? The joy is in the trying, and trust me, the payoff is gorgeous.