12 Craft Ideas for School Teens: Quick Diy Glow-Ups
What if your next free period could turn into a mini makeover session for your backpack, desk, or laptop stickers galore? These 12 craft ideas for school teens are fast, fun, and totally doable between classes or after-school hangouts. Trust me, you’ll love the creative glow-up each project brings.
1. Neon Doodle Desk Organizer With Washi Tape Pop
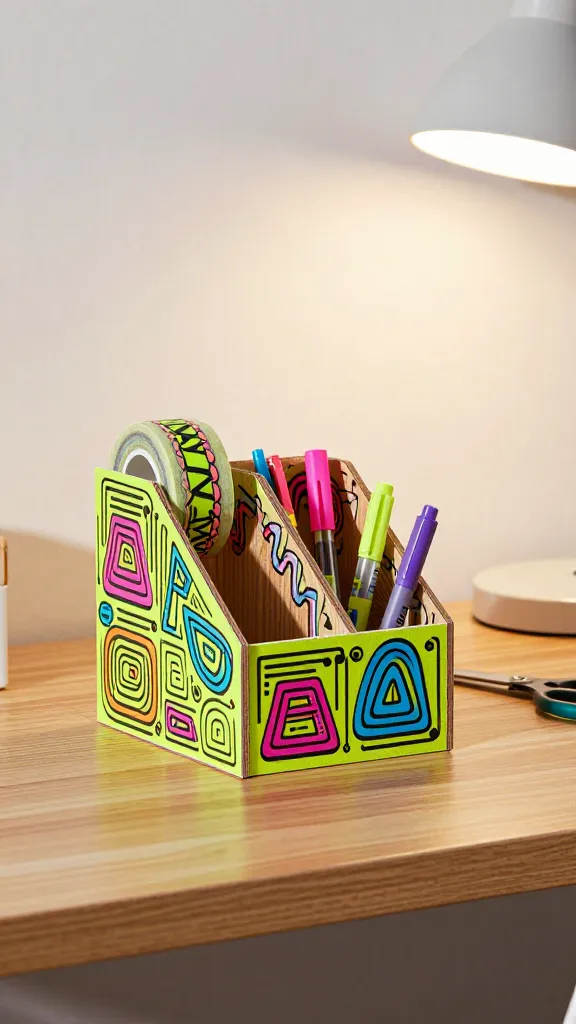
Picture a desk that sparks joy every time you sit down to study. This neon doodle desk organizer brings color, function, and a little rebellion against boring school furniture. The taped details are punchy, and the finished piece looks like it came straight from a trendy dorm room.
Materials Needed
- Small wooden or cardboard desk caddy
- Bright washi tape in bold colors
- Permanent marker or acrylic pens
- Scissors
How to Make It
- Wrap the edges with neon washi tape, layering patterns for extra zing.
- Add doodle designs along the front and sides with markers.
- Seal with a clear spray if you want extra durability (optional).
Pro Tips / Styling Ideas
- Keep a small tray inside for pens, clips, and highlighters.
- Pair with a matching pencil cup and a mug cozy for color coordination.
Who would love it? Anyone who wants a quirky, colorful desk upgrade that’s totally Pinterest-worthy.
2. Scrappy Journal Cover Quilt Patch
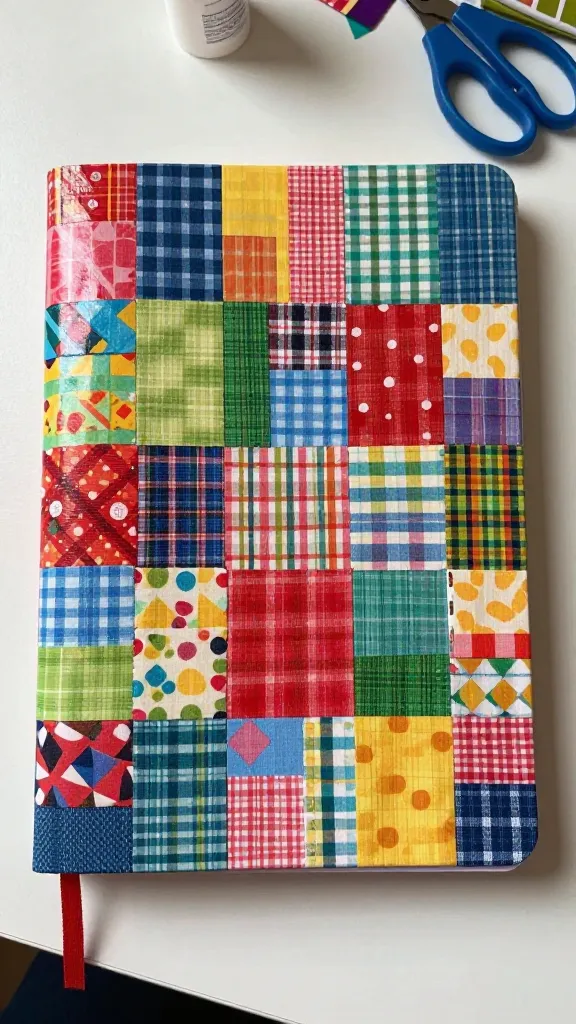
Turn an ordinary notebook into a treasure chest with a patchwork cover. This project merges fabric scraps or colorful paper into a cozy, quilt-like design—perfect for school notes and personal expression. It feels DIY, but it’s quick enough for a weekend sprint.
Materials Needed
- Plain notebook or student planner
- Assorted fabric scraps or decorative paper
- Mod Podge or fabric glue
- Scissors
- Clear sealant spray (optional)
How to Make It
- Cut fabric or paper into small squares or rectangles.
- Arrange a pleasing patchwork layout on the cover, then glue down.
- Seal with Mod Podge layer or clear spray to keep everything in place.
Pro Tips / Styling Ideas
- Use school colors or a favorite theme (galaxy, florals, retro) for a cohesive look.
- Add a fabric label with your name or a doodle at the corner.
Who would love it? Makers who adore tactile, textural art and want a personalized notebook that stands out in their backpack.
3. Customizable Ribbon Bookmark Charms
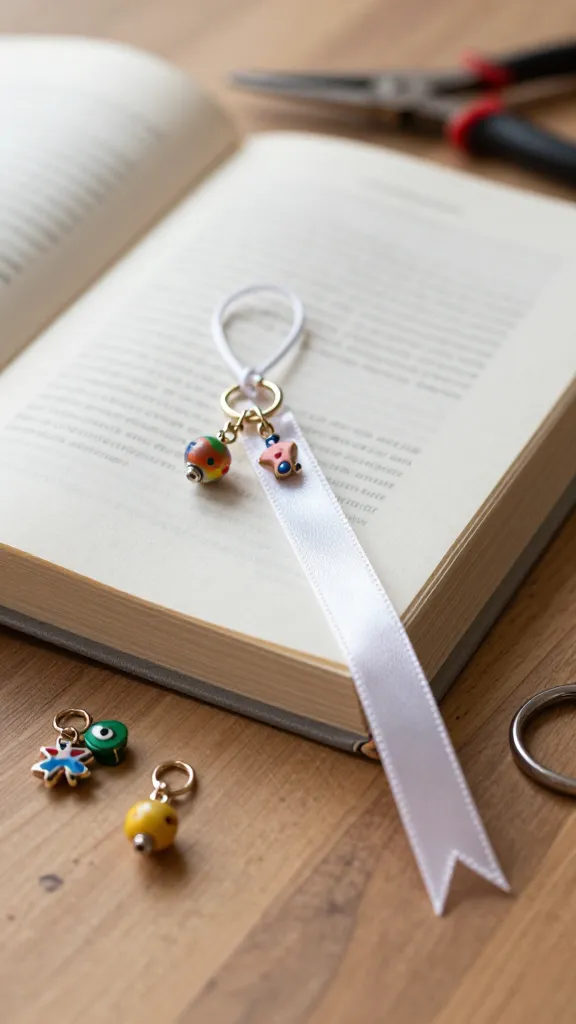
Gift or keep a tiny treasure you’ll actually reach for. A ribbon bookmark with a little charm doubles as a crafty celebration of bookish vibes and personal flair. It’s simple, cheap, and endlessly customizable.
Materials Needed
- Ribbon spool (thin, 1/4 inch works best)
- Mini charm or bead assortment
- Jump rings or small keychain clasps
- Jump ring pliers
- Scissors
How to Make It
- Fold ribbon to form a tail, then attach a charm with a jump ring.
- Trim the ends for a clean look and secure with a dab of glue.
Pro Tips / Styling Ideas
- Match charms to your personality—zodiac, favorite animal, or tiny space rocket.
- Create a set of two or three bookmarks as a small gift pack.
Who would love it? Book lovers and stationery enthusiasts who want a tiny, stylish touch for their pages.
4. Celestial Sticky Note Galaxy Board
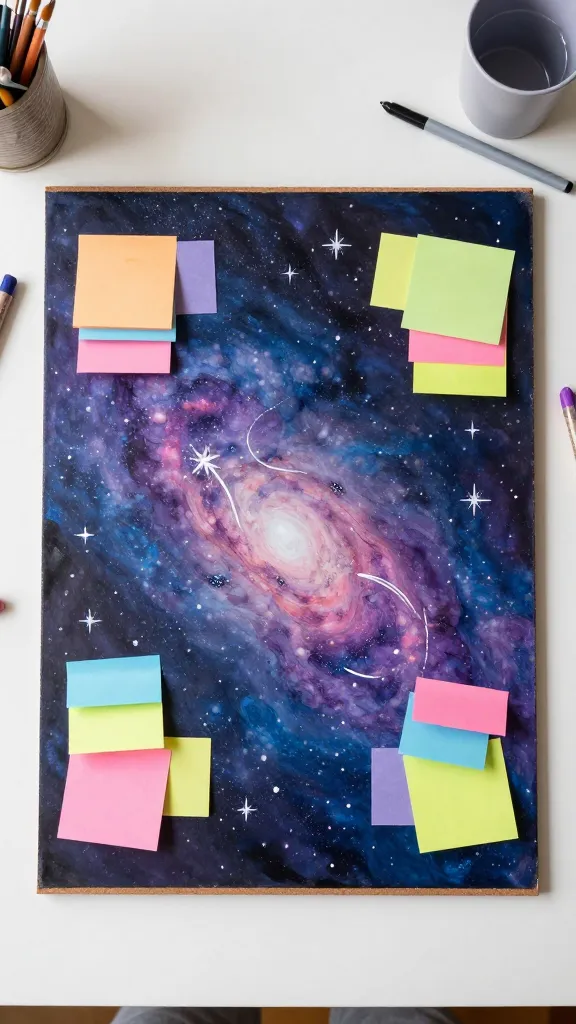
Turn a plain sticky note pad into a little galaxy canvas. This project layers colors, stars, and swirls into a dreamy, desk-worthy galaxy board that makes homework feel a little less icky.
Materials Needed
- Plain corkboard or thick cardboard
- Sticky notes in multiple colors
- Acrylic paints or watercolor paints
- White gel pen or paint marker
- Glitter (optional)
How to Make It
- Paint a gradient background on the board, then sprinkle a few starry dots with white pen.
- Decorate with sticky notes arranged like a constellation map.
Pro Tips / Styling Ideas
- Write study prompts on different colored notes for a quick cue system.
- Frame the board with faux metal corners for a framed-glow effect.
Who would love it? Visual learners and anyone who thrives with color-coded organization.
5. Cardboard Tech Cozy Sleeve
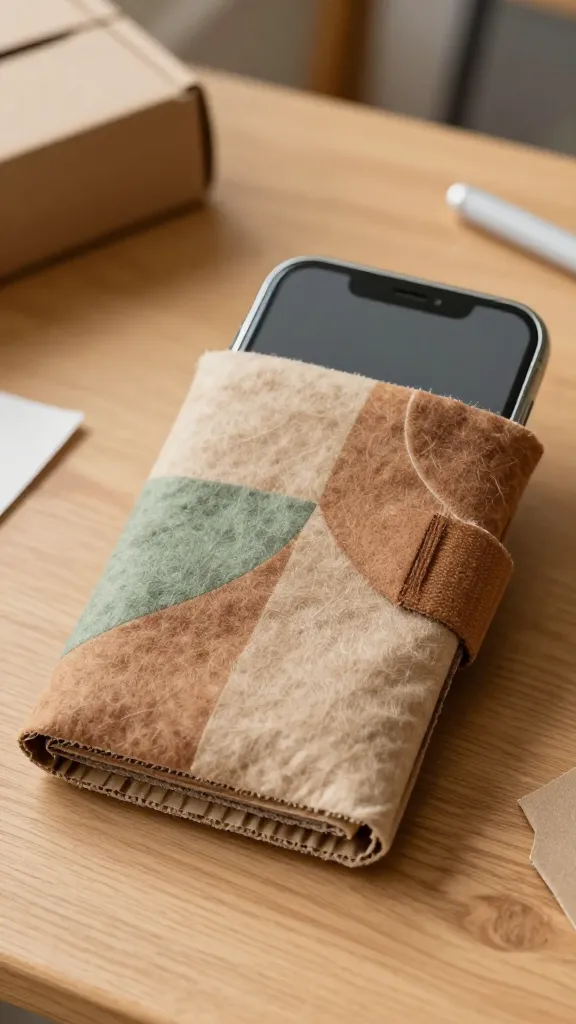
Give your phone, tablet, or handheld console a soft landing with a cozy sleeve made from upcycled cardboard and fabric. It’s a sustainability win and a stylish way to protect gear between classes.
Materials Needed
- Thick cardboard or an old cereal box
- Felt or soft fabric scraps
- elastic or Velcro strap
- Glue or a hot glue gun
- Scissors
How to Make It
- Cut a rectangle to fit the device, add a pocket, then wrap with fabric twice for a snug fit.
- Attach an elastic loop or Velcro strap closure.
Pro Tips / Styling Ideas
- Hide a mini charging cable inside the sleeve pocket for a nifty surprise.
Who would love it? Tech lovers who want a snug, thrifty case with a handmade feel.
6. Faux Succulent Wall Constellation
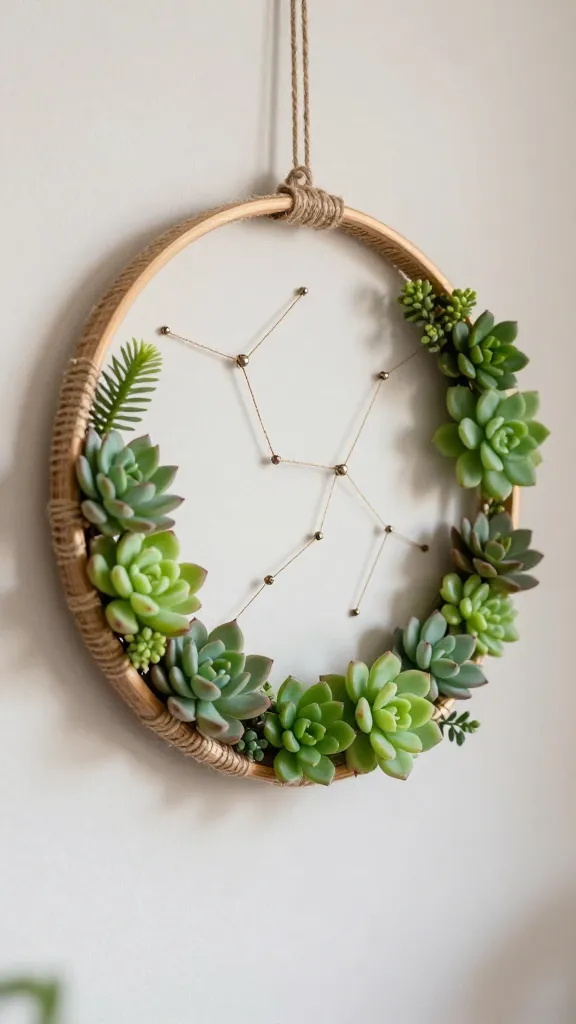
Create a tiny green oasis for a dorm or bedroom wall using faux succulents and a twine-and-wreath frame. It’s low-maintenance, high-impact, and seriously adorable.
Materials Needed
- Small faux succulents or greenery
- Wreath frame or wooden hoop
- Jute twine or thin ribbon
- Hot glue or craft glue
- Wire cutters
How to Make It
- Arrange succulents around the frame, then glue in place.
- Weave twine in a geometric pattern to mimic a constellation.
Pro Tips / Styling Ideas
- Paint the hoop in a metallic shade for a modern twist.
- Add a tiny chalkboard tag with your name or a welcome message.
Who would love it? Plant lovers who want a maintenance-free green corner that still feels lush.
7. Upcycled Denim Pocket Wall Holder
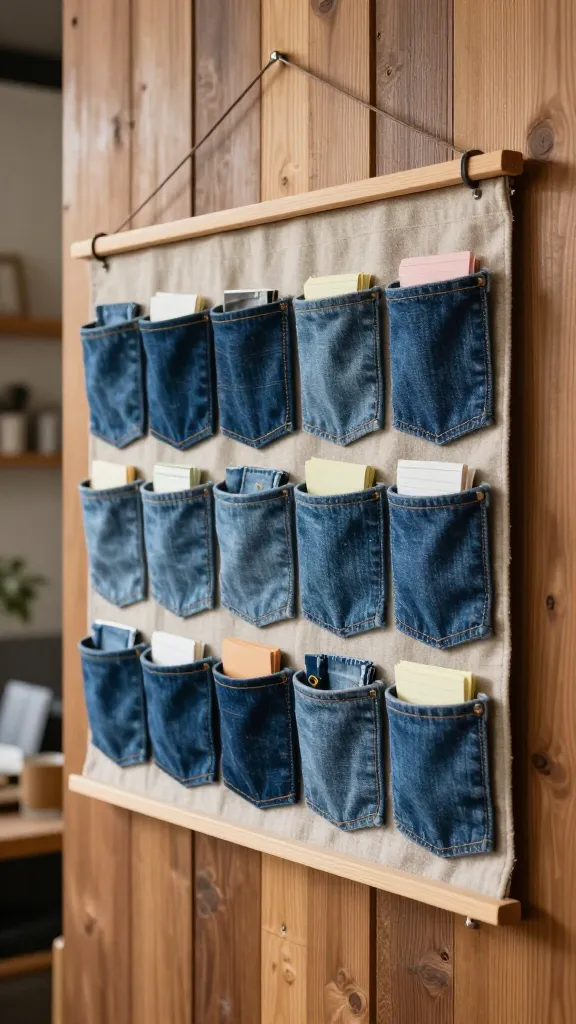
Turn old jeans into a funky wall-mounted organizer with pockets to stash notes, IDs, and small trinkets. It’s a practical, rugged piece that screams casual-cool.
Materials Needed
- Old denim jeans
- Strong fabric glue or sewing kit
- Wooden dowel or sturdy mounting strip
- Scissors
How to Make It
- Cut out back pocket sections and stitch or glue them to a fabric backing.
- Attach to a wooden dowel or mount on the wall with screws.
Pro Tips / Styling Ideas
- Label each pocket with a chalk marker for quick organization.
- Mix with mini string lights for a cozy vibe.
Who would love it? Students who crave a rugged yet decorative storage solution for backpacks and papers.
8. Glow-In-The-Dark Passport Mini-Organizer
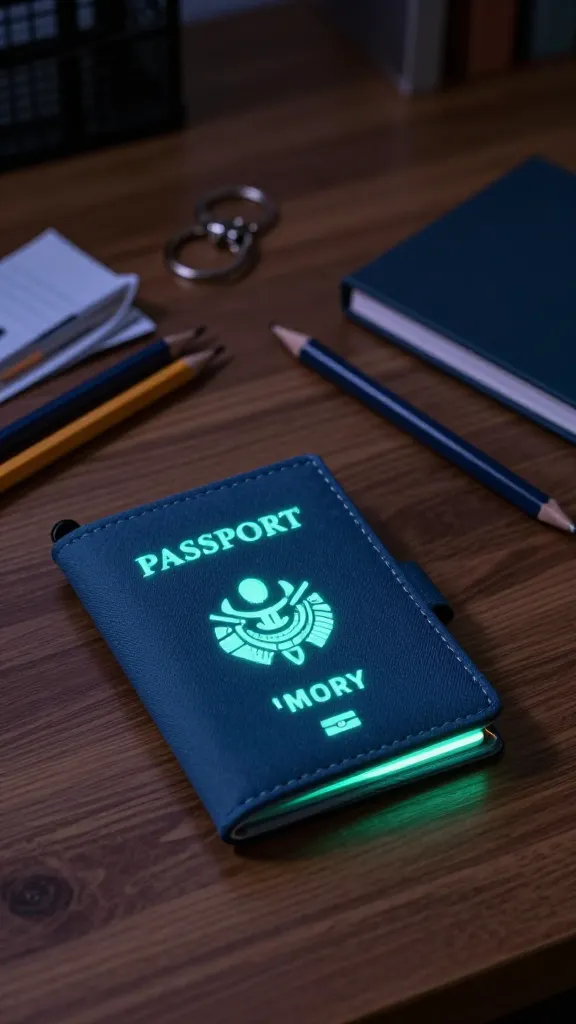
A compact, glow-in-the-dark organizer keeps school essentials in one place and meets a stylishly nocturnal vibe. Perfect for late study sessions or quick runs to the library.
Materials Needed
- Small fabric pouch or zipper pouch
- Glow-in-the-dark paint or fabric markers
- Stickers or stencils for designs
- Clear fabric sealant (optional)
How to Make It
- Decorate the pouch with glow paint or markers, adding simple icons or initials.
- Seal with a light coat to set the glow effect and protect the design.
Pro Tips / Styling Ideas
- Keep spare room keys and ID cards inside for easy nighttime access.
Who would love it? Night owls and organizers who want a little glow for their late-night planning sessions.
9. Botanical Washi Letterboard Art
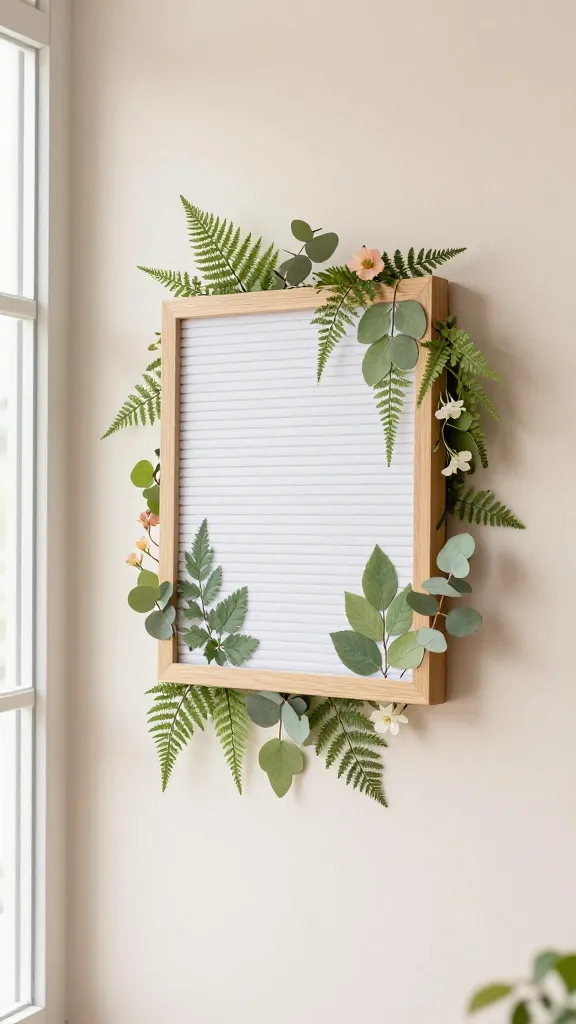
Combine a tiny letterboard with pressed leaves or faux plants for a fresh, leafy message board. It’s like a tiny greenhouse you can hang on your wall.
Materials Needed
- Mini letterboard or alphabet tiles
- Pressed leaves or faux greenery
- Glue or double-sided tape
- Small frame (optional)
How to Make It
- Arrange a short word or message using letters on the board.
- Scatter greenery around the frame and secure with glue.
Pro Tips / Styling Ideas
- Change the message with seasons or moods.
- Pair with a pastel-painted frame for a soft, botanical look.
Who would love it? Plant lovers and minimalists who want a calm, nature-inspired message piece.
10. Candy Stripe Cable Knit Mug Cozy
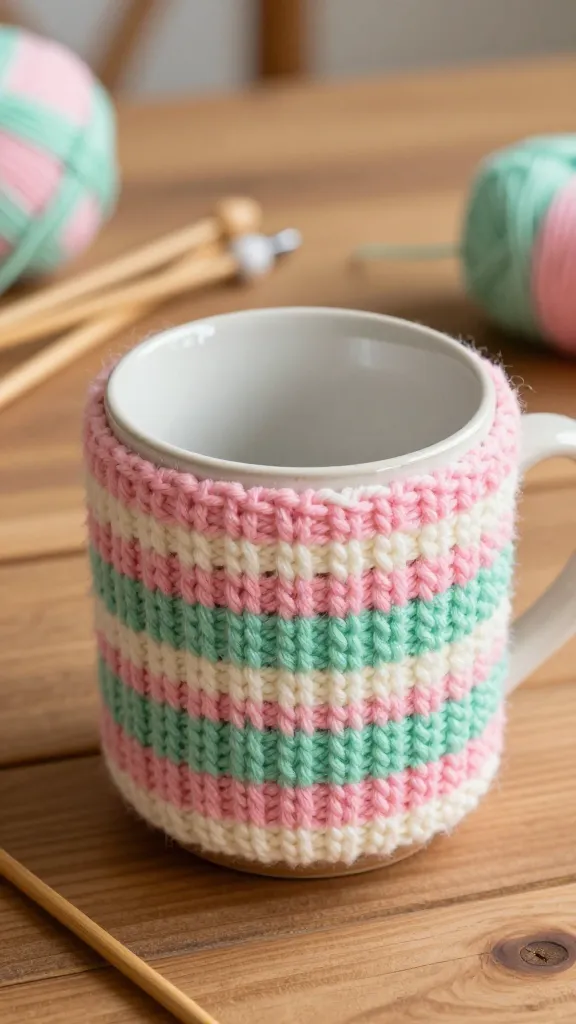
Who says cozy can’t be cute? Knit or crochet a simple mug cozy in candy stripe colors to brighten cold study sessions and coffee runs. It’s quick, satisfying, and seriously cozy.
Materials Needed
- Cotton knitting yarn in 2–3 colors
- Knitting needles or a crochet hook (depending on skill)
- Scissors and a yarn needle
How to Make It
- Choose a simple rib pattern, knit a small rectangle long enough to wrap around a mug, then sew ends together.
Pro Tips / Styling Ideas
- Add a tiny fabric tag with your initials for a custom touch.
Who would love it? Coffee lovers, hot cocoa fans, and anyone who wants a quick handmade mug hug.
11. Printable Tie-Dye Desk Pad Pages
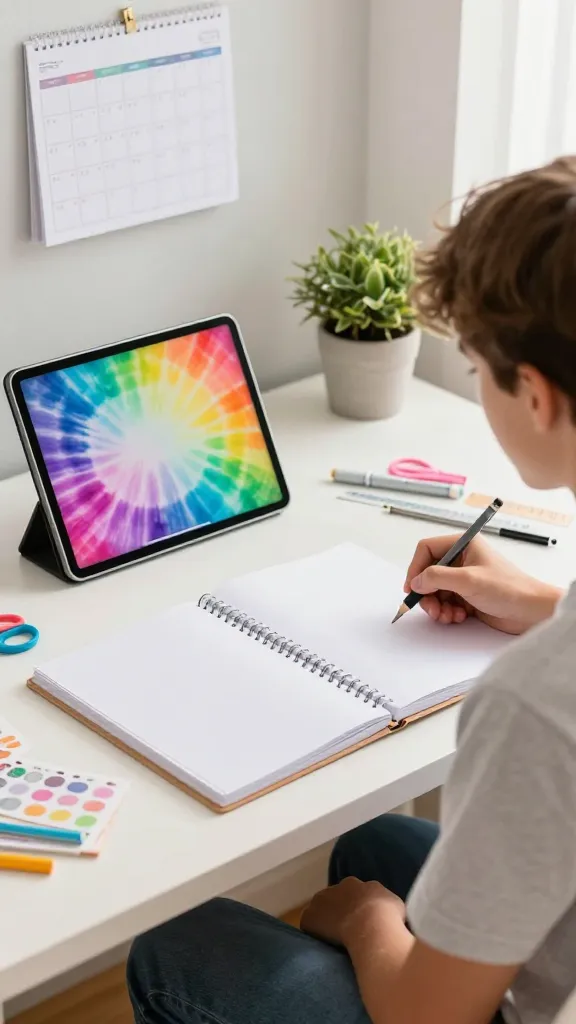
Give your planner a rainbow uplift with printable tie-dye desk pad pages. It’s digital meets DIY, and you can swap designs every week to match mood or season.
Materials Needed
- Printable paper or sticker pages
- Tie-dye digital templates or hand-drawn designs
- Printer or markers for freehand art
- Binder or clipboard for display
How to Make It
- Design or download tie-dye patterns, print on sturdy paper, then cut to fit your desk pad or notebook.
- Decorate with doodles and captions that inspire you.
Pro Tips / Styling Ideas
- Laminate if you want a reusable desk mat you can wipe clean.
Who would love it? Creative planners who crave a playful, color-splashed workspace vibe.
12. Puzzle Piece Wall Clock Shuffle
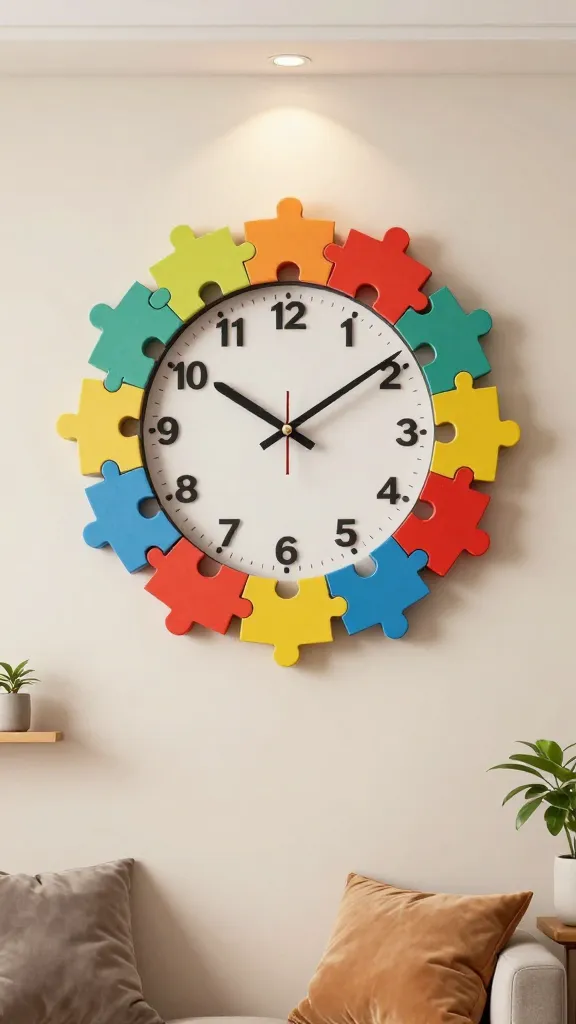
Turn a plain wall clock into a tactile, interactive piece by painting the clock face with puzzle “teeth” pieces. It’s a clever conversation starter and a bold statement of creative energy.
Materials Needed
- Plain round wall clock (battery-operated)
- Cardboard or foam puzzle pieces (adhesive-backed if possible)
- Acrylic paints in coordinating colors
- Glue gun or strong craft glue
How to Make It
- Paint puzzle pieces in colors that match your room, then glue around the edge of the clock to resemble a puzzle edge.
- Leave the center unpainted or add a bold accent color for the clock hands to pop.
Pro Tips / Styling Ideas
- Use different textures on the puzzle pieces for extra depth.
- Pair with a bold clock stand and a neon desk lamp for a show-stopping focal point.
Who would love it? Puzzle lovers and anyone who wants a playful, kinetic wall feature that doubles as a timekeeper.
Conclusion
That’s 12 completely unique, distinct craft ideas for school teens—each with its own vibe, twist, and wow factor. Pick one tonight and start small, or go for the full lineup and transform your space into a personal DIY gallery. You’ll enjoy the process, and your locker, desk, and walls will thank you.
Ready to dive in? Grab a few supplies, invite a friend to join, and start creative momentum. These projects are fun, approachable, and totally worth showing off—pin-worthy, even. You’ll love the confidence boost of making something with your own hands, and trust me, the craft glow-up is real.