5 Gorgeous Button & Pine Cone Craft Ideas
Ready for a cozy, crafty afternoon? These button and pine cone projects are proof that simple found objects can become stunning décor and charming gifts. You’ll love how quick these come together, and trust me—your space will feel whimsy-warm in no time.
Let’s dive into five completely unique ideas that celebrate texture, color, and a dash of whimsy. No overlaps, no repeats—just five fresh, totally original crafts you can actually finish tonight.
1. Button & Pine Cone Wall Quatrefoil Necklace of Buttons
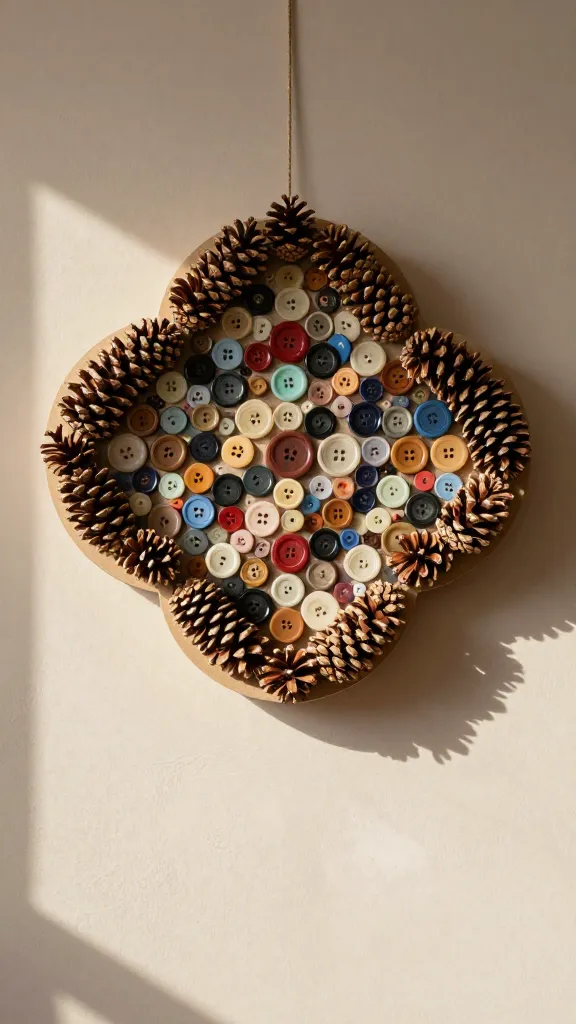
Picture this: a sunlit wall with a sculptural quatrefoil motif made from pine cones and a mosaic of buttons. The contrast between the natural pine and glossy, colorful buttons adds depth and charm to any entryway or gallery wall. It’s both earthy and a little editorial—Pinterest gold, honestly.
Materials Needed
- Small pine cones (about 8–10), cleaned and dried
- Assorted buttons (mixed sizes and colors)
- Rigid craft board or thick cardboard
- Hot glue gun and glue sticks
- Thin jute cord or wire for hanging
- Optional: acrylic paint for touch-ups
How to Make It
- Arrange pine cones in a quatrefoil pattern on the board. Tweak spacing until you love the silhouette.
- Glue each cone in place, holding a few seconds to secure.
- Fill the gaps with buttons, layering color to create a subtle gradient vibe.
- Glue a small loop of jute or a wire hanger to the back for easy mounting.
- Touch up any gaps with extra buttons or a stripe of paint if desired.
Pro Tips / Styling Ideas
- Choose a monochrome button palette for a graphic, modern look or go bold with a rainbow mix.
- Mount on a soft sunset-toned backdrop for a dramatic contrast.
- Group a few different sizes of this motif for a larger wall statement.
Who will love it or when to use it
Fans of natural textures and geometric art will adore this. It’s perfect for living rooms, hallways, or as a unique seasonal display—especially in autumn or winter. Seriously, it’s a conversation starter!
2. Pine Cone Lanterns Topped With Button “Stars”
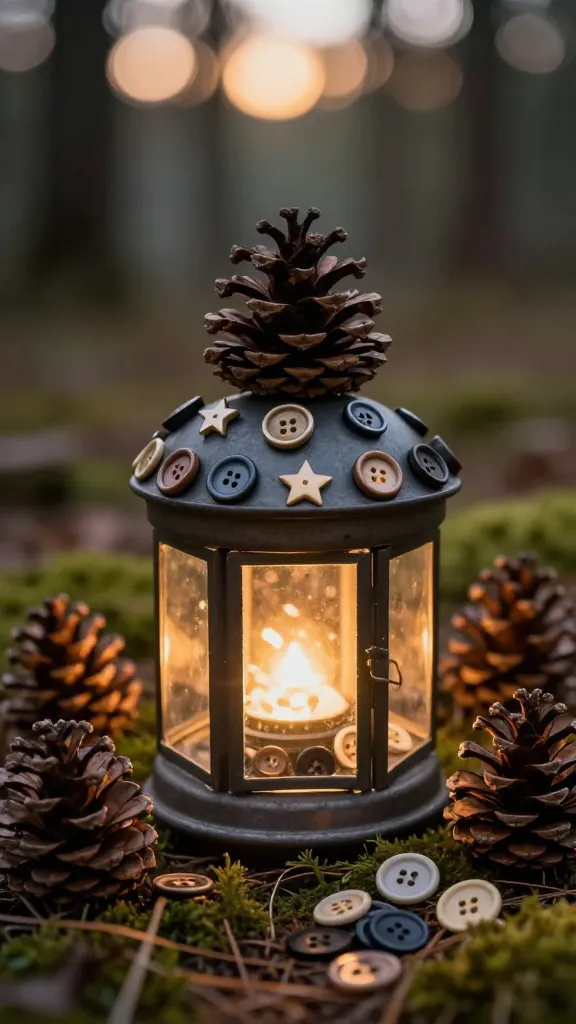
Imagine tiny lanterns glowing softly at dusk, each crowned with button stars. This project blends rustic pine cones with delicate button accents to craft a whimsical lighting piece that feels both forest-floor and fairy-tale. It’s the kind of piece you’ll want to photograph for the ‘gram.
Materials Needed
- Pine cones (large for lantern bodies, smaller for accents)
- Assorted buttons in metallic or matte finishes
- Mini LED string lights
- Glass jars or metal lantern bases
- Hot glue gun and glue sticks
- Twine or ribbon for hanging
How to Make It
- Place an LED string inside the jar or lantern base; secure with a small dab of glue if needed.
- Glue pine cones around the outside to form a lantern shape, leaving space for light to peek through.
- Arrange buttons on the pine cone tips to mimic stars—vary sizes for a twinkling effect.
- Wrap twine around the neck of the jar and tie for a rustic handle.
- Turn off overhead lights to enjoy the warm glow and button accents.
Pro Tips / Styling Ideas
- Choose metallic buttons to enhance the glow on dim evenings.
- Group three lanterns of varying heights on a tray for a cozy centerpiece.
- Use battery-powered candles for safety if you’re placing them on a tabletop.
Who will love it or when to use it
This is perfect for autumnal or wintery setups, outdoor patios with lantern displays, or gifting to a friend who loves ambient lighting. It’s seriously adorable and completely doable in an afternoon.
3. Button & Pine Cone Guestbook Frame
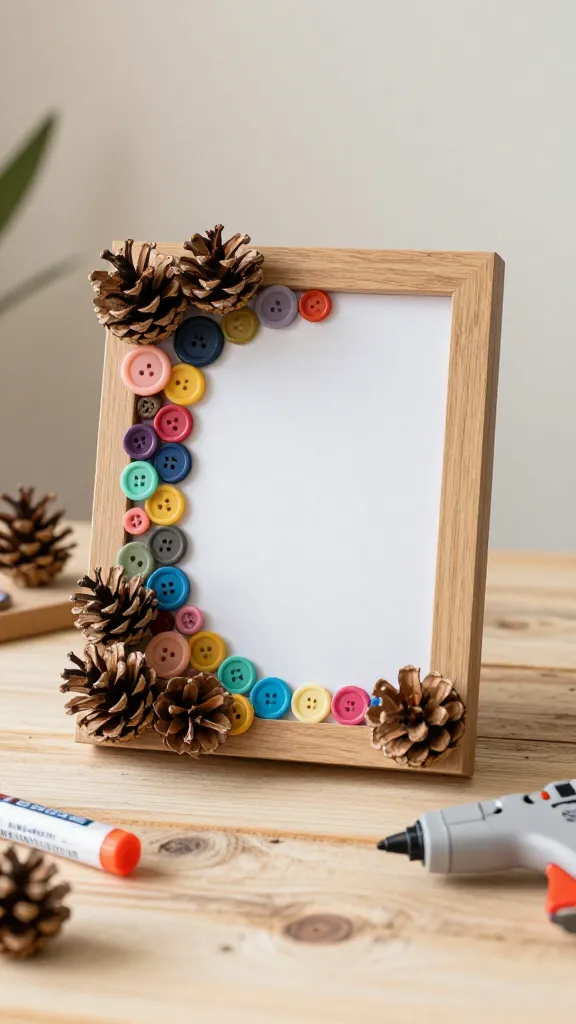
Welcome guests with a frame that’s as personal as it is pretty. A pine cone base gives it natural charm, while a shower of assorted buttons invites color and texture to pop. It feels like a tiny forest meeting a craft-store rainbow, and you’ll never want to swap it out.
Materials Needed
- Decorative picture frame with glass
- Flat backing board (thin wood or cardboard)
- Small pine cones, flattened or cut to fit
- Assorted buttons (eight to twelve colors or styles)
- Hot glue gun and glue sticks
- Permanent marker or label for guest signatures
How to Make It
- Remove existing backing and lay it flat. Arrange pine cone pieces around the border to create a natural frame edge.
- Glue the pine cone pieces in place, then fill the interior border with buttons in a loose mosaic pattern.
- Leave the center area open for a guest signature card, or insert a note card and a small marker.
- Write a friendly label on the bottom edge of the frame so guests remember the occasion.
Pro Tips / Styling Ideas
- Coordinate button colors with the wedding or party palette if this is a guestbook frame for events.
- Seal the buttons with a light spray of clear matte varnish to keep them secure over time.
- Switch the mat to a contrasting color to highlight the button mosaic.
Who will love it or when to use it
Perfect for weddings, housewarming gatherings, or a cozy family keepsake room. It’s warm, personalized, and totally charming.
4. Button & Pine Cone Centerpiece Terrarium
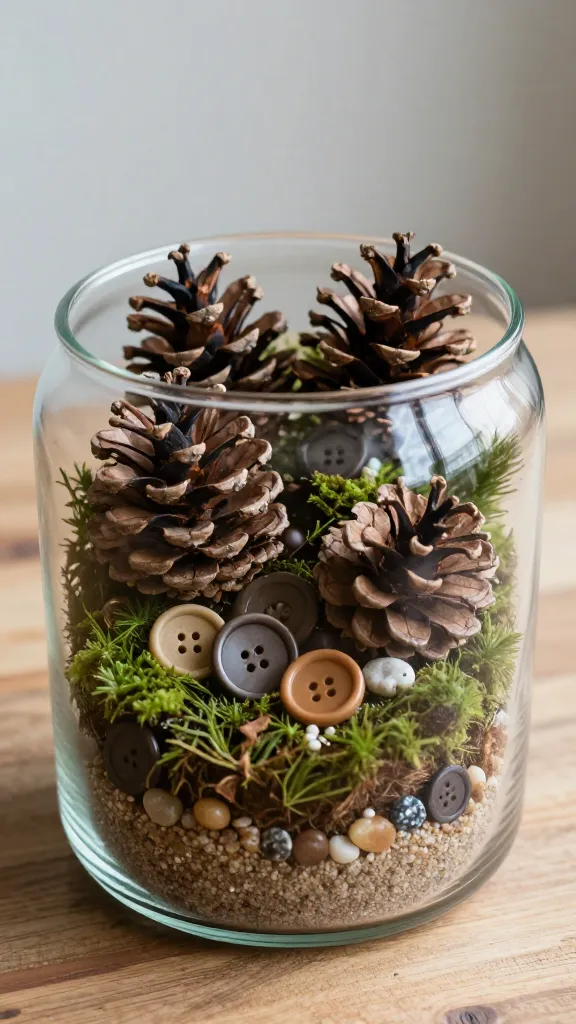
Who says a terrarium has to be glass and plastic? This tabletop centerpiece layers pine cones, moss, and a curated button assortment to create a tactile, evergreen vibe. It’s a mini forest you can curate and reshuffle as seasons change.
Materials Needed
- Glass jar or shallow terrarium container
- Mini pine cones
- Preserved moss or faux moss mat
- Assorted buttons (earthy tones work well)
- Decorative pebbles or sand
- Hot glue gun or clear-drying adhesive
How to Make It
- Layer pebbles or sand at the bottom for stability and texture.
- Spread moss in the bottom third of the space to anchor the scene.
- Arrange pine cones standing up and leaning against the sides for structure.
- Scatter buttons across the moss, tucking some beneath the cones for a natural ground cover look.
- Secure everything with a touch of glue and close the lid or top edge of the terrarium.
Pro Tips / Styling Ideas
- Use a mix of matte and glossy buttons for visual texture.
- Incorporate one accent color (like teal or gold) to add a pop without overwhelming the natural vibe.
- Switch out the buttons with the seasons—bright pastels for spring, warm ambers for fall.
Who will love it or when to use it
This centerpiece is ideal for coffee tables, dining rooms, or as a gift for nature-loving friends. It’s calming, collectible, and seriously photogenic.
5. Button-Wrapped Pine Cone Orbs for Holiday Flair
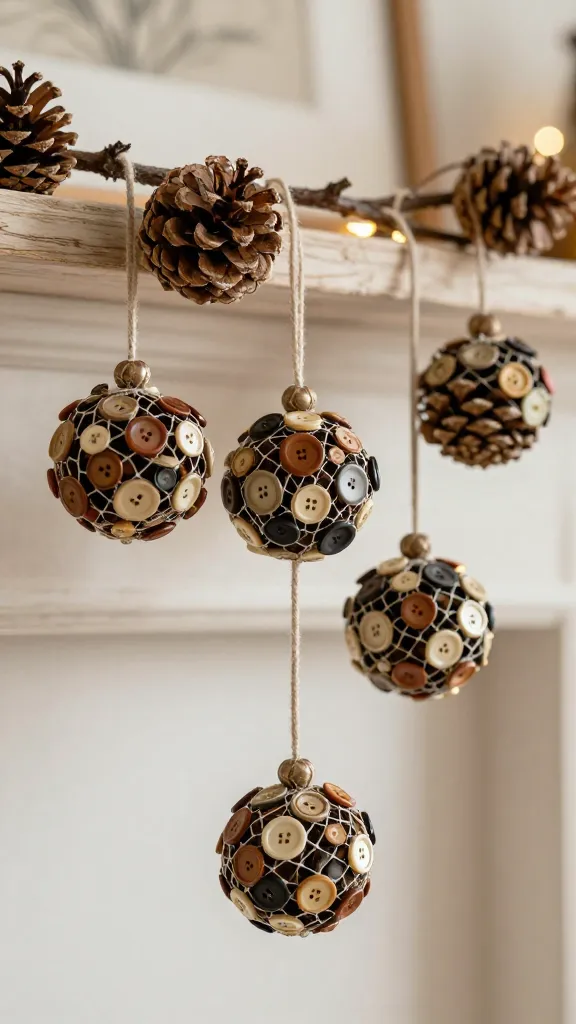
These little orbs feel festive without shouting Christmas. Wrapped in a net of buttons and coated with a gentle gloss, they hang elegantly from a twig garland or sit on a mantle as merry, handmade orbs. It’s a playful, scalable project that yields instant seasonal charm.
Materials Needed
- Medium to large pine cones
- Assorted small buttons
- Clear craft glue or hot glue
- Thin twine or metallic string
- Acrylic sealer spray (optional)
How to Make It
- Wash pine cones and let dry completely; choose ones with interesting shapes.
- Apply glue to the cone and press buttons onto the surface, covering all visible ridges while leaving some natural texture.
- Wrap a length of twine around the top and tie to create a hanging loop; tie a small bow for extra cheer if you like.
- Optionally spray with acrylic sealer for a subtle gloss and longer-lasting finish.
Pro Tips / Styling Ideas
- Combine with metallic threads and glassy ornaments for a cohesive holiday display.
- Group in a glass bowl with seasonal greens for a modern centerpiece.
- Use a monochrome button palette for a chic, minimalist holiday vibe.
Who will love it or when to use it
Gift-ready and utterly seasonal, these orbs work beautifully on mantles, Christmas trees, or as festive package toppers. You’ll wow guests with your handmade whimsy.
Conclusion
These five gorgeous button & pine cone craft ideas prove that everyday finds can transform into striking, Instagrammable decor. Each project is distinct, fun to assemble, and easy to customize to your own style. Pick one (or all five) and start crafting—your space will thank you, and you’ll love the cozy, creative glow they bring. Happy crafting, friends!