8 Trendy Craft Ideas for an 8-Year-Old Girl
Ready to spark creativity and giggles? These eight DIY ideas are perfect for curious minds and tiny hands. They’re playful, easy to customize, and totally share-worthy for friends and family.
Trust me, you’ll love how quick each project comes together and how proudly she’ll display her finished masterpieces. Let’s dive into eight totally unique crafts that scream imagination, color, and confetti-level fun.
1. Rainbow Fabric Hoop Wall Hanging
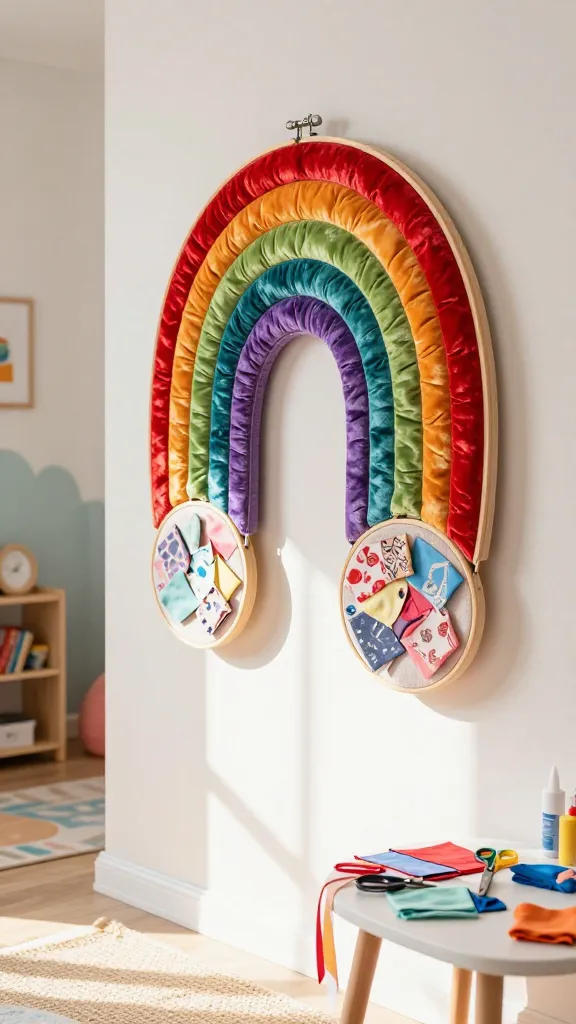
Imagine a sunny, kiss-your-fortune kind of wall display that’s soft, colorful, and totally kid-friendly. This fabric hoop wall hanging brings a cozy, boho vibe to any bedroom or play space, and it’s surprisingly easy to pull off.
Materials Needed
- Wood embroidery hoops (various sizes)
- Assorted fabric scraps in bright colors
- Fabric glue or a tiny hot glue gun with supervision
- Scissors
- Ribbon or yarn for hanging
How to Make It
- Lay out the fabric scraps in a cheerful rainbow order.
- Cut fabric squares or triangles that fit neatly inside the hoop’s inner circle.
- Glue each piece onto the fabric base, overlapping slightly for a textured look.
- Stack hoops for a gallery effect or hang a single statement hoop with three to five layers.
- Attach a ribbon to the hoop’s top for an easy hanging loop.
Pro Tips / Styling Ideas
- Seal in a playful vibe by adding small felt shapes or pom-poms between fabric bits.
- Hang near a window to catch natural light and make colors pop.
- Swap in seasonal fabrics—florals in spring, metallics for winter walls.
Who will love it or when to use it
Ideal for brightening a kid’s bedroom or as a thoughtful, handmade gift for a friend. It’s a cheerful, artsy project that she’ll be proud to show off.
2. Glow-Into-the-Night Mason Jar Sand Art
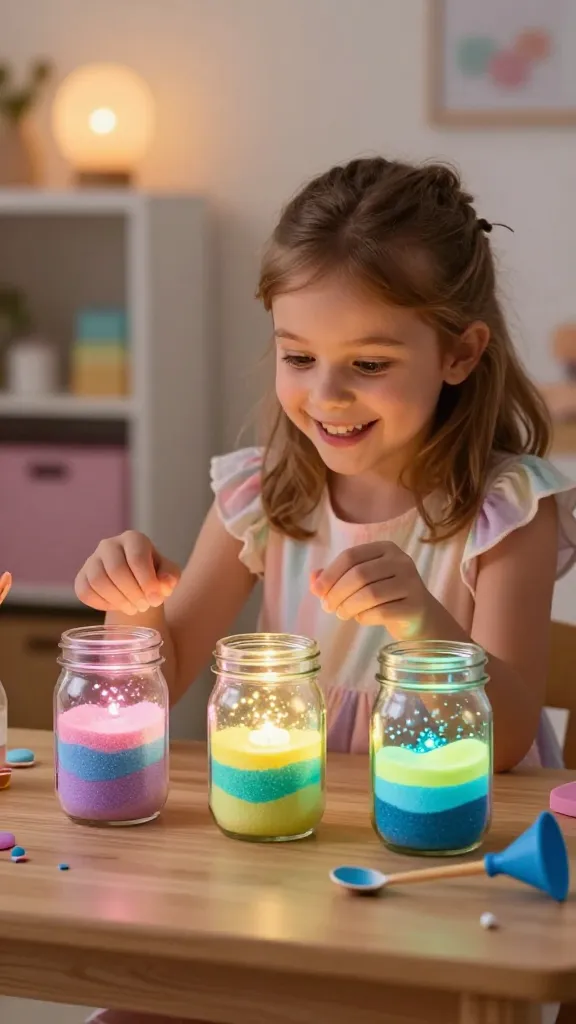
Glow-in-the-dark magic that’s neat, tactile, and endlessly mesmerizing. This sand art in a mason jar turns into a twinkling desk or bedside light—perfect for a science-meets-craft vibe.
Materials Needed
- Mini glass mason jars with lids
- Colored sand in pastel and bold shades
- Glow-in-the-dark paint or glow sand mix
- Mini spoon or funnel
- Battery-powered LED tea light
How to Make It
- Pour layers of colored sand into the jar, creating a rainbow or striped pattern.
- Add a pinch of glow-in-the-dark powder or mix glow sand with regular sand.
- Top with a secured lid and place the LED light inside or underneath the jar.
- Turn off the lights and watch it glow softly.
Pro Tips / Styling Ideas
- Label each jar with a tiny name tag or sticker for a mini collection.
- Pair with a DIY pedestal made from cardboard for a cozy night-light display.
Who will love it or when to use it
Great for shy nighttime readers or science-curious kiddos who adore sparkle and glow. It doubles as a cozy, magical nightlight.
3. Quick-Change Foam Stamp Picture Frames

Frame art that actually inspires her to switch out pictures weekly. This project uses simple foam stamps to create interchangeable, themed frames she can customize for every mood.
Materials Needed
- Plain wooden frames (small size)
- Craft foam sheets and scissors
- Acrylic paints and brushes
- Double-sided tape or removable adhesive strips
- Printed photos or mini art prints
How to Make It
- Cut foam stamps in fun shapes (hearts, stars, crowns, animals).
- Decorate the frame edges with stamped shapes in bright colors.
- Attach the photos with removable adhesive so they can be swapped anytime.
- Paint a bold border on the frame for extra personality.
Pro Tips / Styling Ideas
- Keep a tiny “frame gallery” wall with a few frames that rotate weekly.
- Make a mini “story frame” by adding a sequence of three photos or tiny drawings.
Who will love it or when to use it
Perfect for showcasing her growing art collection or a rotating family-photo corner in the living room.
4. Paper Quill Creature Ornaments
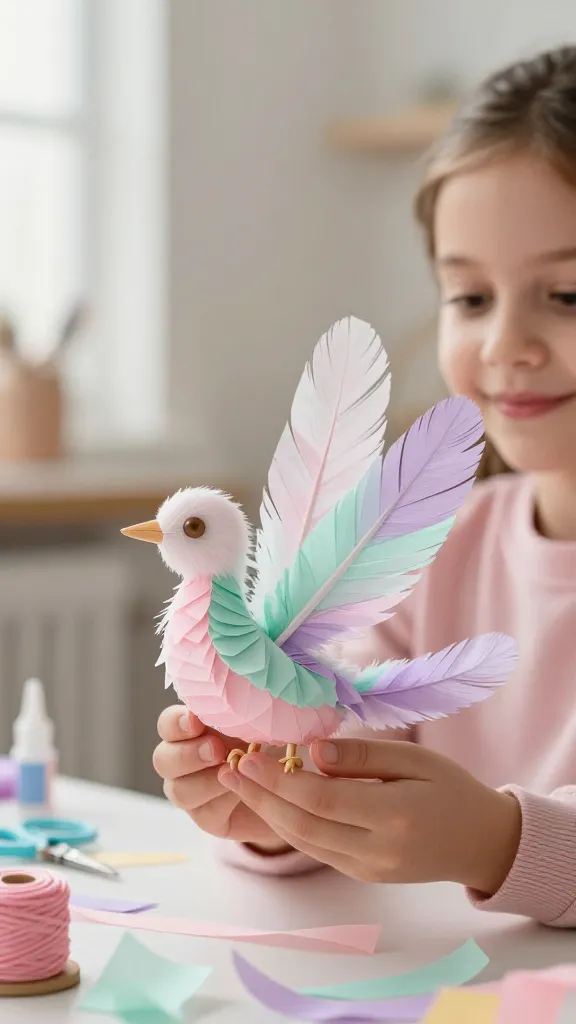
Delicate, whimsical, and totally unique, these paper quill creatures feel like tiny sculptures you can cuddle with in a pinch. They’re light, airy, and wonderfully customizable.
Materials Needed
- Colored tissue paper or paper strips
- Embroidery floss or thin ribbon
- Scissors
- Glue or a glue stick
- Small wooden beads for eyes
How to Make It
- Cut tissue paper into long, slim strips. Fold and twist to create a feathered “quill.”
- Roll strips around a small pencil to shape and stabilize, then glue ends to secure.
- Attach a bead for an eye and tie a hanger at the top.
- Create a small flock of quill creatures to hang on a string or in a tree ornament display.
Pro Tips / Styling Ideas
- Mix metallic tissue with pastel colors for a magical look.
- Turn them into a customizeable garland for a party backdrop.
Who will love it or when to use it
Fantastic for a woodland-themed bedroom or a birthday party decor project she can proudly claim as her own.
5. DIY Themed Treasure Jars
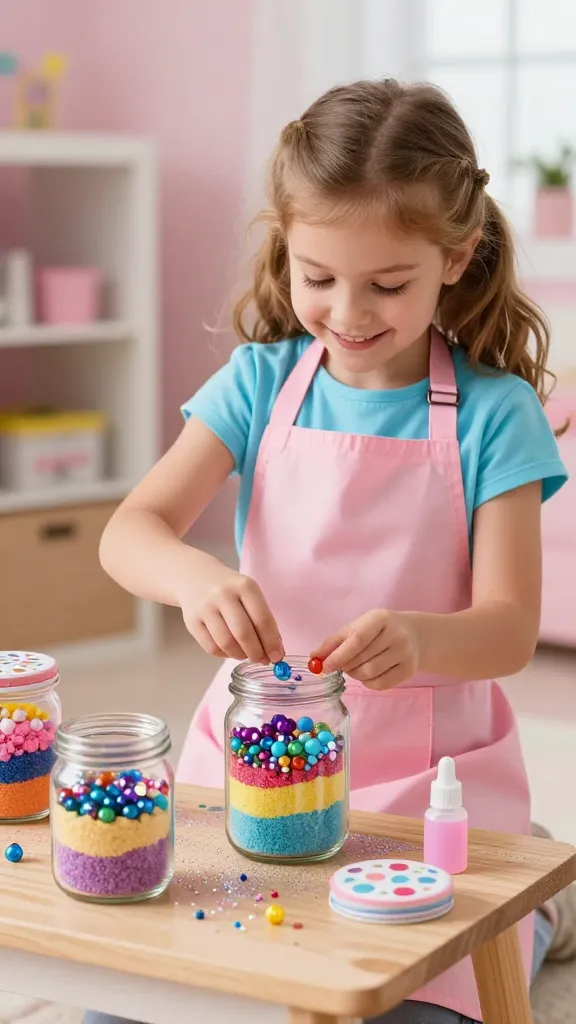
Make sparkly, kid-proof treasure jars that feel like tiny magical cupboards. They’re perfect for coin collections, favorite trinkets, or little “wish jars.”
Materials Needed
- Small glass jars with lids
- Colored sand, sequins, beads, and tiny charms
- Mod Podge or clear-drying glue
- Paint or stickers for decorating the lids
How to Make It
- Layer colored sand, beads, and tiny trinkets inside the jar to create a mini-scene.
- Brush a thin coat of Mod Podge on the lid and decorate with stickers or paint.
- Seal with a final coat of glue if needed for extra sparkle.
- Label the jar with a cute tag like “Dreams” or “Sparkle Savings.”
Pro Tips / Styling Ideas
- Line a trio of jars on a shelf to form a rainbow gradient.
- Use them as party favors filled with a small treat.
Who will love it or when to use it
Ideal for a crafty storage solution that doubles as decor—perfect for a kid who loves tiny, magical things.
6. DIY Sugar-Crystal Dream Ornaments
Crunchy, sparkly, and totally edible-looking (though not for nibbling). These sugar-crystal ornaments are a sweet winter craft that fizzes with science and charm.
Materials Needed
- Clear plastic ornaments or plastic eggs
- Clear school glue or resin-safe glue
- Sugar (granulated or colored)
- Food coloring (optional for color)
- Ribbon for hanging
How to Make It
- Fill the ornament with a small amount of glue and swirl to coat the inside.
- Pour colored sugar into the ornament and shake until evenly coated, creating a crystal look.
- Optional: Add a few drops of food coloring to color the sugar before pouring.
- Let dry completely, then tie a ribbon to hang.
Pro Tips / Styling Ideas
- Pair with a winter-themed photoshoot backdrop for a cozy vibe.
- Use different colors to create a festive ornament collection.
Who will love it or when to use it
Perfect as a holiday or classroom craft, and she’ll adore the sparkle on the tree or mantle.
7. Mini Felt Monster Pincushions
These adorable little monsters aren’t scary at all—they’re cozy, colorful, and totally practical. A bundle of tiny felt creatures becomes a set of cheerful pincushions or desk buddies.
Materials Needed
- Assorted felt sheets
- Polyfill stuffing
- Embroidery floss for stitching
- Small buttons or beads for eyes
- Needle and thread or a kid-friendly fabric glue
How to Make It
- Cut two creature shapes from felt per pincushion.
- Stitch around the edge, stuff lightly, and close with a whipstitch.
- Glue or sew on eyes and a smiling mouth to give each monster personality.
- Optional: add a tiny horn, hat, or fringe to each monster for variety.
Pro Tips / Styling Ideas
- Group three or four pincushions on a colorful saucer or tray.
- Use them as soft desk accents or birthday party favors.
Who will love it or when to use it
Great for kids who love silly stuffed toys and a little bit of sewing practice without frustration.
8. Watercolor Wash Vase Buddies
Soft, watercolor vibes with a practical twist—these mini vases hold a few stems or dried blooms and look like they stepped out of a fancy artsy magazine. It’s calming, creative, and classily imperfect.
Materials Needed
- Small glass jars or bottles
- Watercolor paints or diluted food coloring
- Water and brushes
- Fresh or dried flowers (optional)
- Clear sealant (optional for longevity)
How to Make It
- Rinse jars and set them on a protected surface.
- Paint soft, abstract washes on the outside using water and watercolor paints—let colors blend naturally.
- Let dry, add a light sealant if desired for longer life, and fill with a single stem or small bouquet.
Pro Tips / Styling Ideas
- Pair with a stack of art books or a wooden tray for a chic centerpiece.
- Create a set with three jars in different heights for a dynamic display.
Who will love it or when to use it
Perfect for a dreamy spring table setting, a bedside bouquet, or a playful windowsill display.
Conclusion
So there you have it—eight completely unique, totally doable crafts that an 8-year-old girl will adore. Each project is designed to spark imagination, celebrate color, and build confidence in tiny hands. Pick one, or go on a crafting spree and try them all—your home will thank you with extra charm and a whole lot of happy memories.