9 whimsical crafts for girls night in
Ready to turn a simple night in into a crafty, giggly, and totally shareable soirée? These 9 whimsical projects are designed for instant Pinterest vibes, easy step‑by‑step vibes, and plenty of wow-factor without a giant mess. Trust me, you’ll love this lineup.
1. Celestial Glow-In-The-Dark Wall Muzzle: Constellation String Art
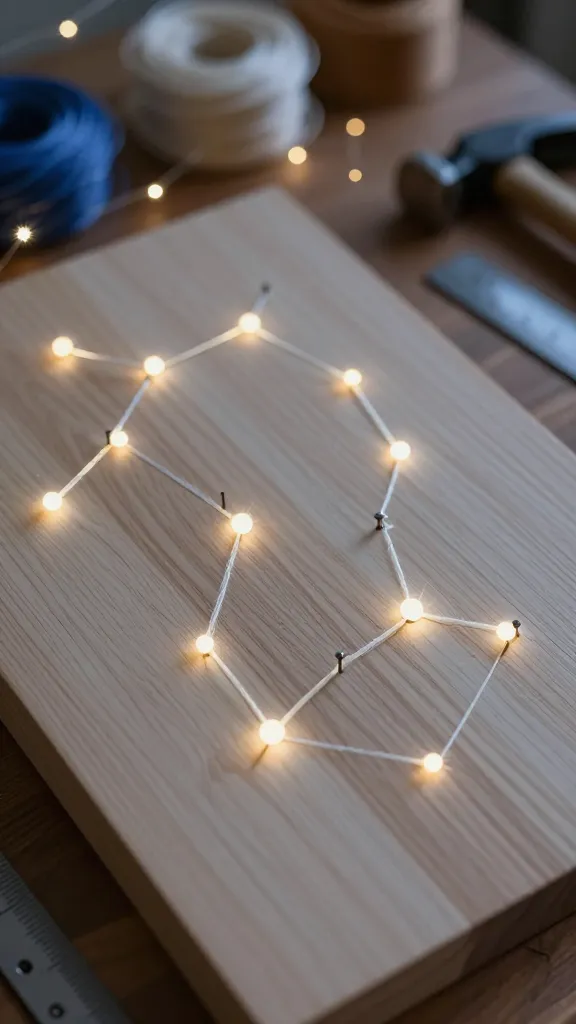
Imagine a wall that sparkles with tiny stars after sundown. This constellation string art feels magical but is totally beginner-friendly, and the glow-in-the-dark accents are peak party-curiosity fodder.
Materials Needed
- Wood plaque or canvas
- Nail or pin set (tiny nails work best)
- Glow-in-the-dark embroidery floss or paint
- Pencil and ruler
- Hammer
How to Make It
- Lightly sketch a simple constellation outline on the plaque.
- Hammer in nails along the lines at even intervals.
- Stretch glow floss between nails to form the stars and lines, filling in gaps for a dreamy web.
- Finish with a soft sealant to protect the glow effect.
Pro Tips / Styling Ideas
- Use a colored backboard (midnight blue or blush pink) to amplify the glow.
- Pair with a cozy moon-themed throw and some fairy lights for the ultimate wall vignette.
Who would love it or when to use it
Best for a dreamy girls night in mix, dorm room decor, or a cute focal point above a reading nook. You’ll love this if you’re into celestial vibes and a little glow-up.
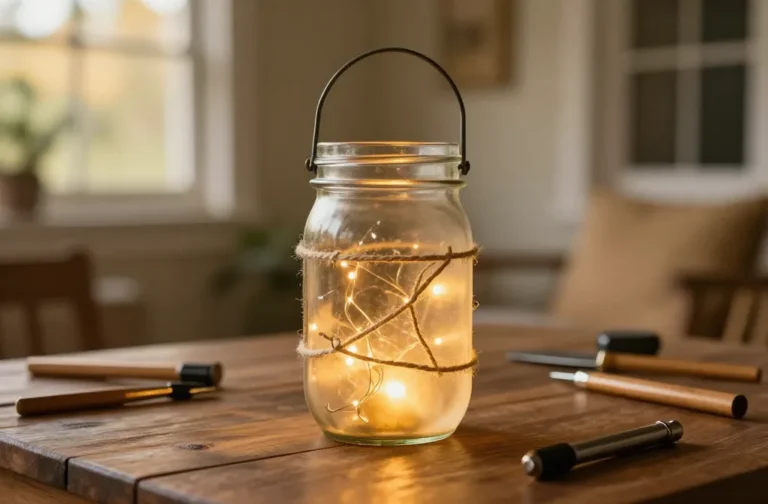
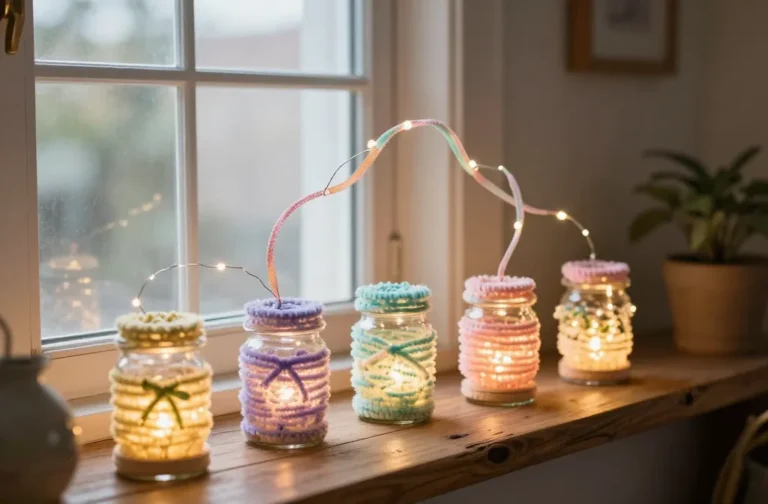
2. Faux Floral Gelato Jars: Sweet-Scented Light-Up Centerpieces
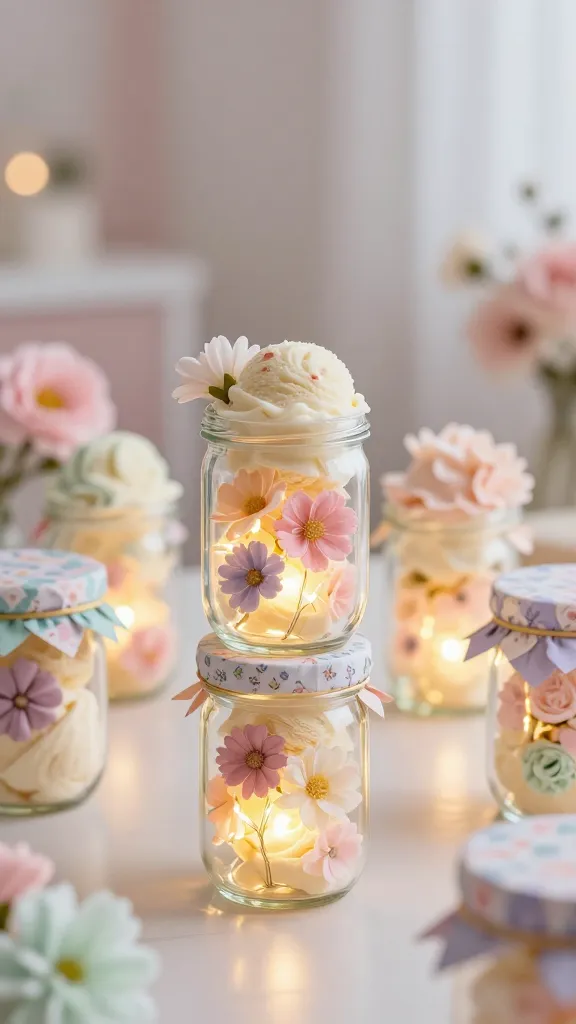
Delicate faux florals chilled in mini glass jars, with a soft LED glow. It’s like dessert for your eyes—cute, fragrant, and perfect as a centerpiece or bathroom shelf accent.
Materials Needed
- Small glass jars or baby jars
- Assorted faux flowers
- Battery-operated fairy lights
- Colored tissue paper or cardstock for toppers
- Hot glue or craft glue
How to Make It
- Fill jars with a small cluster of faux blooms around the lights so they peek from the top.
- Tuck tissue paper or a cute card topper under the lid for a playful finish.
- Turn on the lights and display in a tray or on a windowsill.
Pro Tips / Styling Ideas
- Coordinate colors with your décor palette—blush + champagne or mint + coral are adorable combos.
- Wrap jars with a thin twine and a mini charm to gift to guests.
Who would love it or when to use it
For a brunch‑inspired girls night or a romantic-at-heart sleepover. These are seriously charming and instantly snackable for photos.
3. Memory Jar Mixer: Tiny Confetti Bottles That Tell a Story

Each guest writes a mini memory or wish, drops it into a tiny bottle, and shakes it for a playful toast. It’s quirky, sentimental, and a perfect keepsake-trail for the night.
Materials Needed
- Mini glass bottles with corks
- Colored confetti or micro beads
- Fine glitter (optional)
- Mini scrolls of paper and a pen
- Ribbon and tags for labeling
How to Make It
- Roll a tiny memory note or wish on paper and tuck it into each bottle with confetti.
- Sprinkle glitter inside for extra sparkle, then seal with cork.
- Decorate with a ribbon and a small tag for gifting or collection.
Pro Tips / Styling Ideas
- Create a “toast station” with a tray of opened bottles for guests to shake and read aloud.
- Use pastel confetti for a soft aesthetic, or metallic for glam night vibes.
Who would love it or when to use it
Perfect for a memory‑making session, bachelorette pregame, or as a personalized party favor basket.
4. Velvet Ribbon Wall Canopy: Cozy Backdrop Weaving
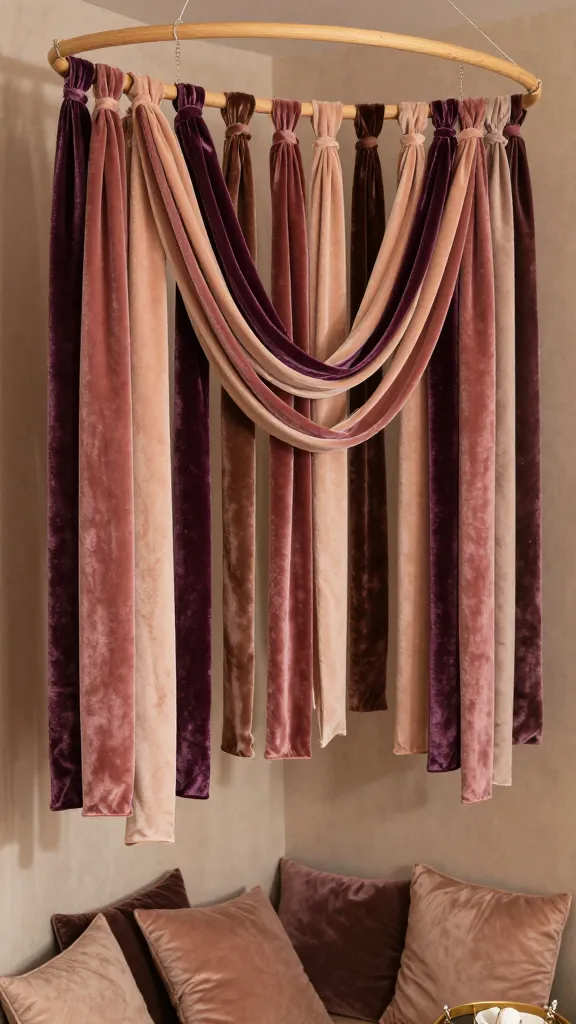
Think chic, tactile, and irresistibly Instagrammable. A velvet ribbon canopy draped as a wall tapestry instantly elevates space and outfits any confessional corner of the night.
Materials Needed
- Lightweight wooden hoop or curtain rod
- Several yards of velvet ribbon in 2–3 colors
- Push pins or small nails
- Glue (optional for securing knots)
How to Make It
- Attach ribbons to the hoop or rod, creating layered strands with gentle drape.
- Overlap colors for dimension and secure lines with tiny knots or glue.
- Hang against a wall with a few decorative tassels at the bottom.
Pro Tips / Styling Ideas
- Add faux florals where strands meet for a lush effect.
- Light a string of warm LEDs around the top for a glowing backdrop.
Who would love it or when to use it
Ideal for a “self-care night” corner, a photo nook, or as a backdrop for a DIY fashion show moment.
5. Hand-Painted Trinket Box Couture: Personalize Your Glam Compartments
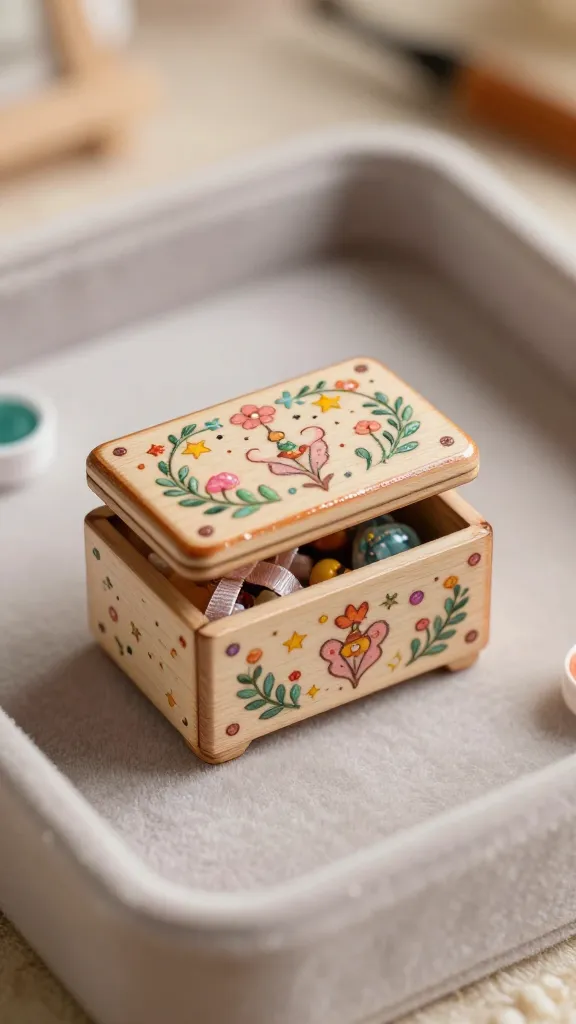
A tiny box that holds secrets, keepsakes, and tiny treasures from the night. Hand‑painted details turn scraps into couture-worthy trinkets that you’ll actually use.
Materials Needed
- Small wood or MDF trinket box
- Acrylic paints in 3–4 colors
- Fine brushes, sealant
- Stencils or freehand motifs (flowers, stars, hearts)
How to Make It
- Prime the box, then paint a base coat and let dry.
- Add designs with stencils or freehand drawing for personality.
- Seal with a protective topcoat and add a tiny velvet lining inside.
Pro Tips / Styling Ideas
- Use it as a jewelry box or a mini gift box for small treats.
- Pair with a matching perfume sample or bath salt vial as a set.
Who would love it or when to use it
Gift‑worthy and made to be admired—great for a DIY gift exchange or keepsake collection night.
6. DIY Feathered Cone Wall Décor: Whimsy Meets Textured Art
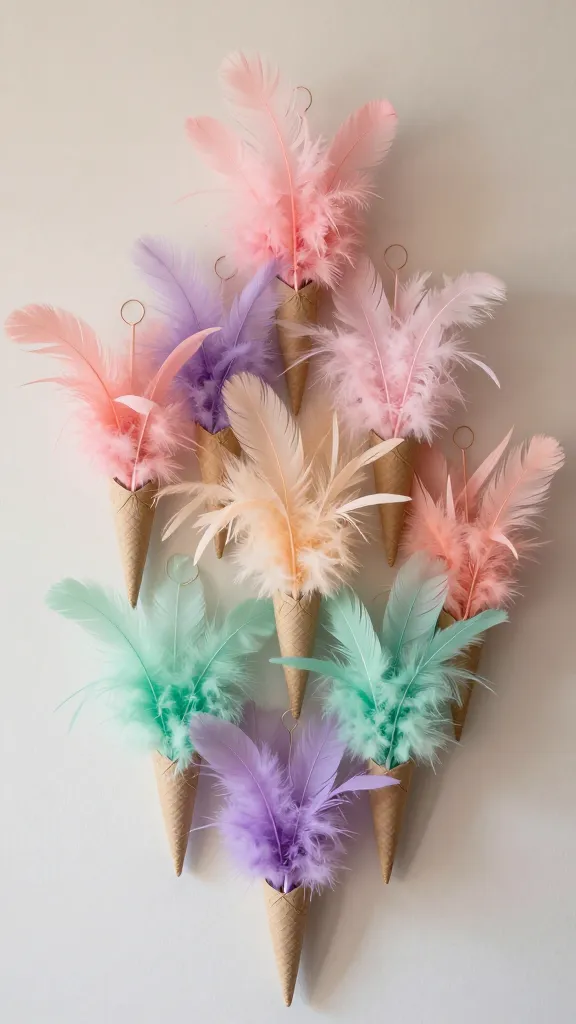
Soft, airy, and perfectly photogenic, feathered cones arranged on a wall create a whimsical forest‑feel that’s light as air and heavy on charm.
Materials Needed
- Cardboard cones or thrifted pinecone bases
- Feathers in assorted colors
- Hot glue, scissors
- Hanging hook or picture frame wire
How to Make It
- Affix feathers to each cone in a gradient or color-block pattern.
- Glue a loop on top for hanging, then arrange on the wall in a playful cluster.
Pro Tips / Styling Ideas
- Keep the color palette cohesive to avoid visual chaos.
- Pair with natural textures—wood beads, dried florals—for an earthy vibe.
Who would love it or when to use it
For a nature‑inspired corner or a chic wall gallery that begs to be photographed.
7. Coraline Coaster Quilt: Patchwork Circles for Cozy Chats
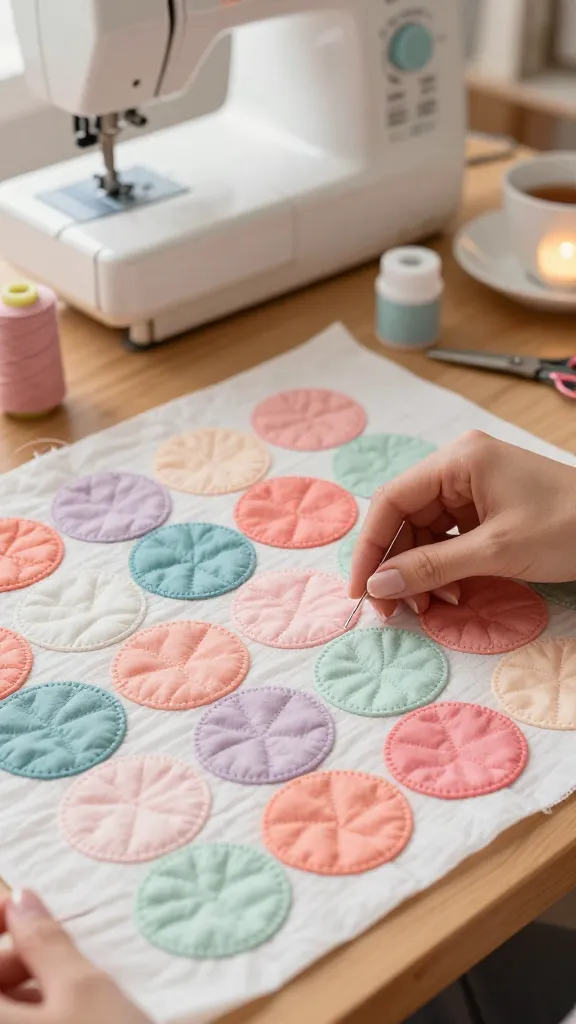
Soft, squishy, and delightfully tactile, a DIY coaster quilt assembles as a set of circle patches that protect surfaces and invite conversation over tea.
Materials Needed
- Fabric scraps in coordinating hues
- Fusible interfacing or batting
- Scissors, needle, thread or sewing machine
- Fabric glue or iron-on backing (optional)
How to Make It
- Cut circles from fabric scraps, mount onto interfacing to give structure.
- Arrange into a pleasing pattern, then stitch together in rows.
- Finish edges with a simple hem or zigzag stitch for a playful touch.
Pro Tips / Styling Ideas
- Create a small quilt set with matching mug cozies for a complete tea party vibe.
- Opt for velvety fabrics for a luxe texture or cotton for a breezy look.
Who would love it or when to use it
Ideal for a crafty seamstress night, a tea party, or a thoughtful handmade gift set.
8. Mermaid Tail Candles: Ocean-Glass Tealight Holders
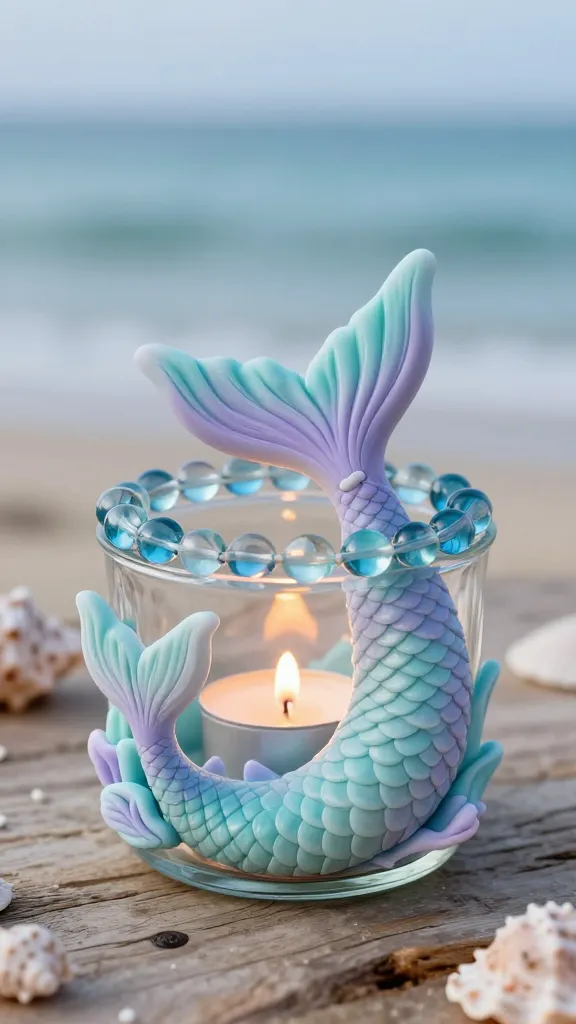
Whimsical, coastal, and surprisingly easy, these mermaid tail candle holders glow softly and bring a splash of under-the-sea fantasy to any table or shelf.
Materials Needed
- Small glass tealight holders or votives
- Sea-blue glass beads or glitter
- Polymer clay (in a pastel hue) or textured clay
- Glue and sealing spray
How to Make It
- Shape clay tails to fit around the bottom of the holder and bake or cure per instructions.
- Glue clay tails to the outer base and spread beads along the rim for a sea-sparkle effect.
- Insert a tealight and enjoy the glow that mimics waves.
Pro Tips / Styling Ideas
- Line a tray with blue glass stones to create an underwater scene.
- Group a few different sizes for a stunning centerpiece.
Who would love it or when to use it
Perfect for a beachy party night, a spa‑like wind‑down, or a coastal home‑decor refresh. Seriously charming and calming.
9. Pop-Couture Jewelry Hangers: Magnetic Accent Display

Turn a simple hanger into a mini fashion show for jewelry. With a splash of color and clever magnets, you’ll have a display that’s as functional as it is fashionable.
Materials Needed
- Plain metal or wooden coat hanger
- Strong magnets or small decorative hooks
- Acrylic paint or spray paint
- Decorative ribbon or washi tape
- Clear sealant
How to Make It
- Paint the hanger in a bold color and pattern with ribbon accents.
- Attach magnets or hooks along the lower bar for earrings, necklaces, and bracelets.
- Seal to keep colors vibrant and resistant to wear.
Pro Tips / Styling Ideas
- Hang near a mirror for quick outfit coordination sessions.
- Wrap a few sections with color-blocking tape for a playful visual cue.
Who would love it or when to use it
Great for a fashion‑forward girls night in, a dorm room upgrade, or a gift for the aspiring stylist in your life.
Conclusion
These 9 whimsical crafts for girls night in are designed to spark creativity, spark conversation, and spark a little joy. Pick one to start, or go all in and transform your night into a mini crafting carnival. You’ll come away with not just pretty decor, but memories and maybe a new party trick to show off at your next get-together.