5 Quick Crafts Ideas for Christmas
Hey, crafty friend! Christmas is calling, and these five quick, totally unique ideas will have your home looking magical in no time. No stress, no expensive supplies—just a splash of color, whimsy, and a sprinkle of holiday cheer. Ready to spark your creative side? Let’s go!
1. Rustic Copper-Burnished Pinecone Wall Hanger
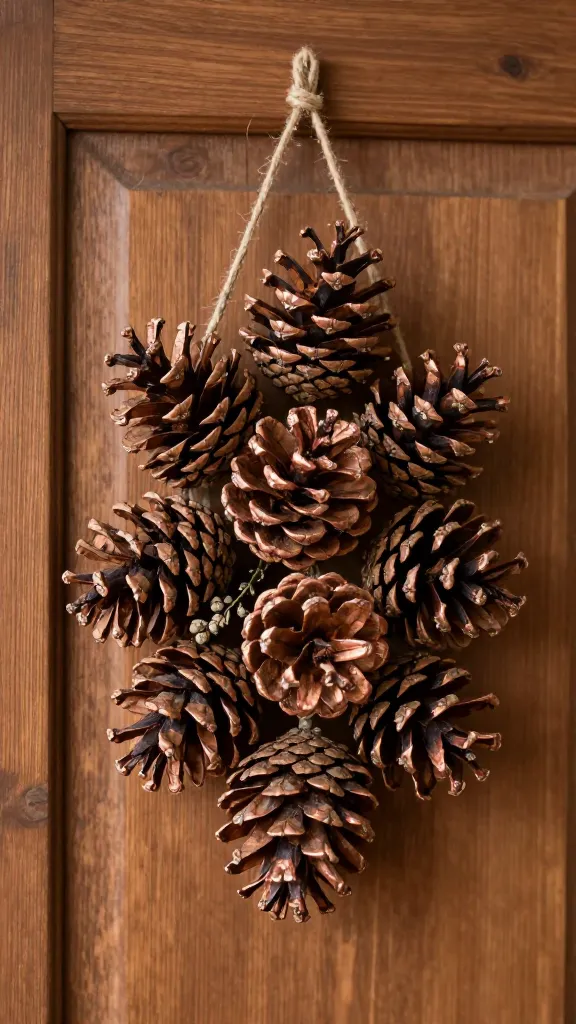
Imagine a natural centerpiece you can hang on the wall or by the door that smells faintly of forest magic and shines with coppery warmth. This pinecone wall hanger is rustic, elegant, and seriously simple to assemble. It’s the kind of piece you’ll reach for again next year with a triumphant, “I made that!”
Materials Needed
- Assorted pinecones (fresh or faux)
- Copper spray paint or copper metallic paint
- Thin jute twine or natural hemp string
- Hot glue gun and glue sticks
- Small dried berries or pine sprigs (optional)
- Old wooden cutting board or reclaimed wood plaque (for mounting)
How to Make It
- Spray the pinecones with copper paint, letting them dry completely for a warm, glowy finish.
- Arrange 3–5 pinecones in an appealing cluster, then glue them to a small piece of wood or a rustic plaque.
- Wrap jute around the top to create a hanger, tying a secure bow knot or adding a loop for hanging.
- Optionally tuck in tiny dried berries or pine sprigs for texture and color variation.
- Seal with a matte spray if you want extra durability, especially in a high-traffic entryway.
Styling ideas: Hang by the front door, above a lantern, or in a cozy nook with a string of warm lights. It’s a conversation starter that feels timeless rather than kitschy.
Who will love it: Fans of rustic-chic decor and anyone who wants a simple, eye-catching accent with zero-fuss assembly.
FYI, you’ll love this if you enjoy nature-inspired crafts and a minimalist copper palette.
2. Velvet Ribbon Christmas Monogram Ornaments
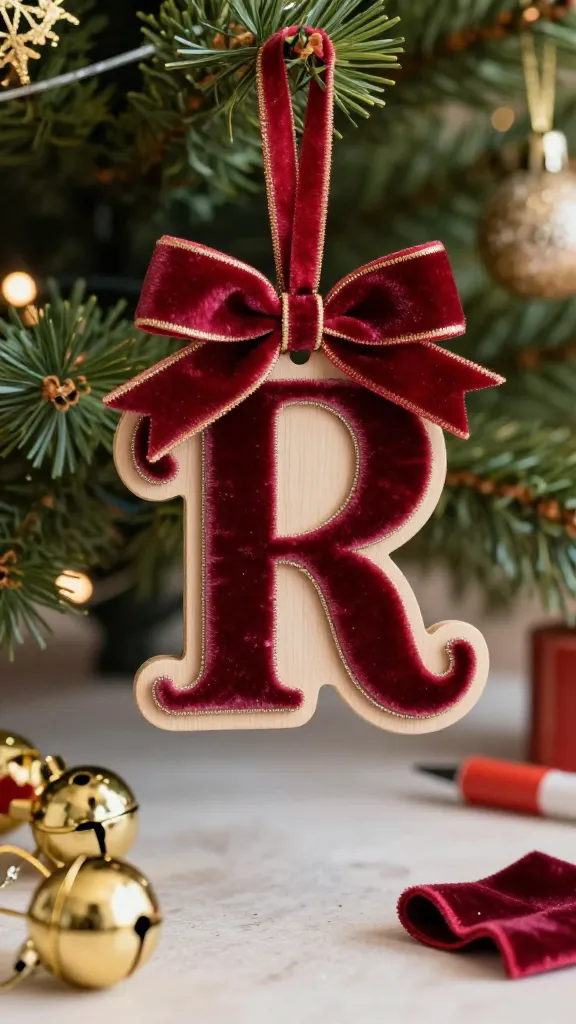
Bright, plush, and unbelievably easy, these monogram ornaments scream festive luxury without breaking the bank. Wrap a single letter in velvet and finish with metallic accents to create a boutique-look ornament collection you’ll be proud to hang on the tree or gift to friends and family.
Materials Needed
- Wooden or cardboard letter cutouts (A–Z)
- Velvet ribbon in 2–3 colors
- Hot glue gun and glue sticks
- Mini jingle bells (optional)
- Gold or silver craft paint for edging
- Orb or flat ornament hooks
How to Make It
- Paint or edge the letter with metallic paint so the edges pop against the velvet.
- Cut a long strip of velvet ribbon, wrap tightly around the letter, and glue in place, layering for full coverage.
- Optional: glue a tiny jingle bell at the bottom for a playful touch as it sways on the tree.
- Attach a small loop of ribbon to the top for hanging, or pair with a decorative hanger for a festive focal point.
Styling ideas: Mix and match letters for a customized greeting on the tree, or display them on a mantel with a garland and candles for dramatic texture.
Who will love it: People who adore tactile textures and luxe accents, or anyone gifting a personalized ornament set.
Trust me, the velvet texture reads high-end but the process is delightfully quick and forgiving.
3. Snowy Jar Lanterns With Felt Snow Accents
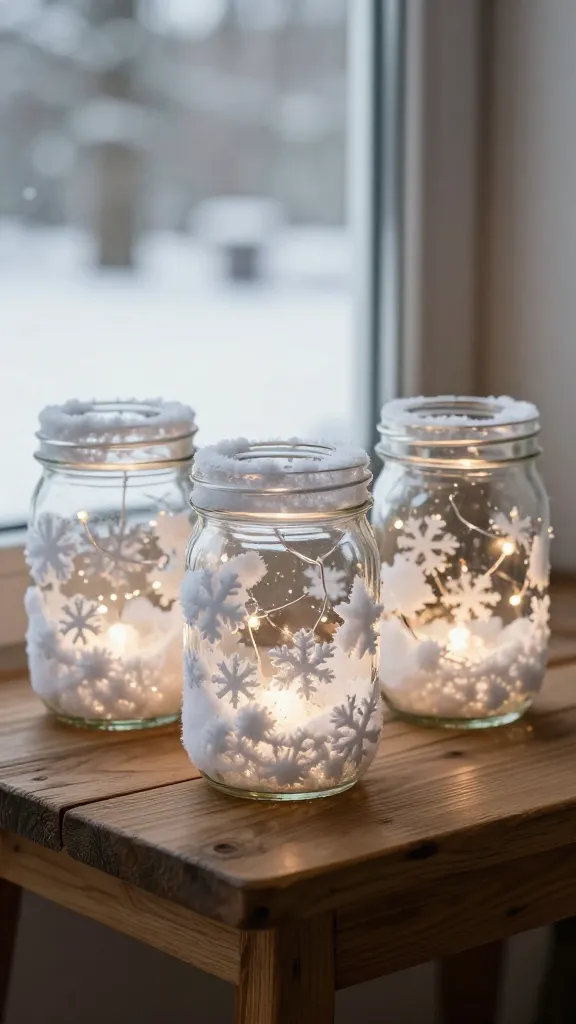
Cozy, candle-safe and irresistibly charming, these snowy jar lanterns illuminate your space with a soft, forgiving glow. The secret sauce? A thin felt snow layer that catches the light and adds a tactile, frosted dimension to clear glass jars. They’re perfect on a windowsill, coffee table, or as a charming gift.
Materials Needed
- Clear glass jars (mason jars work great)
- White felt, cut into snowflake or blob shapes
- Tacky glue or hot glue
- White or cool-toned fairy lights (battery-operated)
- Faux snow or Epsom salt (optional, for extra frost)
- Ribbon or twine for a decorative top
How to Make It
- Line the inside of the jar with a string of fairy lights, then twist the battery pack to the back so it’s hidden.
- Glue white felt snow shapes onto the outside of the jar, layering for depth. Let dry fully.
- Sprinkle a tiny amount of faux snow or Epsom salt into the bottom for a wintry base (optional).
- Top with a bow or twine handle, then switch on the lights to reveal a soft, magical glow.
Styling ideas: Group a trio on a windowsill, line a shelf with varying jar heights, or place near a guest seating area for ambient festive lighting.
Who will love it: Anyone who loves glow-y ambiance with a handmade vibe and a quick project that looks store-bought but feels personal.
Seriously, these simple jars are mood-setters you’ll reuse year after year.
4. Mini Peppermint Glass Tray Ornaments
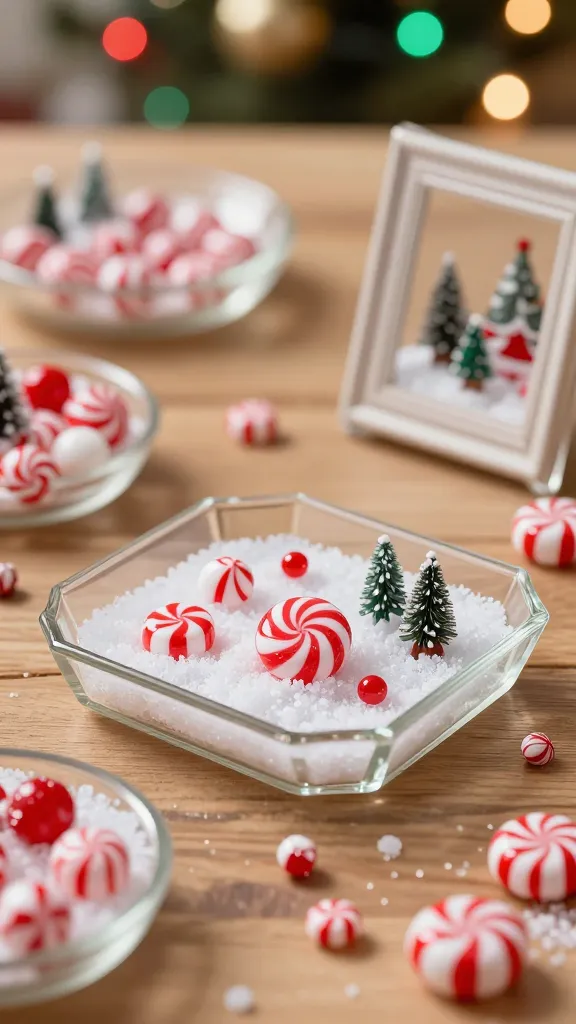
These mini trays feel candy-shop cute and honestly, they’re easier than you’d think. Create tiny peppermint-inspired scenes in shallow glass trays by filling with holiday minis, faux snow, and a drop of gloss to mimic a candy swirl. It’s a whimsical table decor piece that doubles as a gift topper or a delightful “on-tray” treat for guests.
Materials Needed
- Small glass trays or shallow glass photo frames
- Peppermint-inspired beads or small red/white beads
- Faux snow or fine white sand
- Clear-drying adhesive or epoxy (optional for durability)
- Mini pine sprigs, red berries, or tiny ornaments for detail
- Glossy sealant spray (optional for a candy-like finish)
How to Make It
- Spread a thin layer of faux snow in the tray as your base.
- Arrange peppermint beads in a swirl pattern, or in neat stripes for a classic candy look.
- Drop in a few mini sprigs or berries to add color and texture.
- Seal with a light gloss spray if you want a glossy candy finish that pops in the light.
Styling ideas: Layer several trays on a coffee table for a centerpiece, or place on a tray with a tiny string of lights for a dessert-drawer vibe. They also make adorable, easy gifts or stocking stuffers.
Who will love it: Perfect for candy-cane lovers, kids who love sparkle, and anyone craving a bright, playful touch to holiday decor.
FYI, you can customize colors to match your tree—swap in pinks, greens, or icy blues for a different vibe.
5. Reclaimed Wood Card-Holder Christmas Village Display

Turn scrap wood into a tiny, heart-warming Christmas village that doubles as a card holder. This is the kind of project that feels thoughtfully handmade and endlessly customizable. It’s practical, charming, and a standout piece in any year-end display.
Materials Needed
- Small reclaimed wood boards or picture frame scraps
- Cardboard or thin plywood for house silhouettes
- Acrylic or craft paint in festive colors
- Small mailbox-sized slots or slots cut into the wood for cards
- Sandpaper, glue, and a small saw (optional, depending on your setup)
- Mini LED string lights (battery-operated)
How to Make It
- Cut wood into small house shapes or silhouette forms; sand edges for a polished look.
- Paint a simple snowy or festive color scheme on each house, adding windows with a fine brush or white gel pen.
- Glue the pieces to a base board to create a little village scene; carve slots or attach small pockets for greeting cards.
- String a line of LED lights behind the village for a warm glow that peeks through “windows.”
Styling ideas: Display on a console table, mantle, or beneath a garland with the lights softly illuminating holiday cards in a delightful, curated way.
Who will love it: DIY lovers who adore upcycling, small-space decorators, and anyone who wants a functional piece with big visual impact.
Seriously, this village is a gift to your future self—easy to expand year after year and endlessly charming.
Conclusion
These five ideas prove that Christmas crafts can be fast, fun, and unmistakably you. Each project brings a different texture, color story, and vibe to your space, so you can mix and match to fit your decor personality. Pick one (or all five) and start crafting—your home (and your future self who saved time and money) will thank you.
Ready to dive in? Gather a few supplies, pick a cozy playlist, and get your hands busy. Trust me, you’ll be amazed at how quickly these little creations come together—and how much joy they’ll bring all season long.